Administrator’s guide
Please note that links displayed within the curation interface will vary depending on database contents and the permissions of the curator.
Types of user
There are four types of user in BIGSdb:
User - can view data but never modify it. Users should be created for every submitter of data so that records can be tracked, even if they do not actually use the database.
Submitter (isolate databases only) - can add and modify their own isolate data and data submitted by anybody else that is in the same user group as them but not anyone elses. A limited range of Individual permissions can be set for each submitter, so their roles can be controlled. A submitter with no specific permissions set has no more power than a standard user.
Curator - can modify data but does not have full control of the database. Individual permissions can be set for each curator, so their roles can be controlled. A curator with no specific permissions set has no more power than a standard user.
Admin - has full control of the database, including setting permissions for curators and setting user passwords if built-in authentication is in use.
User groups
User groups allow submitter accounts to be grouped such that the submitter can edit isolates where the sender is either themselves or any member of a user group to which they belong.
Curator permissions
Individual permissions can be set for each curator:
disable_access - if set to true, this user is completely barred from access.
query_users - allowed to query and view users registered to the database. This is automatically allowed if permission is set to modify users.
modify_users - allowed to add or modify user records. They can change the status of users, but can not revoke admin privileges from an account. They can also not raise the status of a user to admin level.
modify_usergroups - allowed to add or modify user groups and add users to these groups.
set_user_passwords - allowed to modify other users’ passwords (if built-in authentication is in use).
modify_loci - allowed to add or modify loci.
modify_locus_descriptions - allowed to modify the description text and external hyperlinks used. Even with this setting, only loci for which a user is explicitly set as a curator can be modified.
modify_schemes - allowed to add or modify schemes.
modify_sequences - allowed to add sequences to the sequence bin (for isolate databases) or new allele definitions (for sequence definition databases).
modify_isolates - allowed to add or modify isolate records.
modify_projects - allowed to create projects, modify their descriptions and add or remove isolate records to these.
modify_composites - allowed to add or modify composite fields (fields made up of other fields, including scheme fields defined in external databases). Composite fields involve defining regular expressions that are evaluated by Perl - this can be dangerous so this permission should be granted with discretion.
modify_field_attributes - allow user to create or modify secondary field attributes (lookup tables) for isolate record fields.
modify_value_attributes - allow user to add or modify secondary field values for isolate record fields.
modify_probes - allow user to define PCR or hybridization reactions to filter tag scanning.
tag_sequences - allowed to tag sequences with locus information.
designate_alleles - allowed to manually designate allele numbers for isolate records.
modify_profiles - allowed to add or modify scheme profiles (only used in a sequence definitions database).
import_site_users - allowed to import site users in to the database.
modify_site_users - allowed to modify site user details (you may not want to this! The user account can be used by multiple databases on the site and any changes to user details will be seen throughout the site).
modify_geopoints - allowed to modify the geography point GPS coordinate lookup table used for mapping.
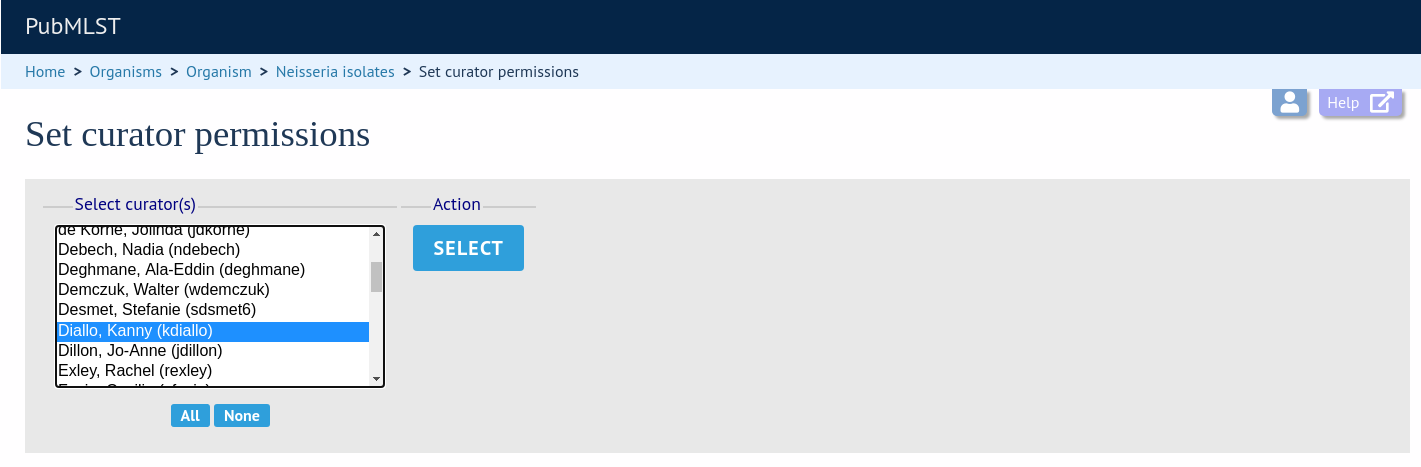
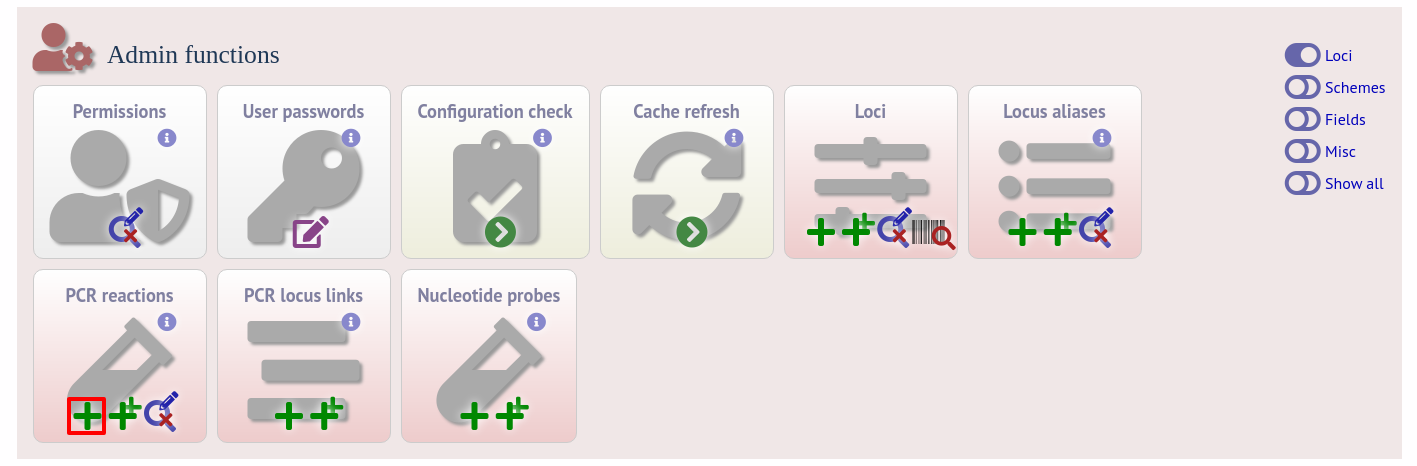
Permissions can be set by clicking the Update/delete button in the Permissions box in the admin functions area of the curator’s interface:

Choose one or more curators from the list (hold down Ctrl to select multiple values). click ‘Select’.
Click the appropriate checkboxes to modify permissions. There are also ‘All/None’ buttons to facilitate quicker selection of options. Click ‘Update’.
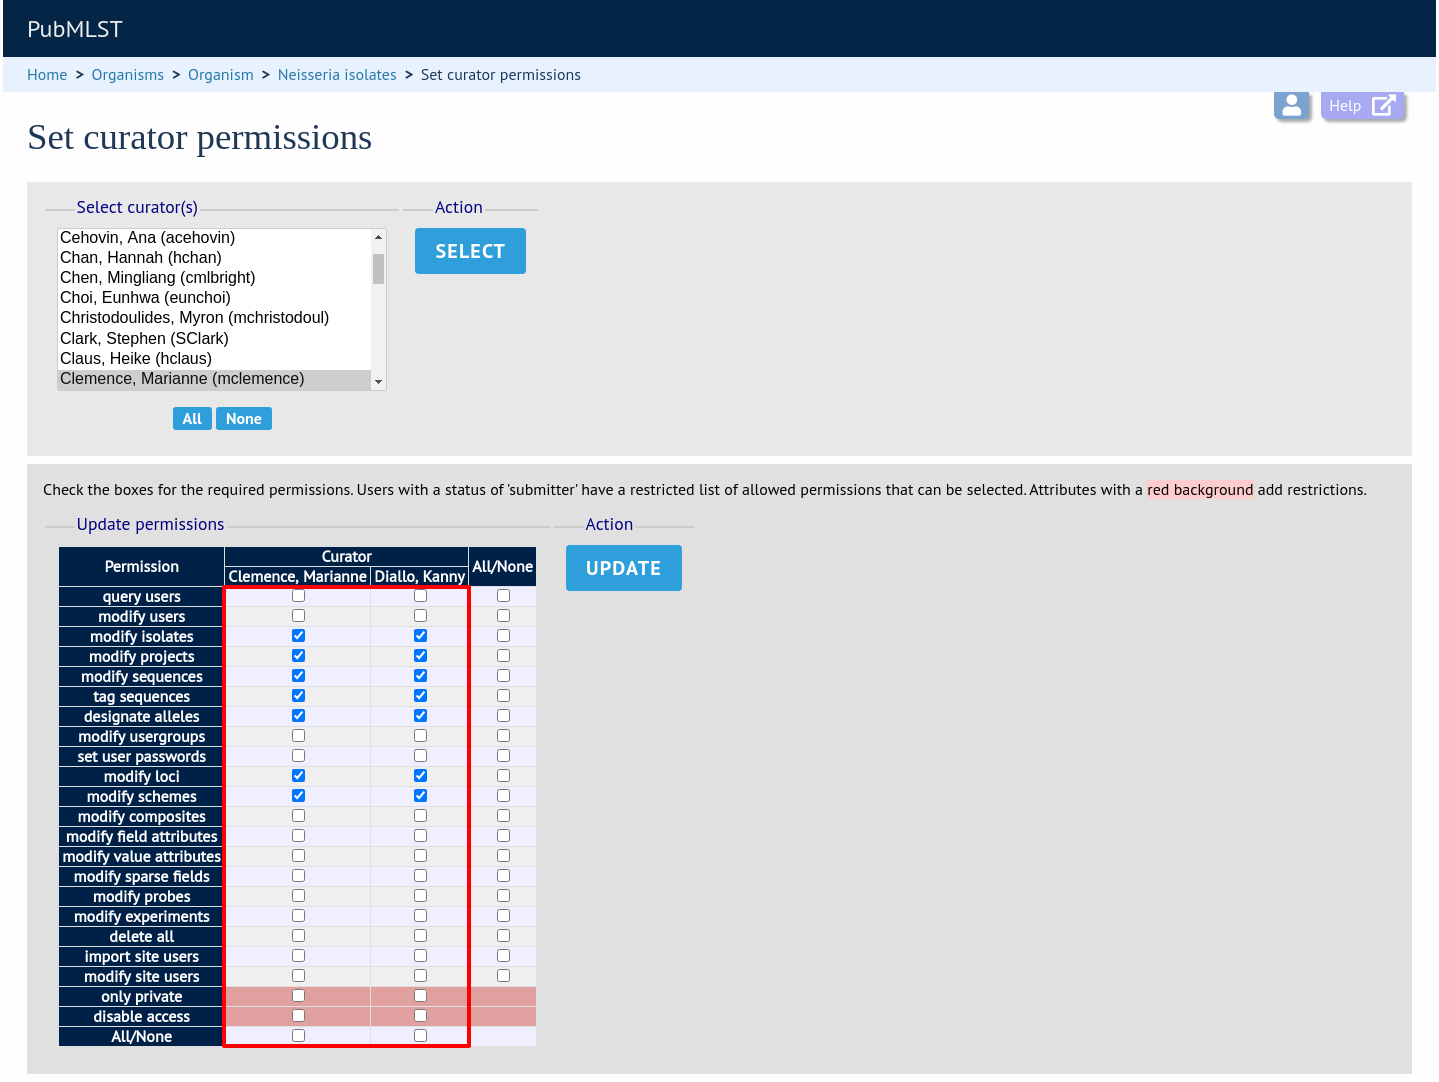
The ‘disable access’ option provides a quick way to disable access to a curator. This will not be selected by the ‘All/None’ buttons.
Locus and scheme permissions (sequence definition database)
To be allowed to define alleles or scheme profiles, curators must be granted specific permission for each locus and scheme by adding their user id number to the ‘locus curator’ and ‘scheme curator’ lists.
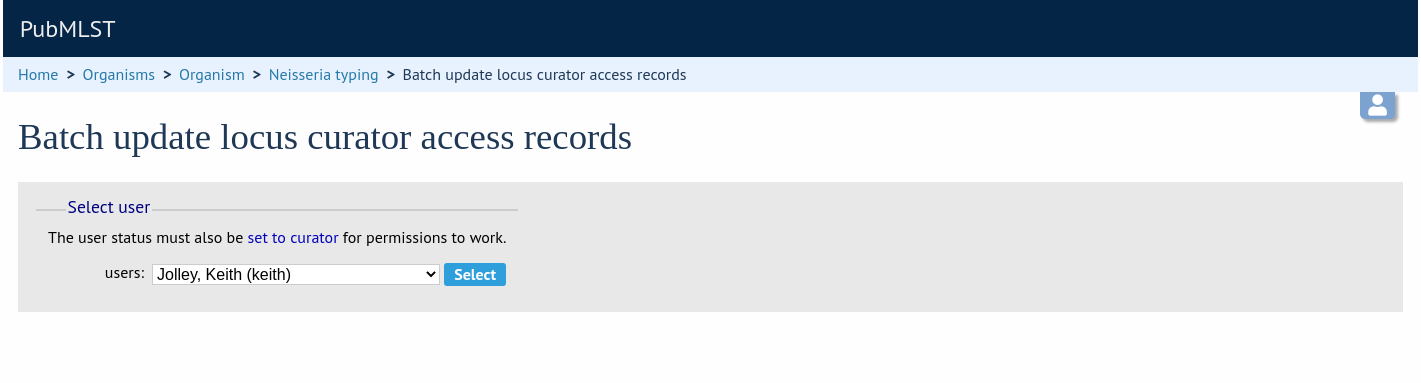
The easiest way to modify these lists is to use the batch update link next to ‘locus curator control list’ and ‘scheme curator control list’:

Select the curator from the list:
Then select loci/schemes that the user is allowed to curate in the left hand ‘Available’ list, and click the right button to move these to the ‘Selected’ list:
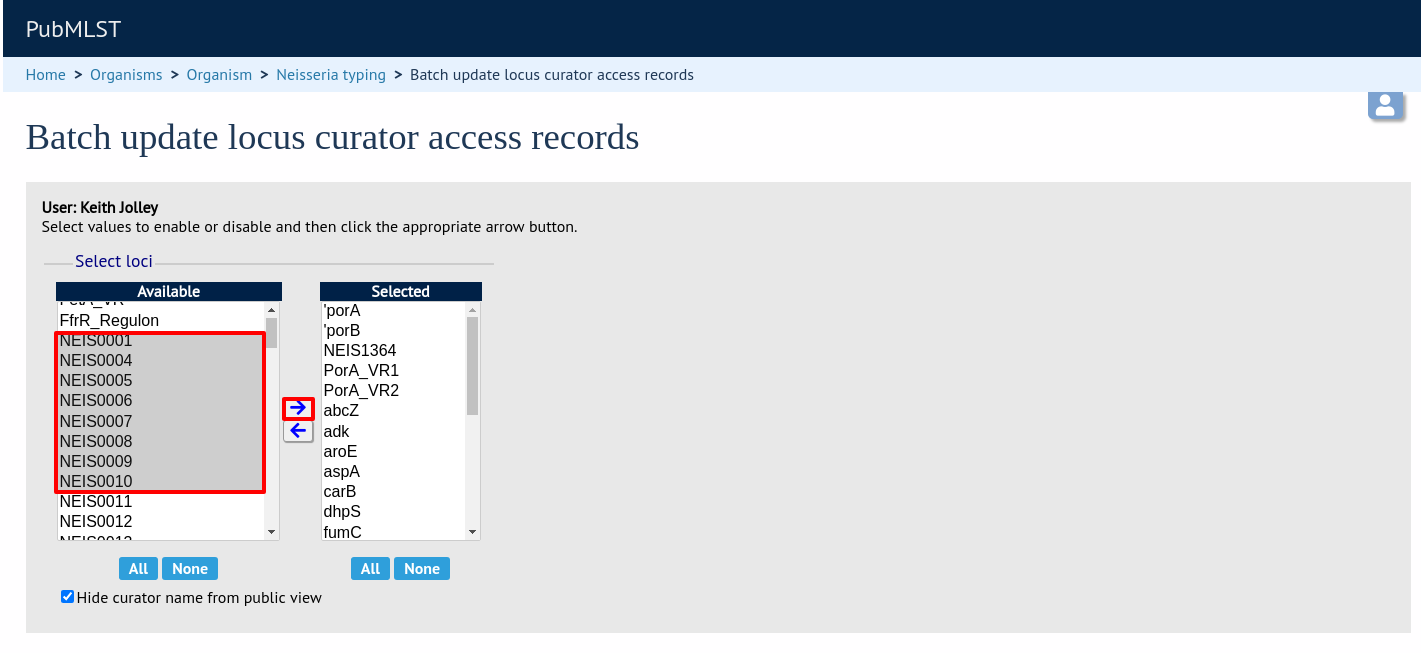
If you uncheck the ‘Hide curator name from public view’ checkbox, the curator name and E-mail address will appear alongside loci in the download table on the website.
Controlling access
Restricting particular configurations to specific user accounts
Suppose you only wanted specific users to access a database configuration.
In the config.xml, add the following directive:
default_access="deny"
This tells BIGSdb to deny access to anybody unless their account name appears within a file called users.allow within the config directory. The users.allow file should contain one username per line. You can also use a usergroups.allow file. This file should contain the names of user groups, the members of which are allowed access. The file should contain one user group name per line.
Alternatively, you can deny access to specific users, while allowing every other authenticated user. In config.xml, add the following directive:
default_access="allow"
This tells BIGSdb to allow access to anybody unless their account name appears within a file called users.deny within the config directory. The users.deny file should contain one username per line.
Setting user passwords
Please note that these instructions only apply if using the built-in BIGSdb authentication system.
If you are an administrator or a curator with specific permission to change other users’ passwords, you should see a ‘User passwords’ box in the admin section of the curator’s index page. Click the ‘Set passwords’ link.

Select the appropriate user from the drop-down list box and enter the new password twice where prompted.
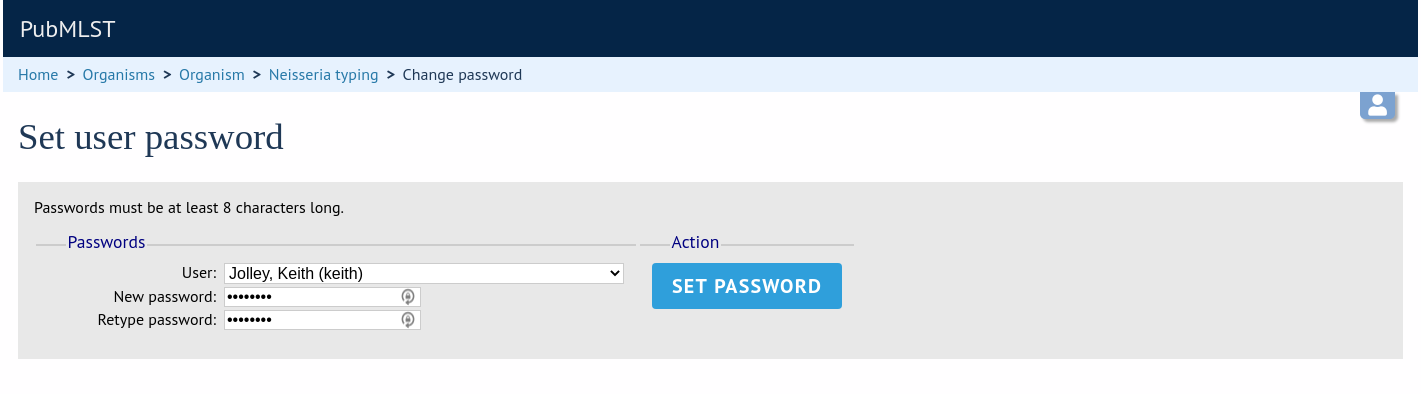
Click ‘Set password’ and the password will be updated.
Setting the first user password
To set the first administrator’s password for a new database, use the add_user.pl script found in the scripts/maintenance directory:
add_user.pl [-a] -d <dbase> -n <username> -p <password>
The first user account needs to be added to the database manually.
Enabling plugins
Some plugins can be enabled/disabled for specific databases. If you look in the get_attributes function of the specific plugin file and see a value for system_flag, this value can be used in the system tag of the database configuration XML file to enable the plugin.
For example, the get_attributes function of the BURST plugin looks like:
sub get_attributes {
       my %att = (
               name        => 'BURST',
               author      => 'Keith Jolley',
               affiliation => 'University of Oxford, UK',
               email       => 'keith.jolley@zoo.ox.ac.uk',
               description => 'Perform BURST cluster analysis on query results query results',
               category    => 'Cluster',
               buttontext  => 'BURST',
               menutext    => 'BURST',
               module      => 'BURST',
               version     => '1.0.0',
               dbtype      => 'isolates,sequences',
               section     => 'postquery',
               order       => 10,
               system_flag => 'BURST',
               input       => 'query',
               requires    => 'mogrify',
               min         => 2,
               max         => 1000
       );
       return \%att;
}
The ‘system_flag’ attribute is set to ‘BURST’, so this plugin can be enabled for a database by adding:
BURST="yes"
to the system tag of the database XML file. If the system_flag value is not defined then the plugin is always enabled if it is installed on the system. If the system_flag value is set to ‘no’ then the plugin will be disabled even if the all_plugins attribute is set to ‘yes’.
Temporarily disabling database updates
There may be instances where it is necessary to temporarily disable database updates. This may be during periods of server or database maintenance, for instance when running on a backup database server.
Updates can be disabled on a global or database-specific level.
Global
In the /etc/bigsdb/bigsdb.conf file, add the following line:
disable_updates=yes
An optional message can also be displayed by adding a disable_update_message value, e.g.
disable_update_message=The server is currently undergoing maintenance.
Database-specific
The same attributes described above for use in the bigsdb.conf file can also be used within the system tag of the database config.xml file, e.g.
<system
  db="bigsdb_neisseria"
  dbtype="isolates"
  ...
  disable_updates="yes"
  disable_update_message="The server is currently undergoing maintenance."
Host mapping
During periods of server maintenance, it may be necessary to map a database host to an alternative server. This would allow a backup database server to be used while the primary database server is unavailable. In this scenario, you would probably also want to disable updates.
Host mapping can be achieved by editing the /etc/bigsdb/host_mapping.conf file. Each host mapping is placed on a single line, with the current server followed by any amount of whitespace and then the new mapped host, e.g.
#Existing_host      Mapped_host
 server1            server2
 localhost          server2
[Lines beginning with a hash are comments and are ignored.]
This configuration would use server2 instead of server 1 or localhost wherever they are defined in the database configuration (either host attribute in the database config.xml file, or within the loci or schemes tables).
Improving performance
Use mod_perl
The single biggest improvement to speed can be obtained by running BIGSdb under mod_perl. There’s very little point trying anything else until you have mod_perl set up and running - this can improve start-up performance a hundred-fold since the script isn’t compiled on each page access but persists in memory.
Cache scheme definitions within an isolate database
If you have a large number of allelic profiles defined for a scheme, you can cache these definitions within an isolate database to speed up querying of isolates by scheme criteria (e.g. by ST for a MLST scheme).
To do this use the update_scheme_caches.pl script found in the scripts/maintenance directory, e.g. to cache all schemes in the pubmlst_bigsdb_neisseria_isolates database
update_scheme_caches.pl --database pubmlst_bigsdb_neisseria_isolates
This script creates indexed tables within the isolate database called temp_scheme_X and temp_isolates_scheme_fields_1 (where X is the scheme_id). If these table aren’t present, they are created as temporary tables every time a query is performed that requires a join against scheme definition data. This requires importing all profile definitions from the definitions database and determining scheme field values for all isolates. This may sound like it would be slow but caching only has a noticeable effect once you have >5000 profiles.
You are able to update the cache for a single scheme, or a list of schemes, and choose the method of update. For large schemes, such as cgMLST, a full refresh may take a long time, so you may wish to only perform this infrequently (perhaps once a week) with more regular ‘daily’ or ‘daily_replace’ updates. A full list of options available are shown by typing
update_scheme_caches.pl --help

NAME
    update_scheme_caches.pl - Update scheme field caches

SYNOPSIS
    update_scheme_caches.pl --database NAME [options]

OPTIONS

--database NAME
    Database configuration name.

--help
    This help page.

--method METHOD
    Update method - the following values are allowed:
    full: Completely recreate caches
    incremental: Only add values for records not in cache.
    daily: Only add values for records not in cache updated today.
    daily_replace: Refresh values only for records updated today.

--quiet
    Don't output progress messages.

--schemes SCHEMES
    Comma-separated list of scheme ids to use.
    If left empty, all schemes will be updated.
Note that you will need to run this script periodically as a CRON job to refresh the cache. Admins can also refresh the caches manually from a link on the curators’ page. This link is only present if the caches have been previously generated.

You can also set cache_schemes=”yes” in the system tag of config.xml to enable automatic refreshing of the caches (using the ‘daily’ method) when batch adding new isolates (you should still periodically run the update_scheme_caches.pl script via CRON to ensure any changes in the sequence definition database are picked up).
If queries are taking longer than 5 seconds to perform and a cache is not in place, you will see a warning message in bigsdb.log suggesting that the caches be set up. Unless you see this warning regularly, you probably don’t need to do this.
Use a ramdisk for the secure temporary directory
If you are running BIGSdb on a large server with lots of RAM, you could use some of this as a ramdisk for temporary files. Debian/Ubuntu systems make available up to half the system RAM as a ramdisk mounted under /run/shm (or /dev/shm) by default. Set the secure_tmp_dir to this RAM disk and you should see significant improvement in operations requiring the writing of lots of temporary files, e.g. tag scanning and the Genome Comparator plugin. This is only likely to be appropriate if you have very large amounts of RAM available. As an example, the server hosting the PubMLST databases is a dedicated machine with 1TB RAM with temporary files rarely using more than 50GB space.
Dataset partitioning
Sets
Sets provide a means to partition the database in to manageable units that can appear as smaller databases to an end user. Sets can include constrained groups of isolates, loci, and schemes from the complete database.
See also
Configuration of sets
First sets need to be enabled in the XML configuration file (config.xml) of the database. Add the following attribute to the system tag:
sets="yes"
With this attribute, the curation interface now has options to add sets, and then add loci or schemes to these sets. These functions are normally hidden, so you may need to click the ‘Sets’ toggle to display it.
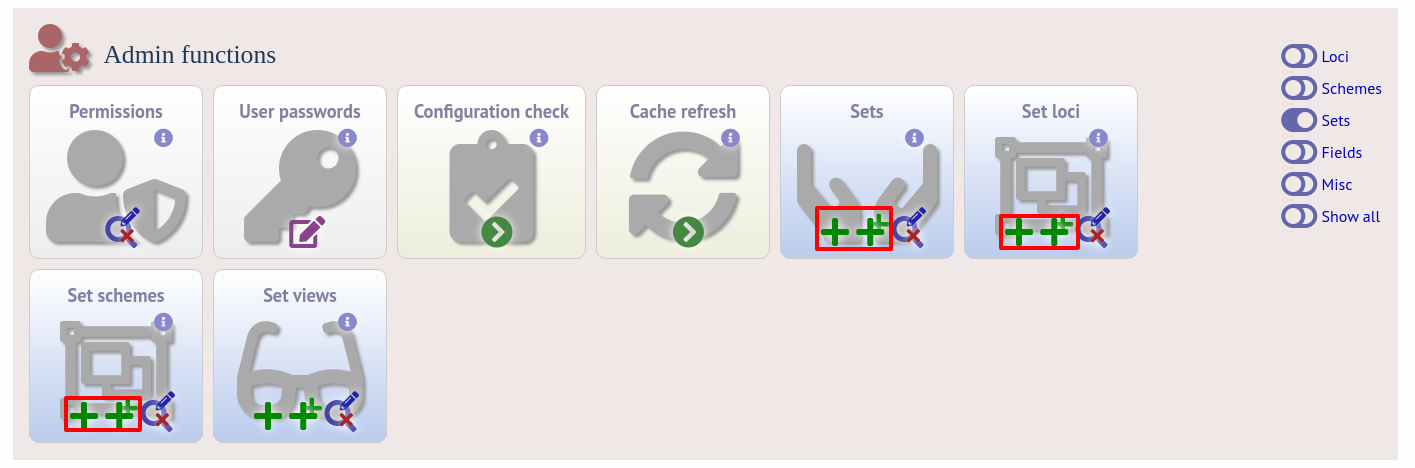
The name of a locus or scheme to use within a set can be defined in the set_name field when adding loci or schemes to a set. Common names can also be set for loci - equivalent to the common name used within the loci table.
Now when a user goes to the contents page of the database they will be presented with a dropdown menu of datasets and can choose either the ‘whole database’ or a specific set. This selection is remembered between sessions.
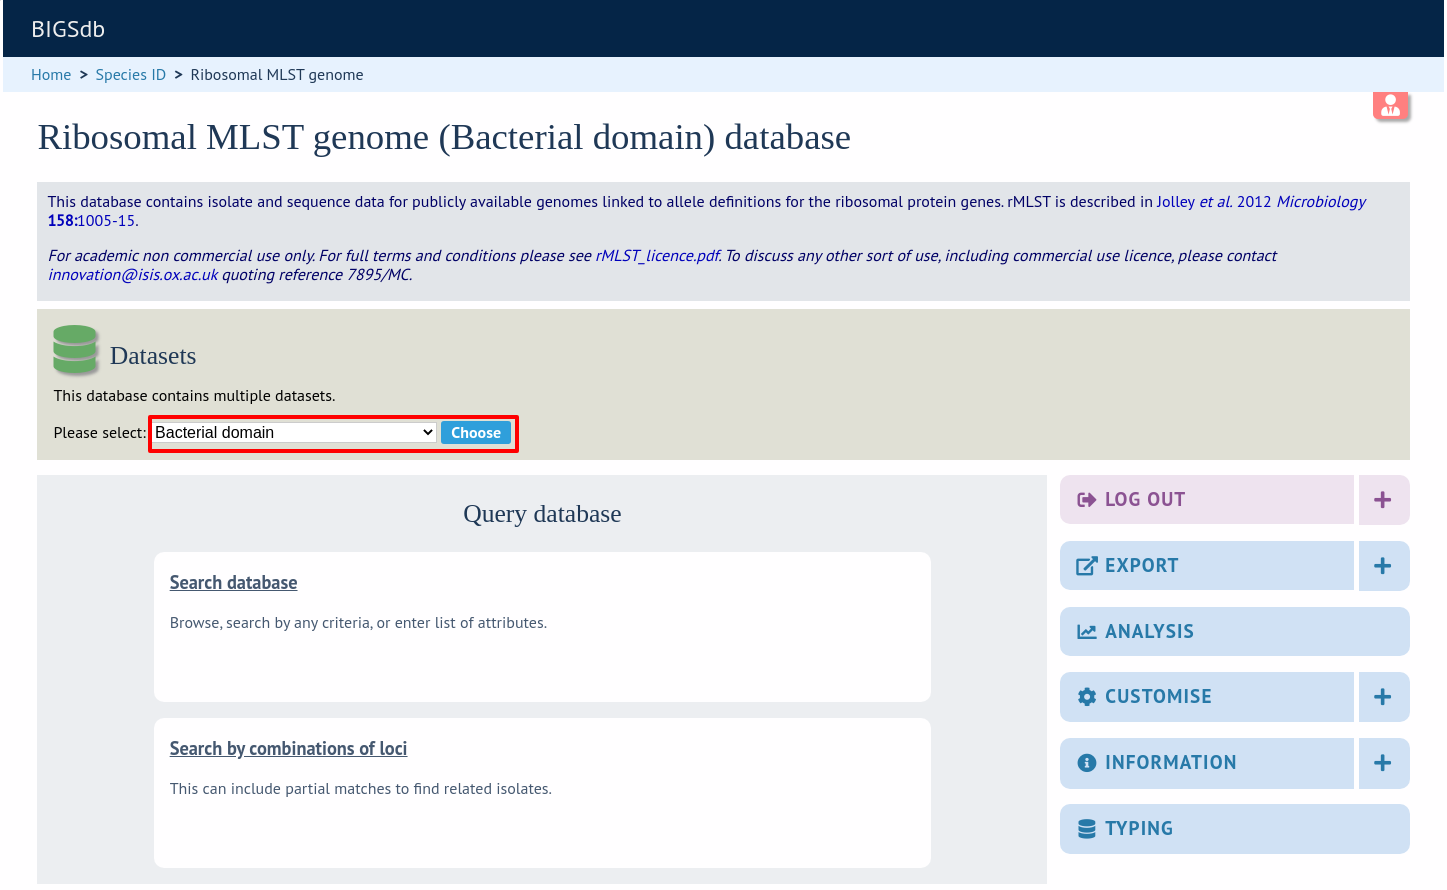
Alternatively, a specific set can be selected within the XML config file so that only a specific set is available when accessed via that configuration. In that case, the user would be unaware that the database contains anything other than the loci and schemes available within the set.
To specify this, add the following attributute to the system tag:
set_id="1"
where the value is the name of the set.
Note
If the set_id attribute is set, database configuration settings in the curator’s interface are disabled. This is because when the configuration is constrained to a set, only loci and schemes already added to the set are visible, so functionality to edit schemes/loci would become very confusing. To modify these settings, you either need to access the interface from a different configuration, i.e. an alternative config.xml with the set_id attribute not set, or temporarily remove the set_id directive from the current config.xml while making configuration changes.
Set views
Finally the isolate record table can be partitoned using database views and these views associated with a set. Create views using something like the following:
CREATE VIEW spneumoniae AS SELECT * FROM isolates WHERE species = 'Streptococcus pneumoniae';
GRANT SELECT ON spneumoniae TO apache;
Add the available views to the XML file as a comma separated list in the system tag ‘views’ attribute:
<system
 .....
 sets="yes"
 views="spneumoniae,saureus"
>
</system>
Set the view to the set by using the ‘Add set view’ link on the curator’s page.
Using only defined sets
The only_sets attribute can be set to ‘yes’ to disable the option for ‘Whole database’ so that only sets can be viewed, e.g.
<system
 .....
 sets="yes"
 only_sets="yes"
>
</system>
Setting a site-wide users database
On large sites you may wish to employ a site-wide users database so that user details are kept in a single location and the user can log in to any database using the same credentials.
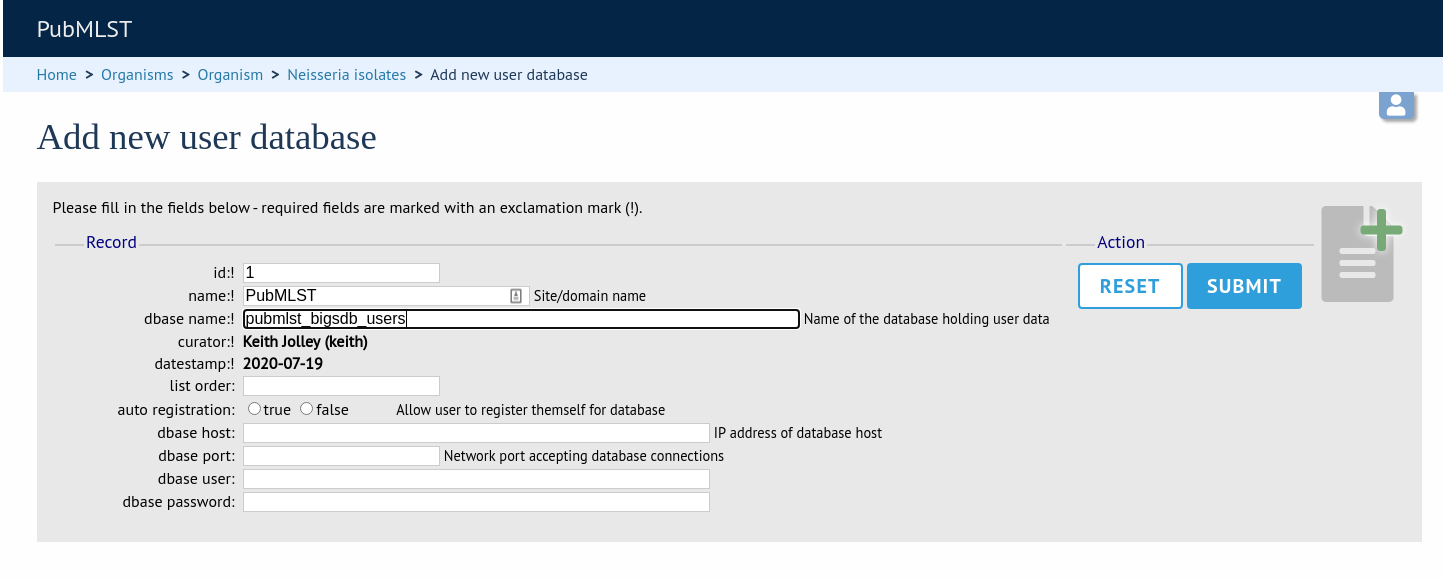
Once a site-wide user database has been set up, this can be defined within each client database as follows. From the curators’ contents page, click the add (+) user databases link. This function is normally hidden, so you may need to click the ‘Misc’ toggle to display it.
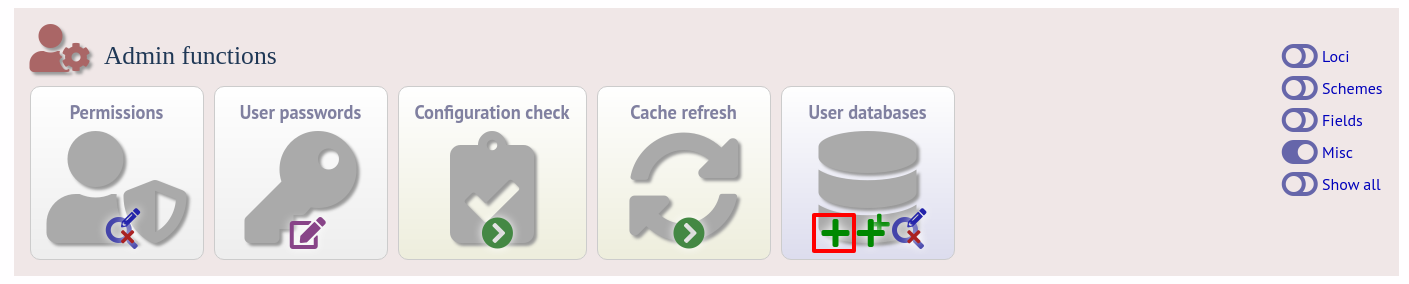
Enter the user database details. You only need to enter the full database connection details if these are different from those set in db.conf. Press submit.
Curators will need specific permissions set to be able to modify details in, or import users from a site-wide users database.
Adding new loci
See also
Sequence definition databases
Single locus
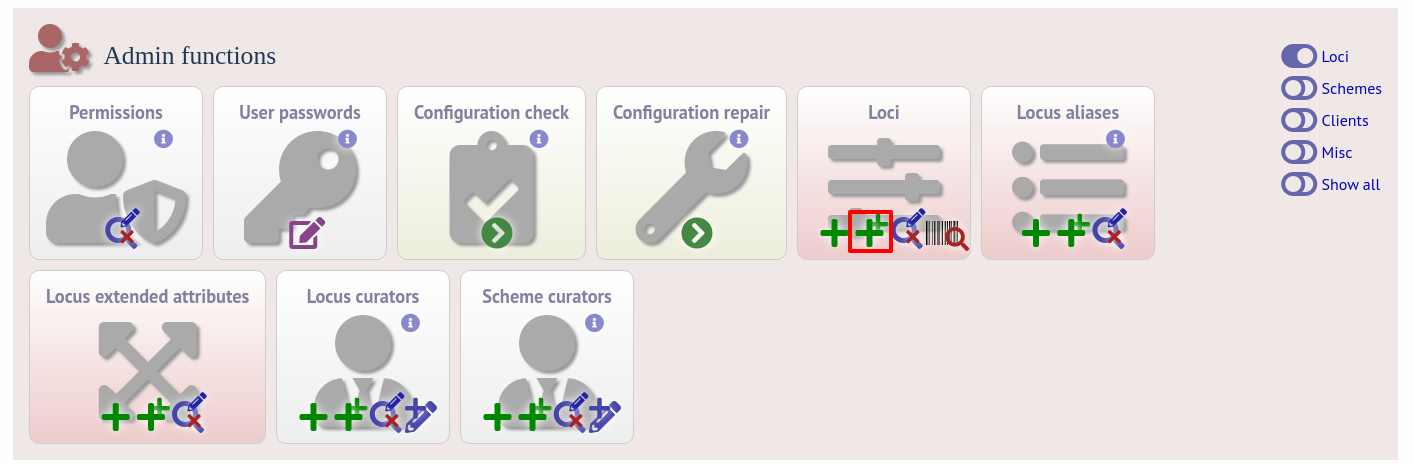
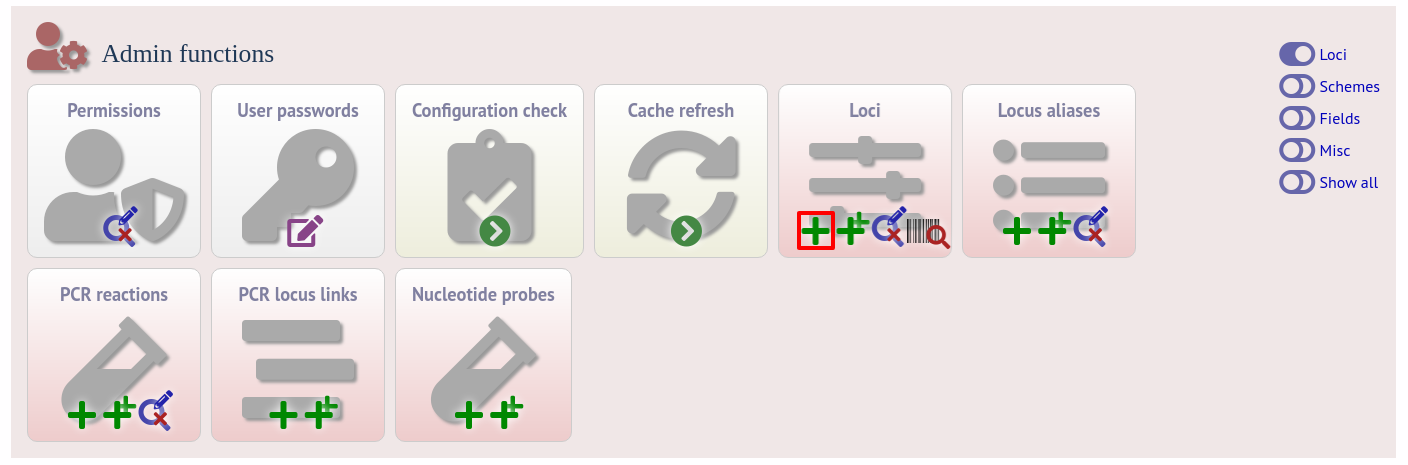
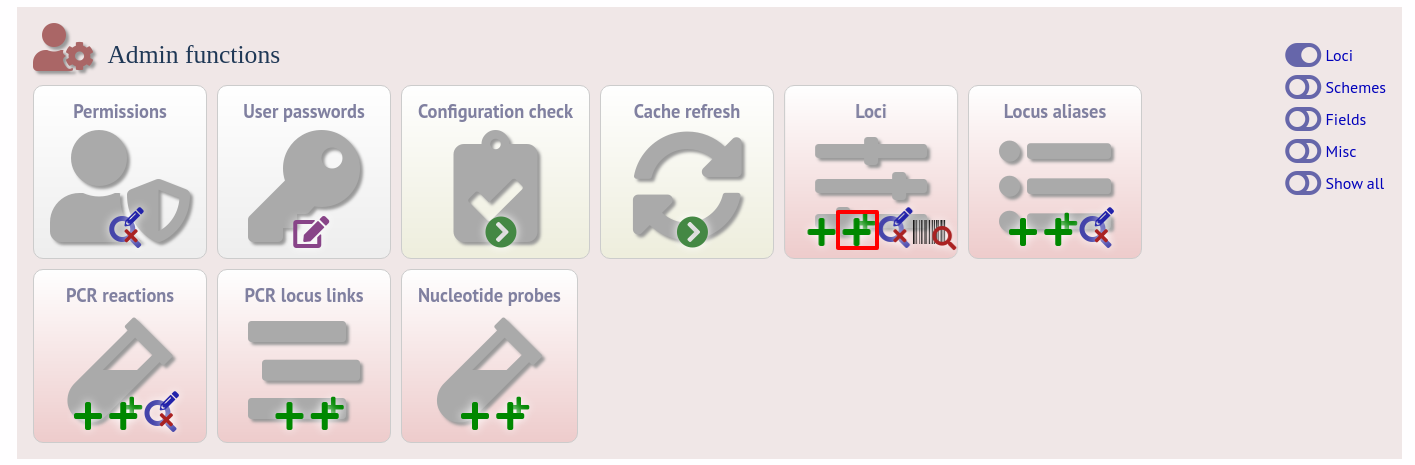
Click the add (+) loci link on the curator’s interface contents page. This function is normally hidden, so you may need to click the ‘Loci’ toggle to display it.

Fill in the web form with appropriate values. Required fields have an exclamation mark (!) next to them:
id - The name of the locus.
Allowed: any value starting with a letter, number or underscore.
data_type - Describes whether the locus is defined by nucleotide or peptide sequence.
Allowed: DNA/peptide.
allele_id_format - The format for allele identifiers.
Allowed: integer/text.
length_varies - Sets whether alleles can vary in length.
Allowed: true/false.
coding_sequence - Sets whether the locus codes for a protein.
Allowed: true/false.
formatted_name - Name with HTML formatting (optional).
This allows you to add formatting such as bold, italic, underline and superscripting to locus names as they appear in the web interface.
Allowed: valid HTML.
common_name - The common name for the locus (optional).
Allowed: any value.
formatted_common_name - Common name with HTML formatting (optional).
Allowed: valid HTML.
allele_id_regex - Regular expression to enforce allele id naming (optional).
^: the beginning of the string
$:the end of the string
d: digit
D: non-digit
s: white space character
S: non white space character
w: alpha-numeric plus ‘_’
.: any character
*: 0 or more of previous character
+: 1 or more of previous character
e.g. ^Fd-d+$ states that an allele name must begin with a F followed by a single digit, then a dash, then one or more digits, e.g. F1-12
length - Standard length of locus (required if length_varies is set to false.
Allowed: any integer.
min_length - Minimum length of locus (optional).
Allowed: any integer.
max_length - Maximum length of locus (optional).
Allowed: any integer (larger than the minimum length).
complete_cds - Whether locus represents a complete coding sequence (optional)
start_codons - Semi-colon separated list of alternative start codons to allow
Note that these are in addition to the built-in defaults of ATG, GTG, TTG.
orf - Open reading frame of locus (optional).
1-3 are the forward reading frame, 4-6 are the reverse reading frames.
Allowed: 1-6.
genome_position - The start position of the locus on a reference genome (optional).
Allowed: any integer.
match_longest - Specifies whether in a sequence query to only return the longest match (optional).
This is useful for some loci that can have some sequences shorter than others, e.g. peptide loci defining antigenic loops. This can lead to instances of one sequence being longer than another but otherwise being identical. In these cases, usually the longer sequence is the one that should be matched.
Allowed: true/false.
full_name - Full name of the locus (optional).
Allowed: any value.
product - Name of gene product (optional).
Allowed: Any value.
description - Description of the locus (optional).
Allowed: any value.
aliases - Alternative names for the locus (optional).
Enter each alias on a separate line in the text box.
Allowed: any value.
pubmed_ids - PubMed ids of publications describing the locus (optional).
Enter each PubMed id on a separate line in the text box.
Allowed: any integer.
links - Hyperlinks pointing to additional resources to display in the locus description (optional).
Enter each link on a separate line in the format with the URL first, followed by a | then the description (URL|description).
Batch adding
Click the batch add (++) loci link on the curator’s interface contents page. This function is normally hidden, so you may need to click the ‘Loci’ toggle to display it.
Click the link to download a header line for an Excel spreadsheet:

Fill in the spreadsheet using the fields described for adding single loci.
Fill in the spreadsheet fields using the table above as a guide, then paste the completed table into the web form and press ‘Submit query’.
Isolate databases
Single locus
Click the add (+) loci link on the curator’s interface contents page. This function is normally hidden, so you may need to click the ‘Loci’ toggle to display it.
Fill in the web form with appropriate values. Required fields have an exclamation mark (!) next to them:
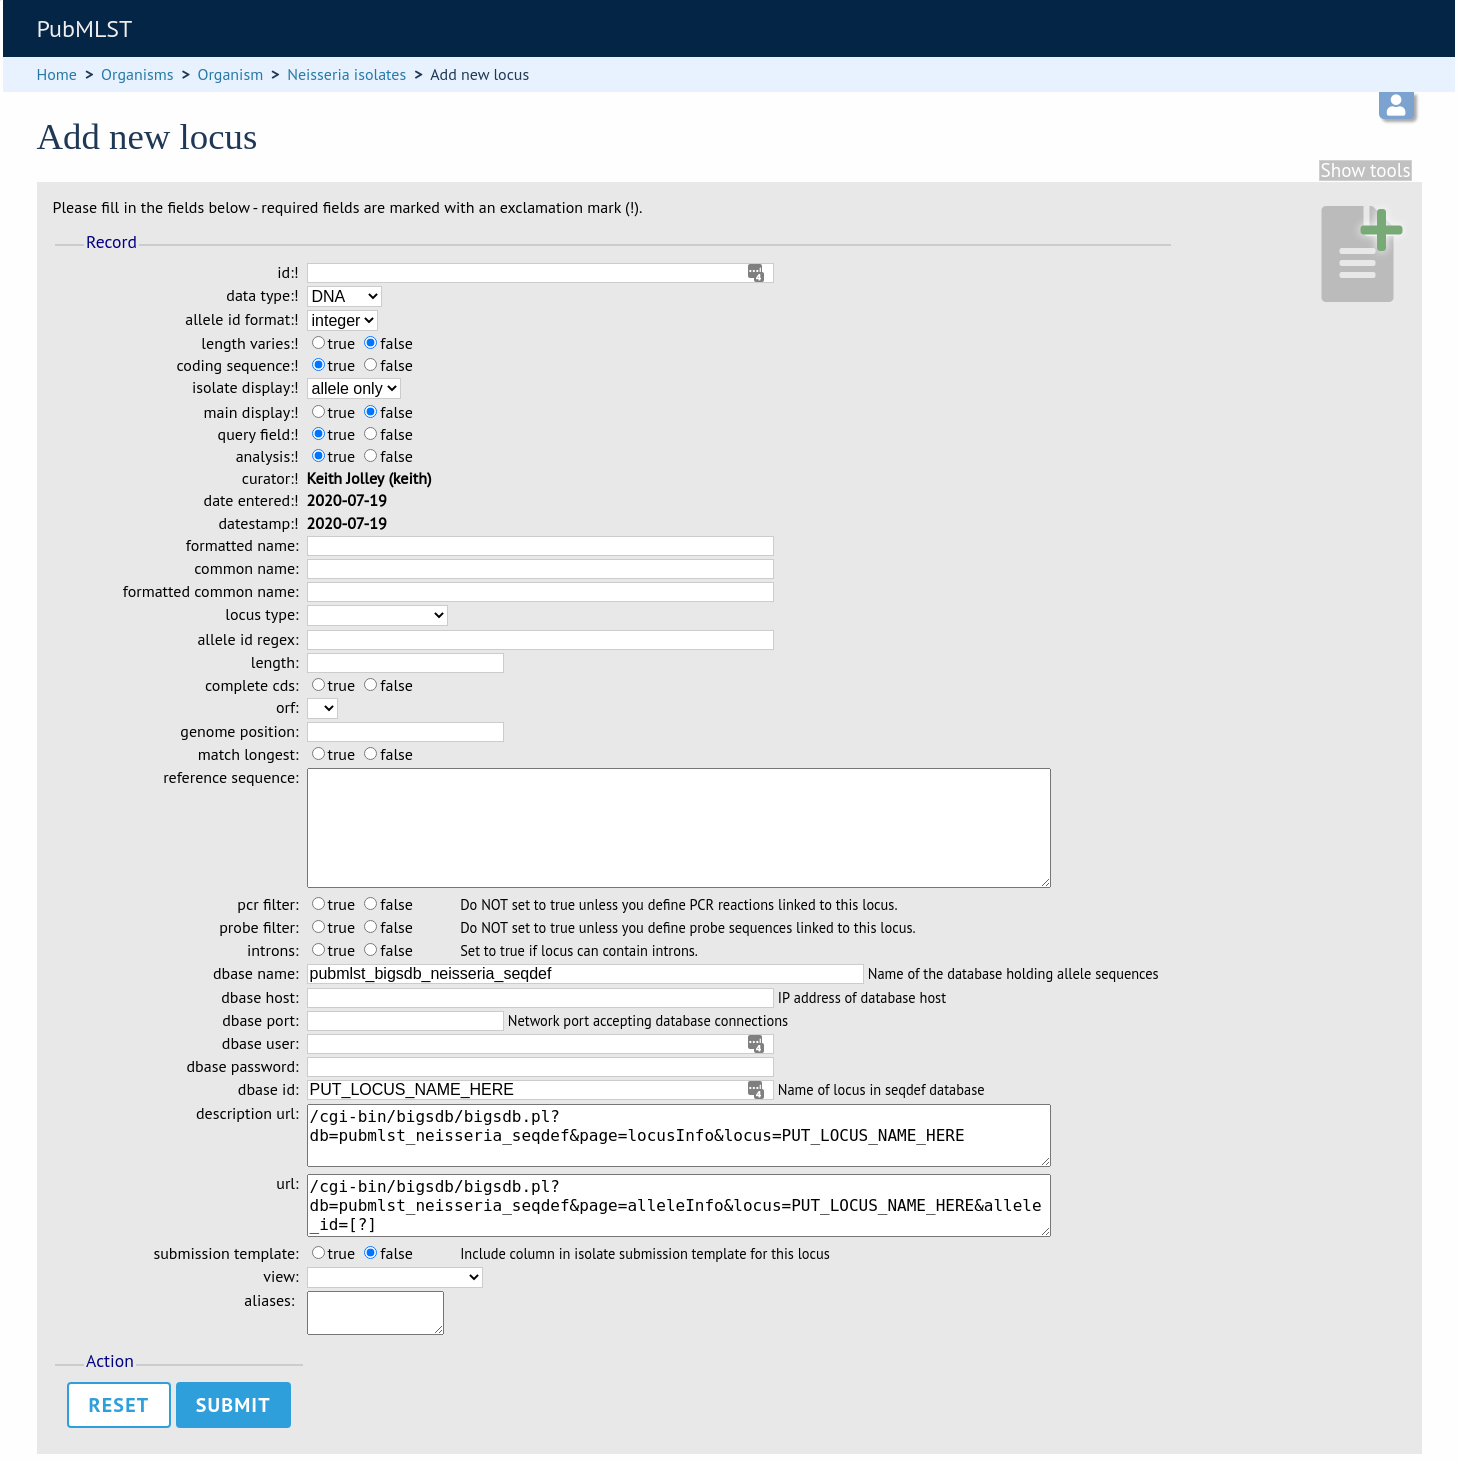
id - The name of the locus
Allowed: any value starting with a letter or underscore.
data_type - Describes whether the locus is defined by nucleotide or peptide sequence.
Allowed: DNA/peptide.
allele_id_format - The format for allele identifiers.
Allowed: integer/text.
length_varies - Sets whether alleles can vary in length.
Allowed: true/false.
coding_sequence - Sets whether the locus codes for a protein.
Allowed: true/false.
isolate_display - Sets how alleles for this locus are displayed in a detailed isolate record - this can be overridden by user preference.
Allowed: allele only/sequence/hide.
main_display - Sets whether or not alleles for this locus are displayed in a main results table by default - this can be overridden by user preference.
Allowed: true/false.
query_field - Sets whether or not alleles for this locus can be used in queries by default - this can be overridden by user preference.
Allowed: true/false.
analysis - Sets whether or not alleles for this locus can be used in analysis functions by default - this can be overridden by user preference.
Allowed: true/false.
formatted_name - Name with HTML formatting (optional).
This allows you to add formatting such as bold, italic, underline and superscripting to locus names as they appear in the web interface.
Allowed: valid HTML.
common_name - The common name for the locus (optional).
Allowed: any value.
formatted_common_name - Common name with HTML formatting (optional).
Allowed: valid HTML.
allele_id_regex - Regular expression to enforce allele id naming.
^: the beginning of the string
$:the end of the string
d: digit
D: non-digit
s: white space character
S: non white space character
w: alpha-numeric plus ‘_’
.: any character
*: 0 or more of previous character
+: 1 or more of previous character
e.g. ^Fd-d+$ states that an allele name must begin with a F followed by a single digit, then a dash, then one or more digits, e.g. F1-12
length - Standard length of locus (required if length_varies is set to false).
Allowed: any integer.
complete_cds - Whether locus represents a complete coding sequence (optional)
start_codons - Semi-colon separated list of alternative start codons to allow
Note that these are in addition to the built-in defaults of ATG, GTG, TTG.
orf - Open reading frame of locus (optional). 1-3 are the forward reading frame, 4-6 are the reverse reading frames.
Allowed: 1-6.
genome_position - The start position of the locus on a reference genome.
Allowed: any integer.
match_longest - Only select the longest exact match when tagging/querying.
This is useful for some loci that can have some sequences shorter than others, e.g. peptide loci defining antigenic loops. This can lead to instances of one sequence being longer than another but otherwise being identical. In these cases, usually the longer sequence is the one that should be matched.
Allowed: true/false.
reference_sequence - Sequence used by the automated sequence comparison algorithms to identify sequences matching this locus. This is only used if a sequence definition database has not been set up for this locus.
pcr_filter - Set to true if this locus is further defined by genome filtering using in silico PCR.
Allowed: true/false.
probe_filter - Set to true if this locus is further defined by genome filtering using in silico hybdridization.
Allowed: true/false.
introns - Set to true if locus may contain introns. This setting will only be available if BLAT is configured in bigsdb.conf.
Allowed: true/false.
dbase_name - Name of database (system name).
Allowed: any text.
dbase_host - Resolved name of IP address of database host - leave blank if running on the same machine as the isolate database.
Allowed: network address, e.g. 129.67.26.52 or zoo-oban.zoo.ox.ac.uk
dbase_port - Network port on which the sequence definition database server is listening - leave blank unless using a non-standard port (5432).
Allowed: integer.
dbase_user - Name of user with permission to access the sequence definition database - depending on the database configuration you may be able to leave this blank.
Allowed: any text (no spaces).
dbase_password - Password of database user - again depending on the database configuration you may be able to leave this blank.
Allowed: any text (no spaces).
dbase_id - Name of locus in seqdef database. This is usually the same as the id field.
Allowed: any text (no spaces).
description_url - The URL used to hyperlink to locus information in the isolate information page. This can either be a relative (e.g. /cgi-bin/…) or an absolute (containing http://) URL.
Allowed: any valid URL.
url - The URL used to hyperlink to information about the allele. This can either be a relative or absolute URL. If [?] (including the square brackets) is included then this will be substituted for the allele value in the resultant URL. To link to the appropiate allele info page on a corresponding seqdef database you would need something like /cgi-bin/bigsdb/bigsdb.pl?db=pubmlst_neisseria_seqdef&page=alleleInfo&locus=abcZ&allele_id=[?].
Allowed: any valid URL.
submission_template - Sets whether or not a column for this locus is included in the Excel submission template.
Allowed: true/false (default: false)
view - Restrict this locus to only isolates contained in the specified database view. This option will only appear if the views attribute is set in the system tag. The view needs to have been defined in the database as a subset of the isolate table (usually filtered by the value of one or more of its fields).
Using existing locus definition as a template
When defining a new locus in the isolate database, it is possible to use an existing locus record as a template. To do this, click the ‘Show tools’ link in the top-right of the screen:
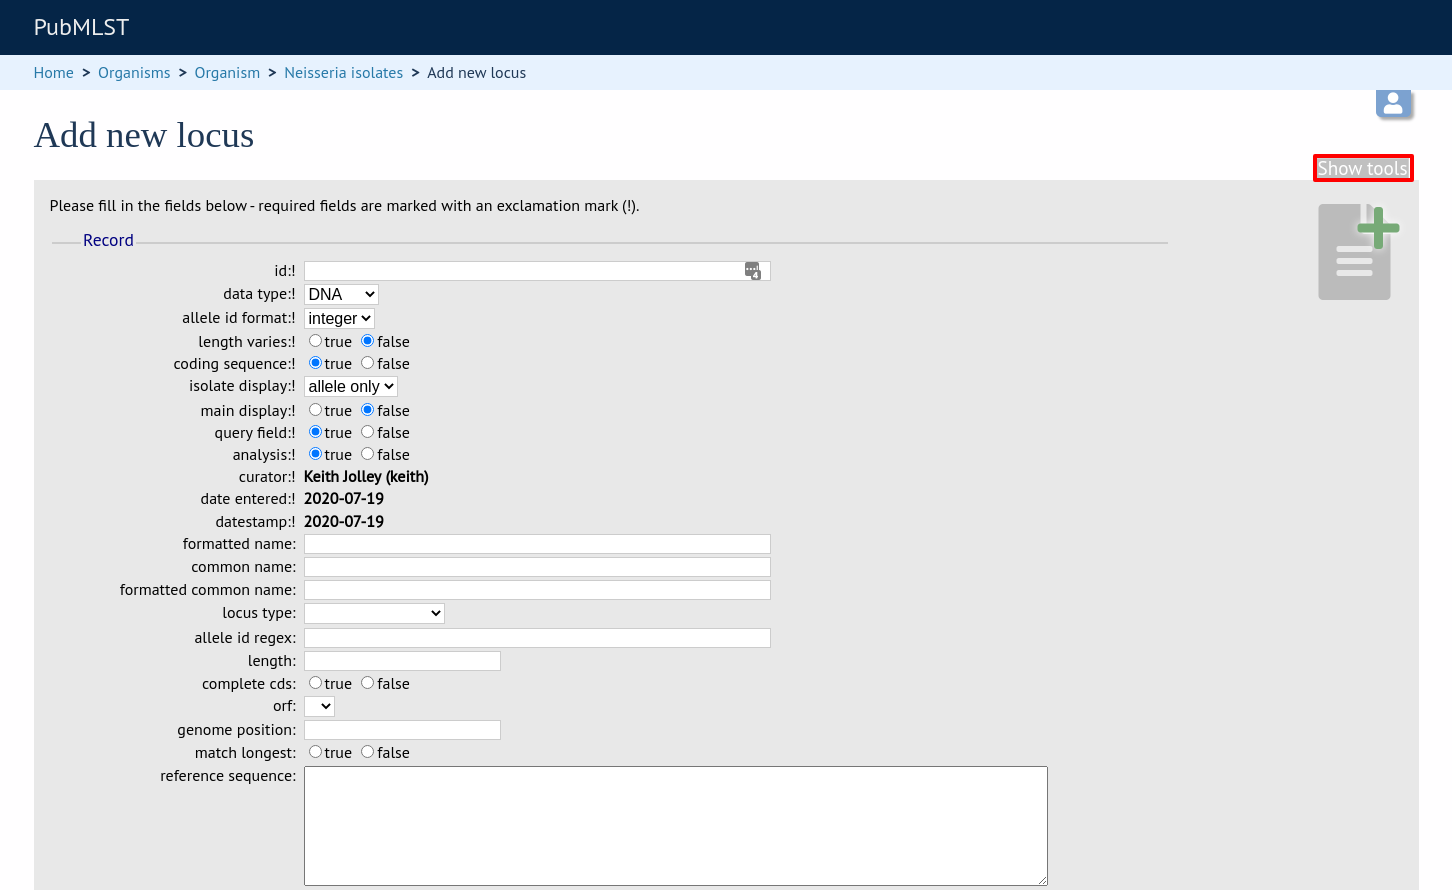
This displays a drop-down box containing existing loci. Select the locus that you wish to use as a template, and click ‘Copy’.
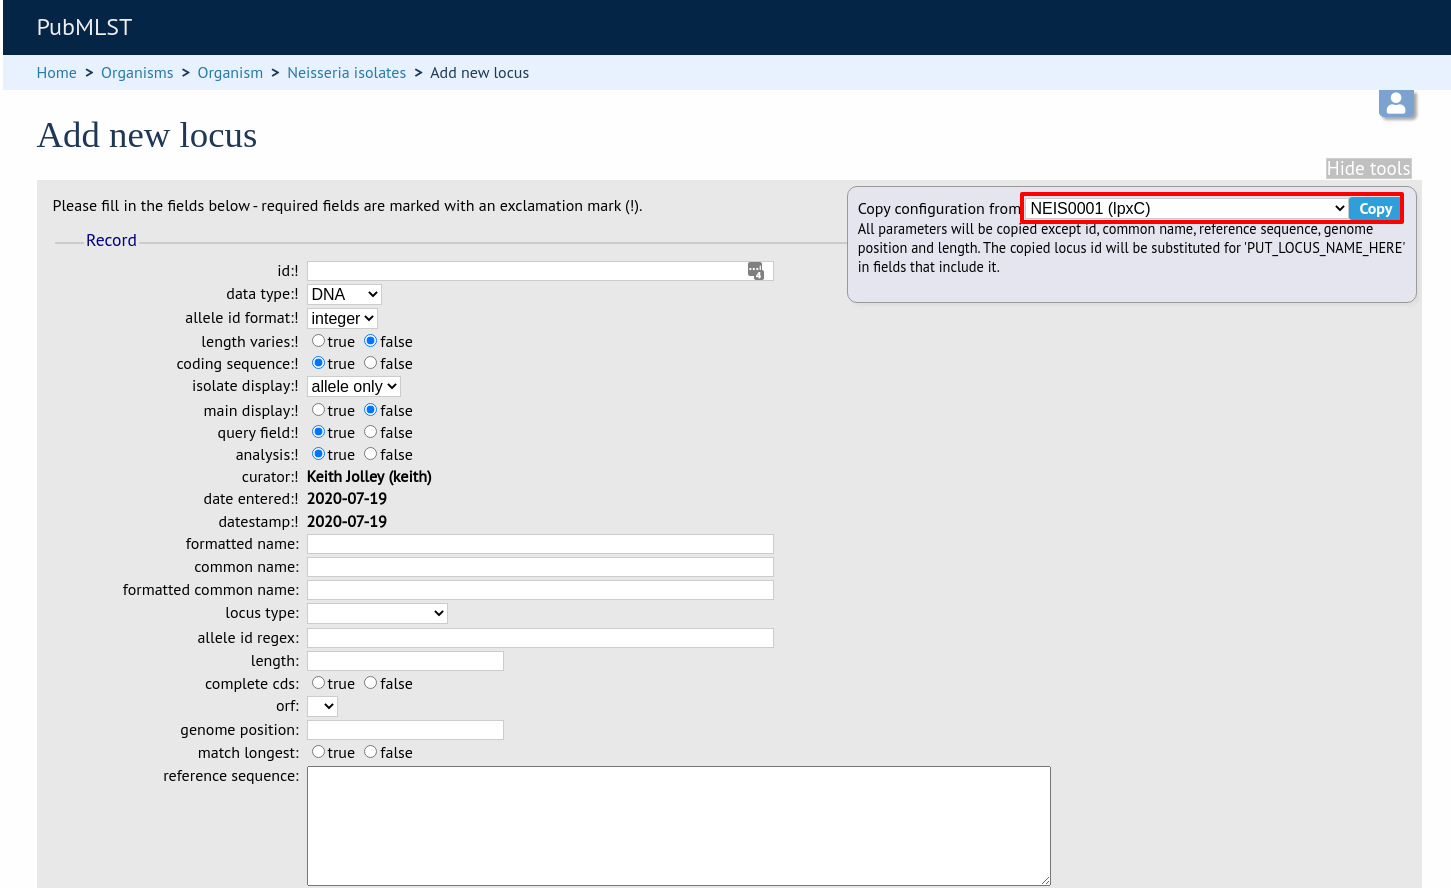
The configuration will be copied over to the web form, with the exception of name fields. Some fields will require you to change the value ‘PUT_LOCUS_NAME_HERE’ with the value you enter in the id field. These are usually the dbase_id2_value, description_url and url fields:
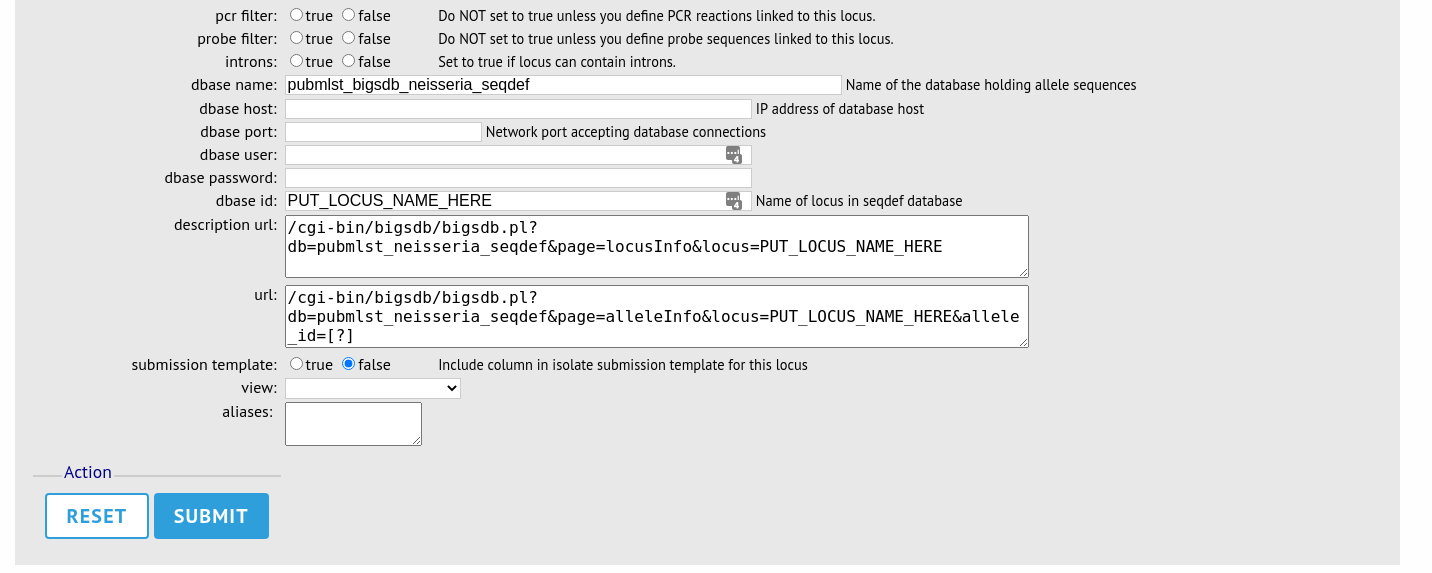
Complete the form and click ‘Submit’.
Note
You can also pre-populate the dbase_name, dbase_url and url fields with boilerplate values by setting the default_seqdef_config and default_seqdef_dbase values in the system attribute of the config.xml file.
Batch adding
Click the batch add (++) loci link on the curator’s interface contents page. This function is normally hidden, so you may need to click the ‘Loci’ toggle to display it.
Click the link to download an Excel template:
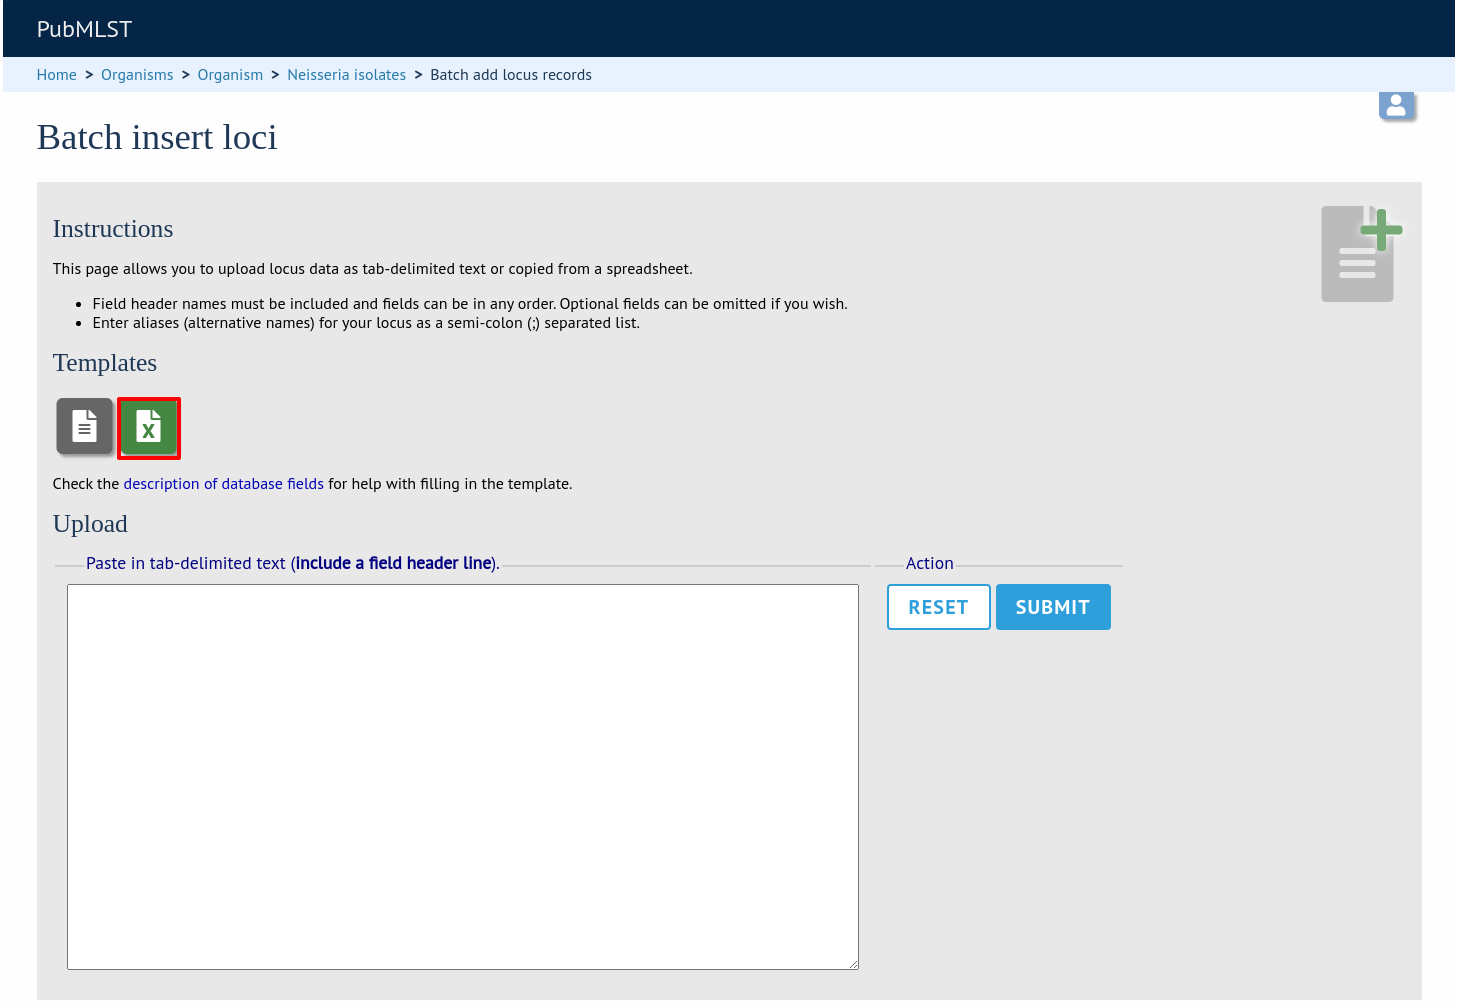
Fill in the spreadsheet fields using the table above as a guide, then paste the completed table into the web form and press ‘Submit query’.
Defining locus extended attributes
You may want to add additional metadata for the allele definitions of some loci. Since these are likely to be specific to each locus, they cannot be defined generically within the standard locus definition. We can, instead, define extended attributes. Examples of these include higher order grouping of antigen sequences, antibody reactivities, identification of important mutations, or cross-referencing of alternative nomenclatures.
To add extended attributes for a locus, click add (+) locus extended attributes in the sequence definition database curator’s interface contents page. This function is normally hidden, so you may need to click the ‘Fields’ toggle to display it.
Fill in the web form with appropriate values. Required fields have an exclamation mark (!) next to them:
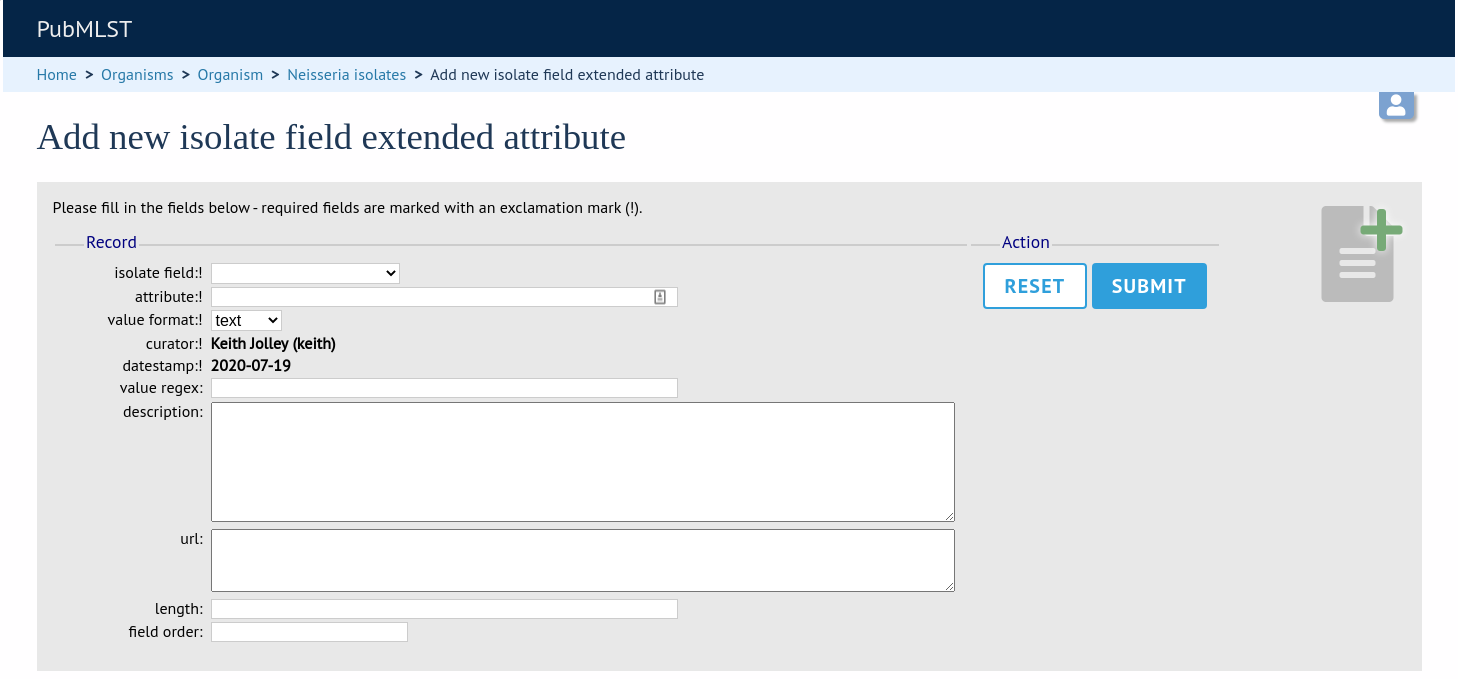
locus - Select locus from dropdown box.
Allowed: existing locus name.
field - Name of extended attributes.
Allowed: any value.
value_format - Data type of attribute.
Allowed: integer/text/boolean.
required - Specifies whether the attribute value but be defined when adding a new sequence.
Allowed: true/false.
value_regex - Regular expression to enforce allele id naming (optional).
^: the beginning of the string
$:the end of the string
d: digit
D: non-digit
s: white space character
S: non white space character
w: alpha-numeric plus ‘_’
.: any character
*: 0 or more of previous character
+: 1 or more of previous character
description - Description that will appear within the web form when adding new sequences (optional).
Allowed: any value.
option_list - Pipe (|) separated list of allowed values (optional).
length - Maximum length of value (optional).
Allowed: any integer.
field_order - Integer that sets the position of the field within scheme values in any results (optional).
Allowed: any integer.
Once extended attributes have been defined, they will appear in the web form when adding new sequences for that locus. The values are searchable when using a locus-specific sequence query, and they will appear within query results and allele information pages.
Defining schemes
Schemes are collections of loci that may be associated with particular fields - one of these fields can be a primary key, i.e. a field that uniquely defines a particular combination of alleles at the associated loci.
A specific example of a scheme is MLST - see workflow for setting up a MLST scheme.
To set up a new scheme, you need to:
Add a new scheme description.
Define loci as ‘scheme members’.
Add ‘scheme fields’ associated with the scheme.
See also
Sequence definition databases
As with all configuration, tables can be populated using the batch interface (++) or one at a time (+). Details for the latter are described below:
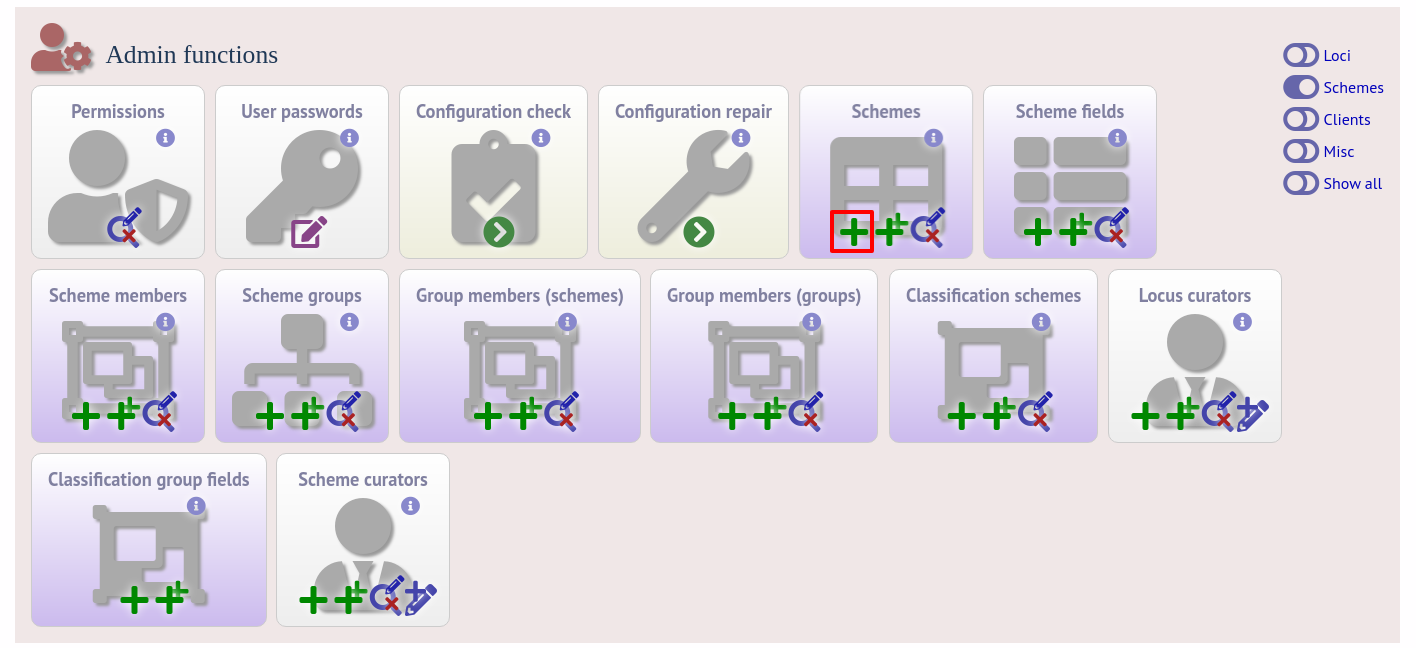
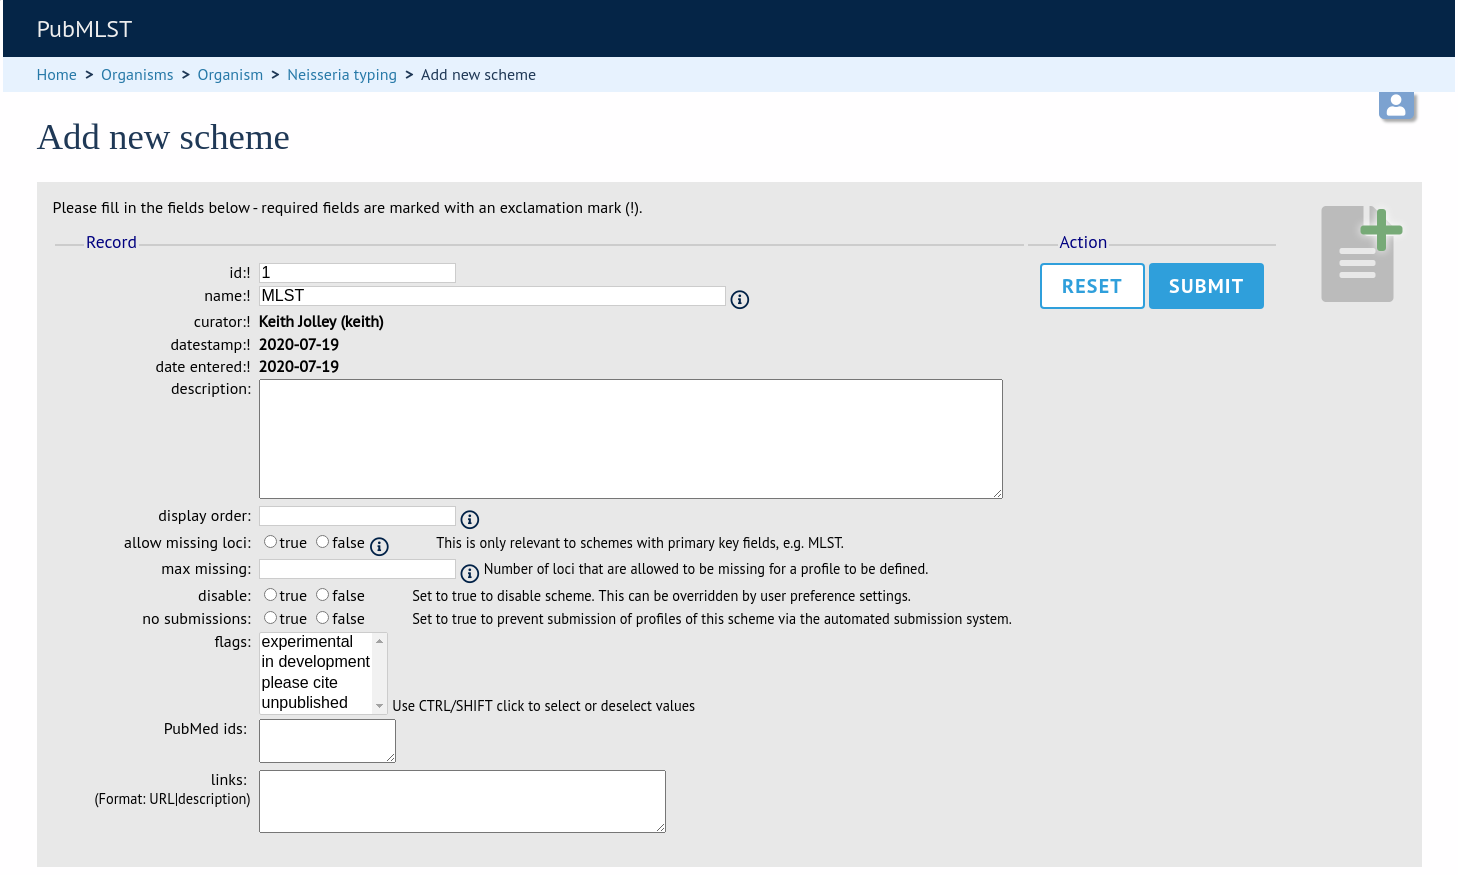
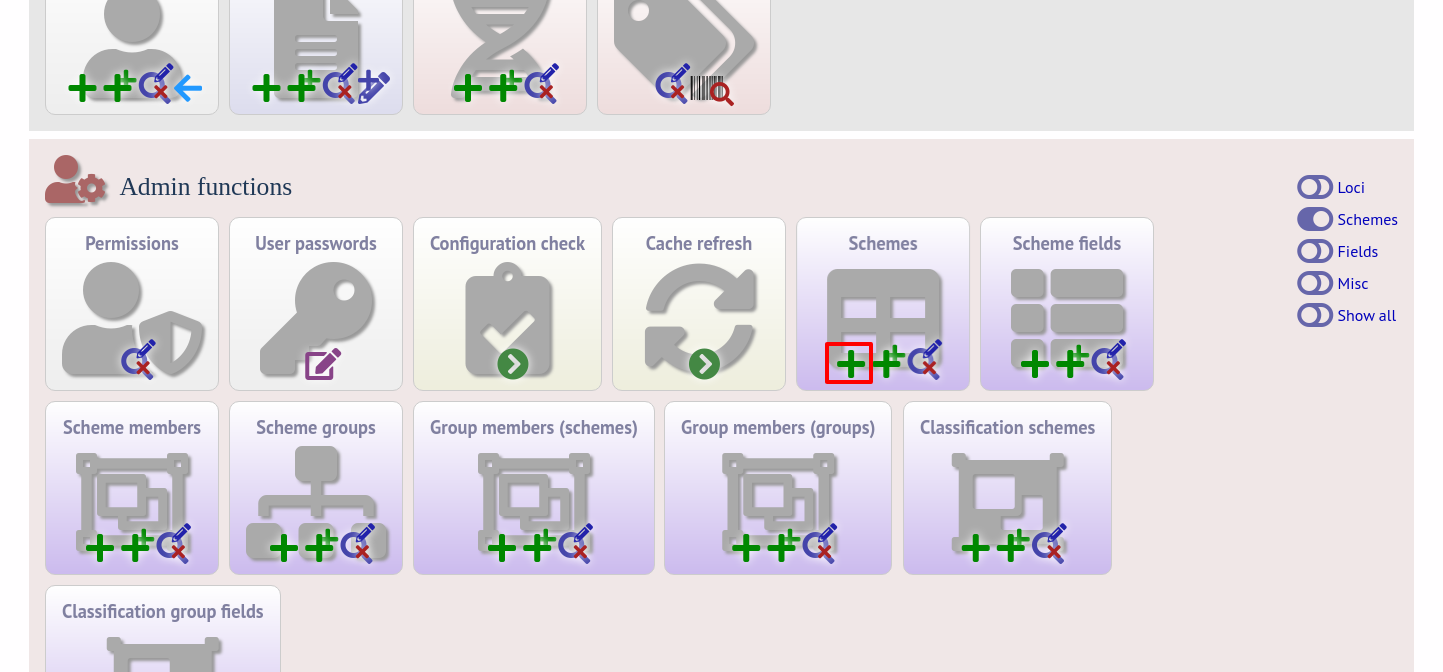
Click the add (+) scheme link on the curator’s interface contents page. This function is normally hidden, so you may need to click the ‘Schemes’ toggle to display it.
Fill in the scheme description in the web form. The next available scheme id number will be filled in already.
The display_order field accepts an integer that can be used to order the display of schemes in the interface - this can be left blank if you wish.
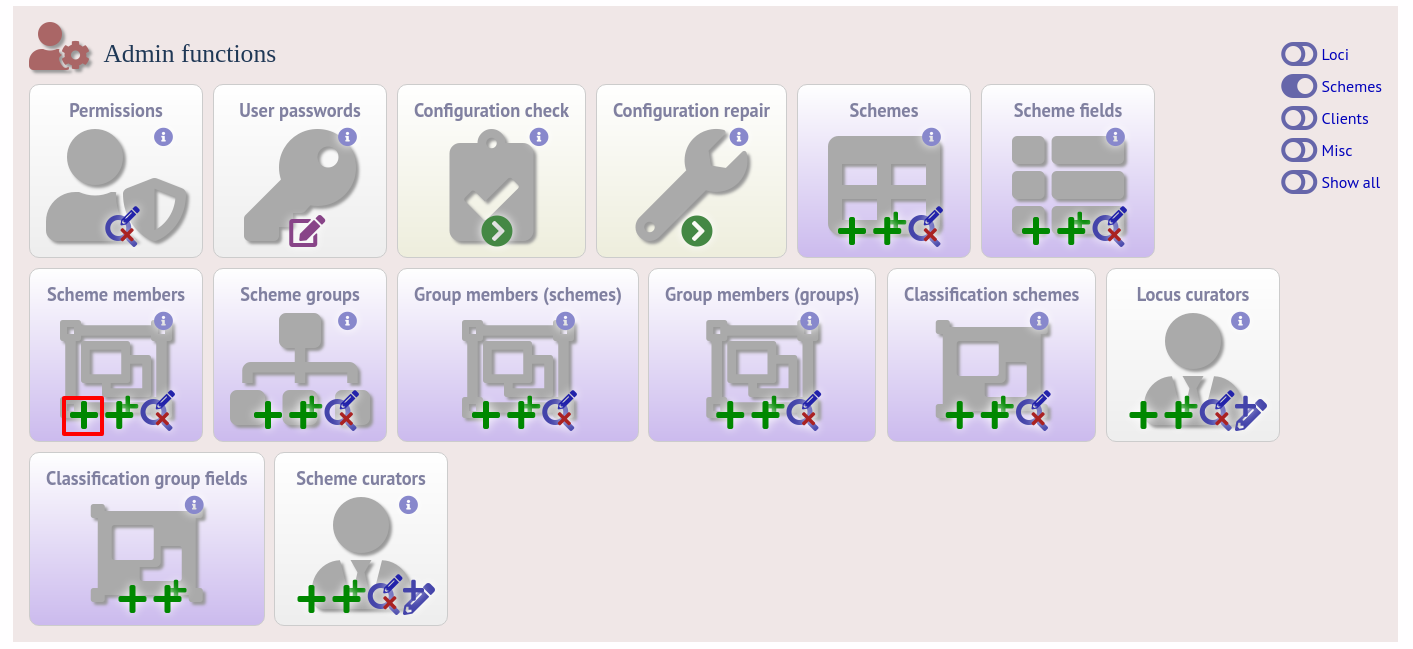
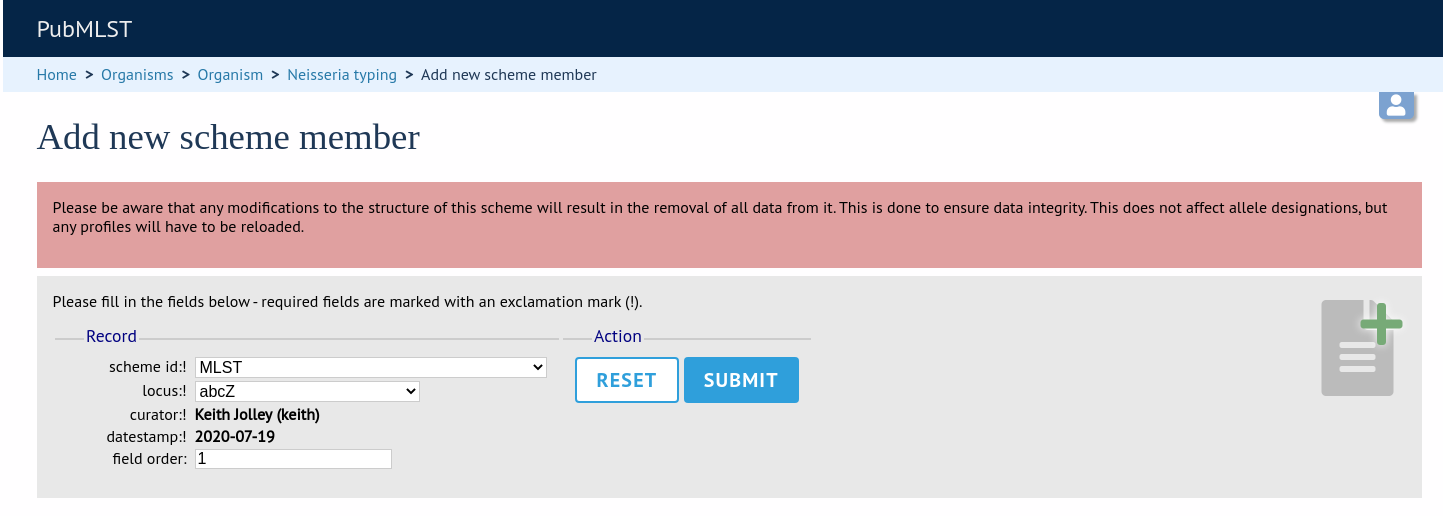
To add loci to the scheme, click the add (+) scheme members link on the curator’s interface contents page. This function is normally hidden, so you may need to click the ‘Schemes’ toggle to display it.
Select the scheme name and a locus that you wish to add to the scheme from the appropriate drop-down boxes. Loci need to have already been defined. The field_order field allows you to set the display order of the locus within a profile - if these are left blank that alphabetical ordering is used.
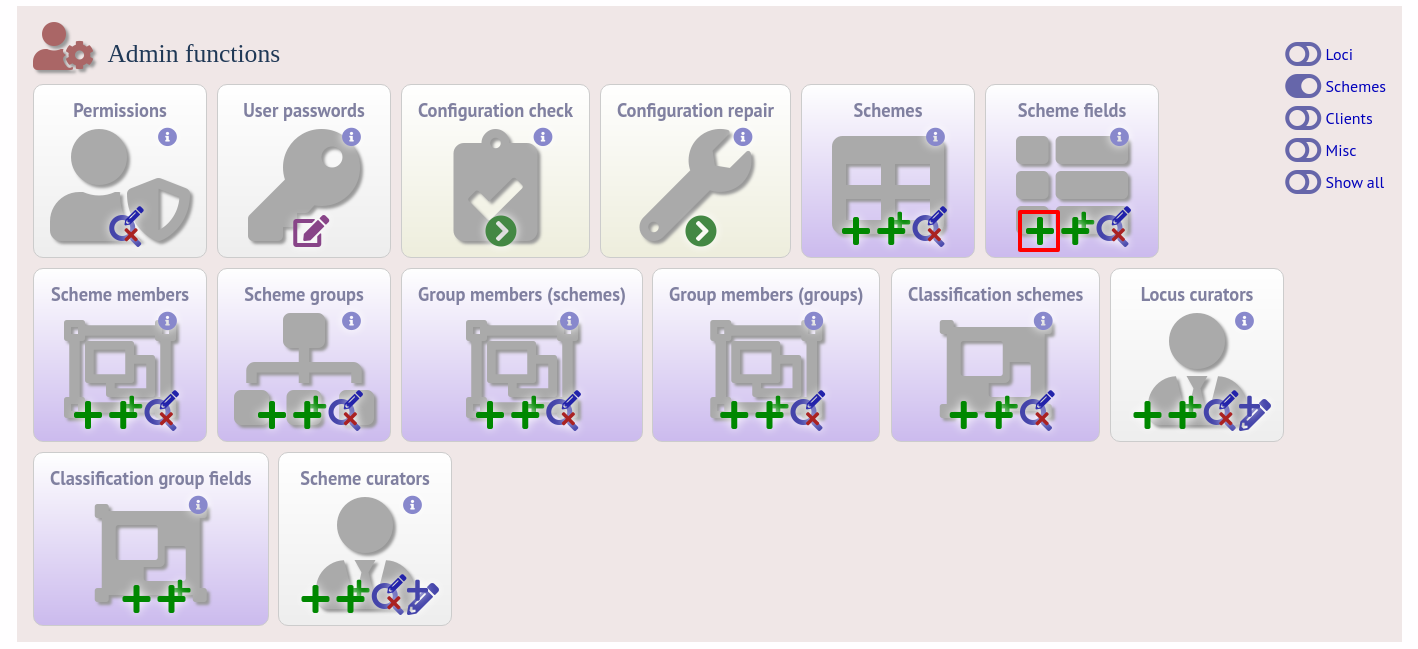
To add scheme fields, click the add (+) scheme fields link on the curator’s interface contents page.
Fill in the web form with appropriate values. Required fields have an exclamation mark (!) next to them:
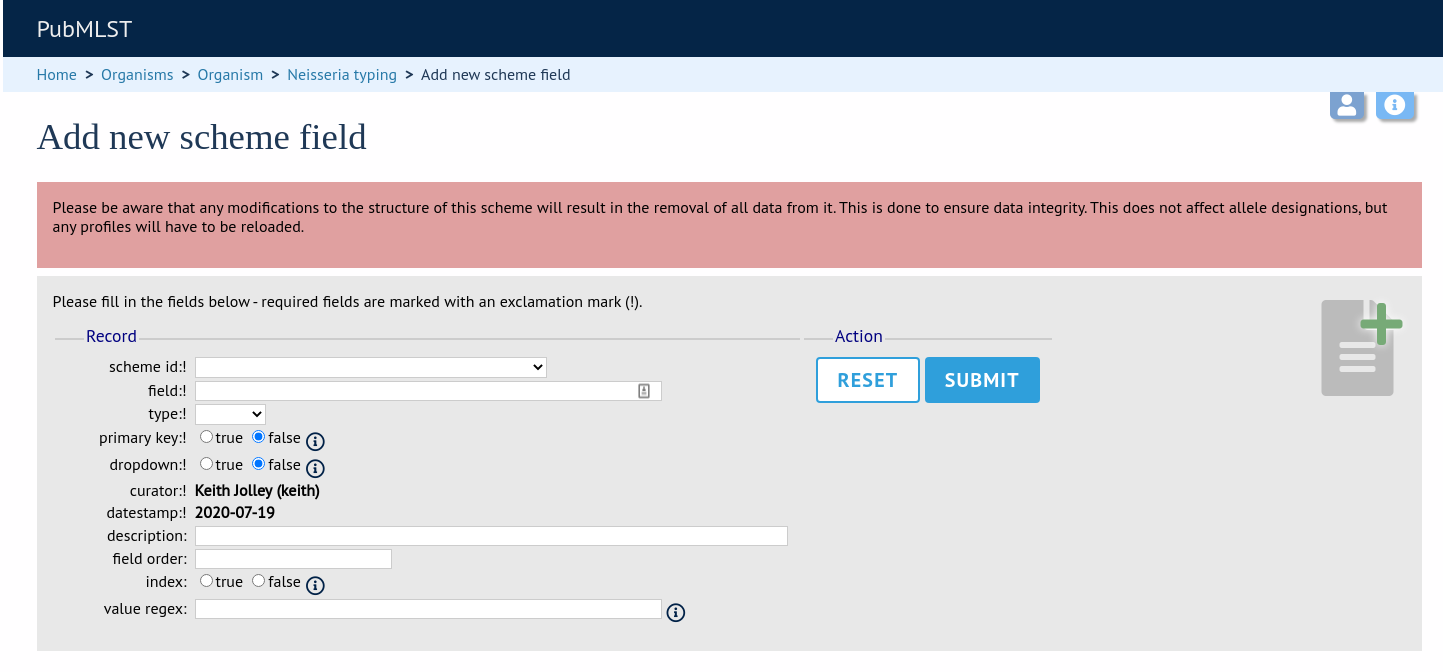
scheme_id - Dropdown box of scheme names.
Allowed: selection from list.
field - Field name.
Allowed: any value.
type - Format for values.
Allowed: text/integer/date.
primary_key - Set to true if field is the primary key. There can only be one primary key for a scheme.
Allowed: true/false.
dropdown - Set to true if a dropdown box is displayed in the query interface, by default, for values of this field to be quickly selected. This option can be overridden by user preferences.
Allowed: true/false.
description - This field isn’t currently used.
field_order - Integer that sets the position of the field within scheme values in any results.
Allowed: any integer.
value_regex - Regular expression to enforce field values.
^: the beginning of the string
$:the end of the string
d: digit
D: non-digit
s: white space character
S: non white space character
w: alpha-numeric plus ‘_’
.: any character
*: 0 or more of previous character
+: 1 or more of previous character
Isolate databases
As with all configuration, tables can be populated using the batch interface (++) or one at a time (+). Details for the latter are described below:
Click the add (+) scheme link on the curator’s interface contents page. This function is normally hidden, so you may need to click the ‘Schemes’ toggle to display it.
Fill in the scheme description in the web form. Required fields have an exclamation mark (!) next to them:
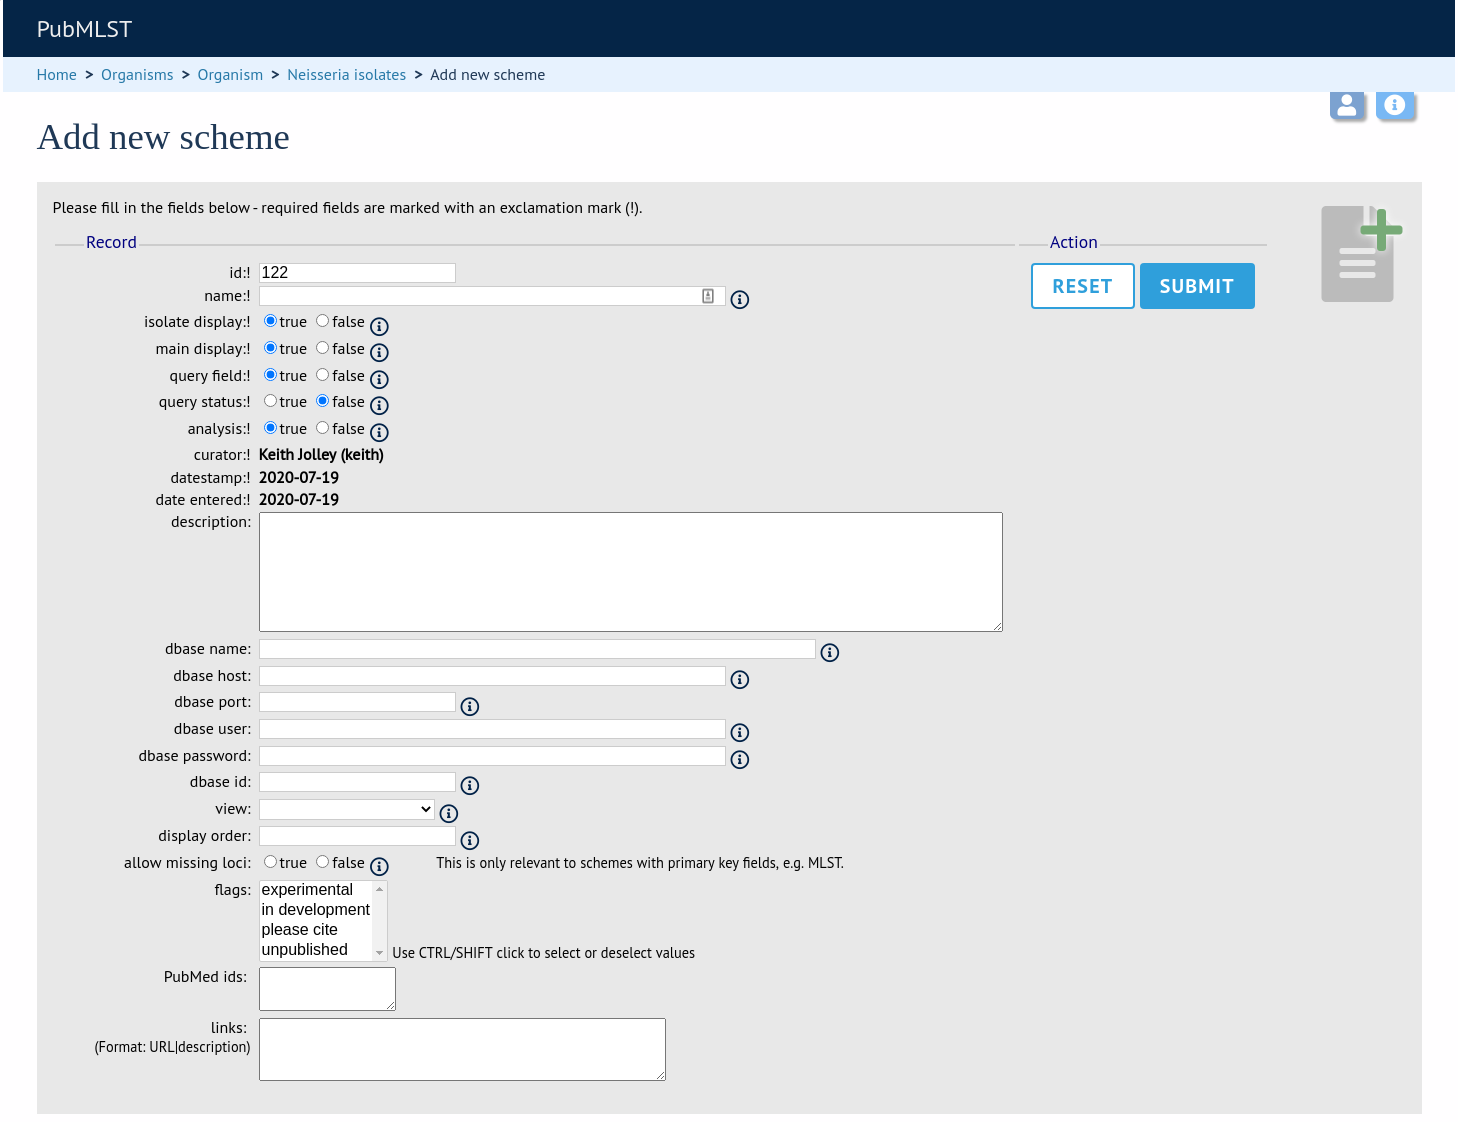
id - Index number of scheme - the next available number will be entered automatically.
Allowed: any positive integer.
description - Short description - this is used in tables so make sure it’s not too long.
Allowed: any text.
isolate_display - Sets whether or not fields for this scheme are displayed in a detailed isolate record - this can be overridden by user preference.
Allowed: allele only/sequence/hide.
main_display - Sets whether or not fields for this scheme are displayed in a main results table by default - this can be overridden by user preference.
Allowed: true/false.
query_field - Sets whether or not fields for this scheme can be used in queries by default - this can be overridden by user preference.
Allowed: true/false.
query_status - Sets whether a dropdown list box should be displayed in the query interface to filter results based on profile completion for this scheme - this can be overridden by user preference.
Allowed: true/false.
analysis - Sets whether or not alleles for this locus can be used in analysis functions by default - this can be overridden by user preference.
Allowed: true/false.
recommended - Sets whether the scheme will appear in a list of recommended schemes for use in some analysis plugins. Selecting this option makes the scheme easier to select when there are a lot of schemes defined. It should be used sparingly.
quality_metric - Sets whether the scheme can be used to help assess the quality of a genome assembly. For a well annotated genome it would be expected for all loci in the scheme to have an allele designated. The annotation status can be searched in an isolate query. This can be used in conjunction with the quality_metric_good and quality_metric_bad attributes that can be used to set the thresholds for what constitutes a good or bad annotation.
dbase_name - Name of seqdef database (system name) containing scheme profiles (optional).
Allowed: any text.
dbase_host - Resolved name of IP address of database host - leave blank if running on the same machine as the isolate database (optional).
Allowed: network address, e.g. 129.67.26.52 or zoo-oban.zoo.ox.ac.uk
dbase_port - Network port on which the sequence definition database server is listening - leave blank unless using a non-standard port, 5432 (optional).
Allowed: integer.
dbase_user - Name of user with permission to access the sequence definition database - depending on the database configuration you may be able to leave this blank (optional).
Allowed: any text (no spaces).
dbase_password - Password of database user - again depending on the database configuration you may be able to leave this blank (optional).
Allowed: any text (no spaces).
dbase_id - Id of scheme in the sequence definition database.
Allowed: any integer.
quality_metric_good - threshold number of loci that must have allele designations for a genome annotation to be considered good for this scheme. If this isn’t set then the number of loci in the scheme is used.
quality_metric_bad - threshold number of loci that must have allele designations below which a genome annotation is to be considered bad for this scheme. If this isn’t set then the value used for quality_metric_good is used (or the number of scheme loci if this also is not set).
view - Restrict this scheme to only isolates contained in the specified database view. This option will only appear if the views attribute is set in the system tag. The view needs to have been defined in the database as a subset of the isolate table (usually filtered by the value of one or more of its fields).
display_order - Integer reflecting the display position for this scheme within the interface (optional).
Allowed: any integer.
allow_missing_loci - Allow profile definitions to contain ‘0’ (locus missing) or ‘N’ (any allele).
Organizing schemes into hierarchical groups
Schemes can be organized in to groups, and these groups can in turn be members of other groups. This faciliates hierarchical ordering of loci, but with the flexibility to allow loci and schemes to belong to multiple groups.
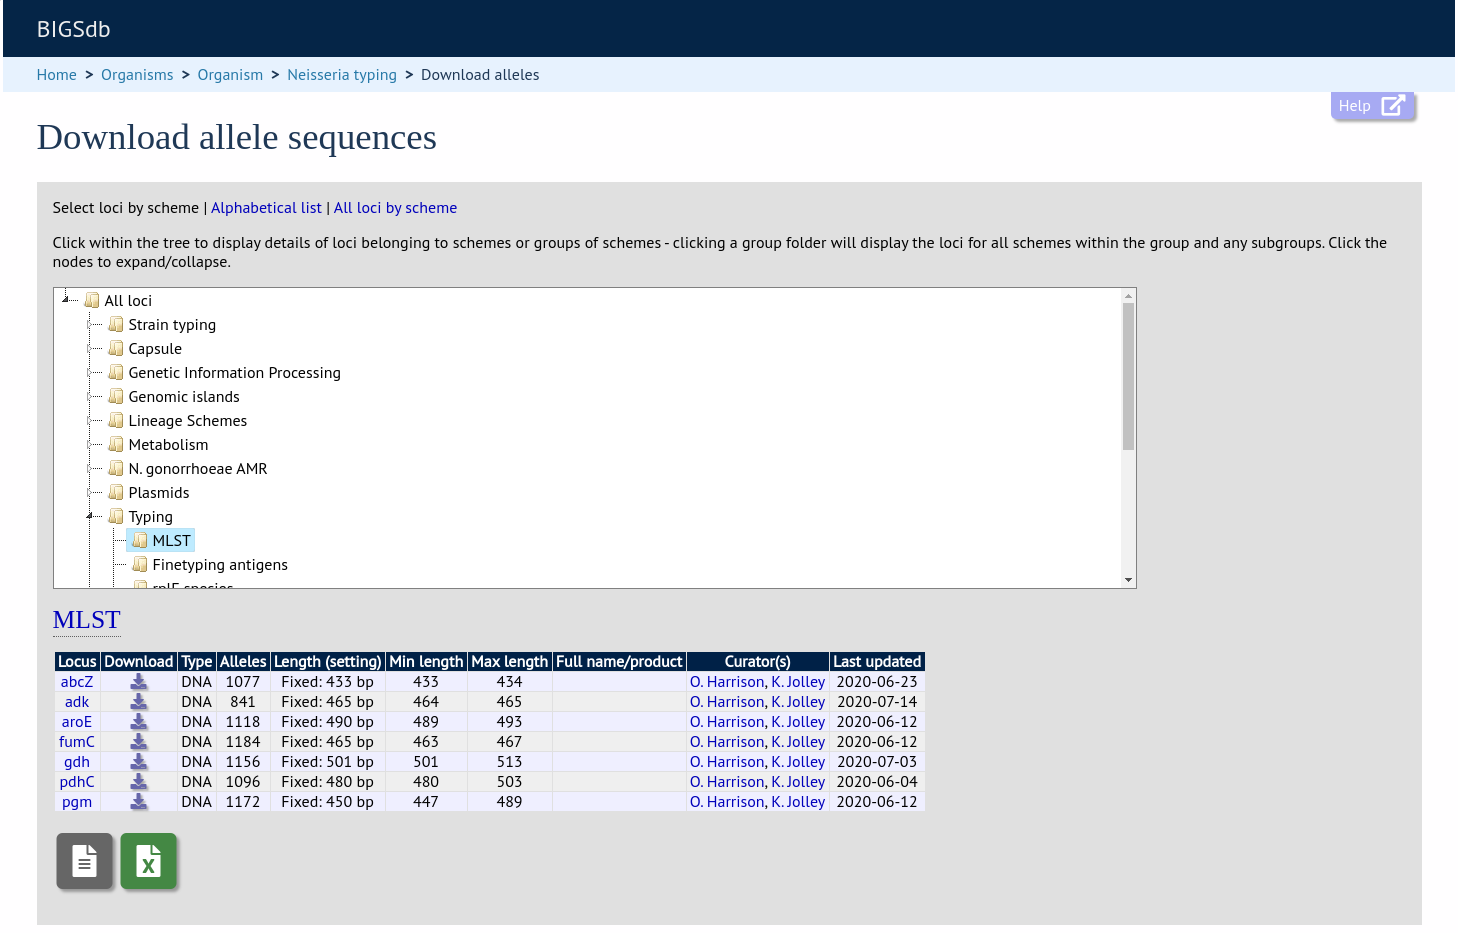
This hierarchical structuring can be seen in various places within BIGSdb, for example the allele download page.
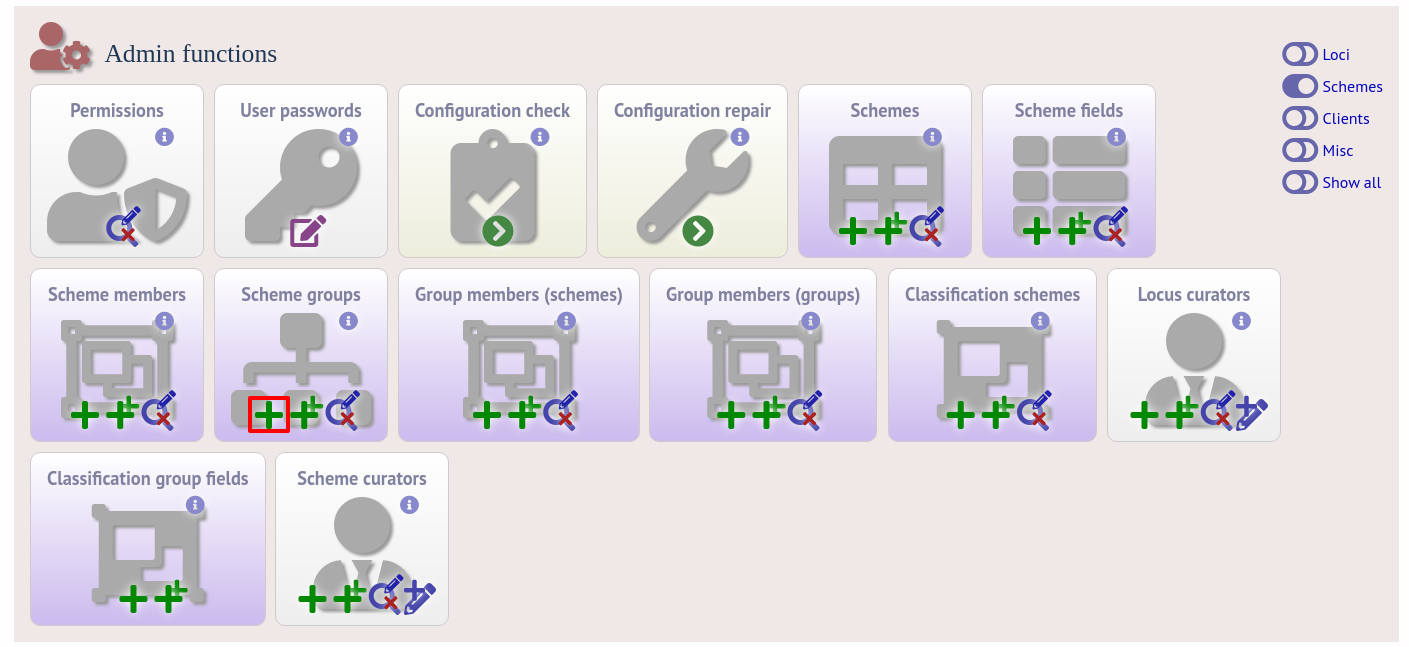
Scheme groups can be added in both the sequence definition and isolate databases. To add a new group, click the add (+) scheme group link on the curator’s contents page. This function is normally hidden, so you may need to click the ‘Schemes’ toggle to display it.
Enter a short name for the group - this will appear within drop-down list boxes and the hierarchical tree, so it needs to be fairly short.
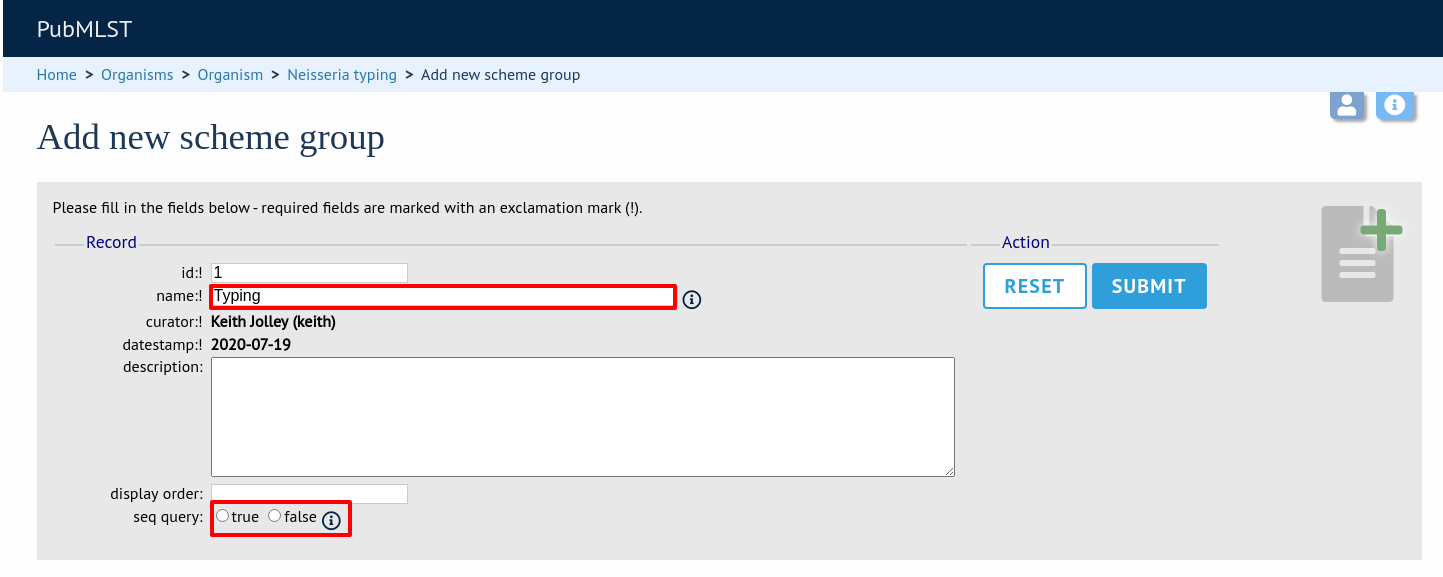
If you are creating a scheme group in the sequence definition database, there is an additional field called ‘seq_query’. Set this to true to add the scheme group to the dropdown lists in the sequence query page. This enables all loci belonging to schemes within the group to be queried together.
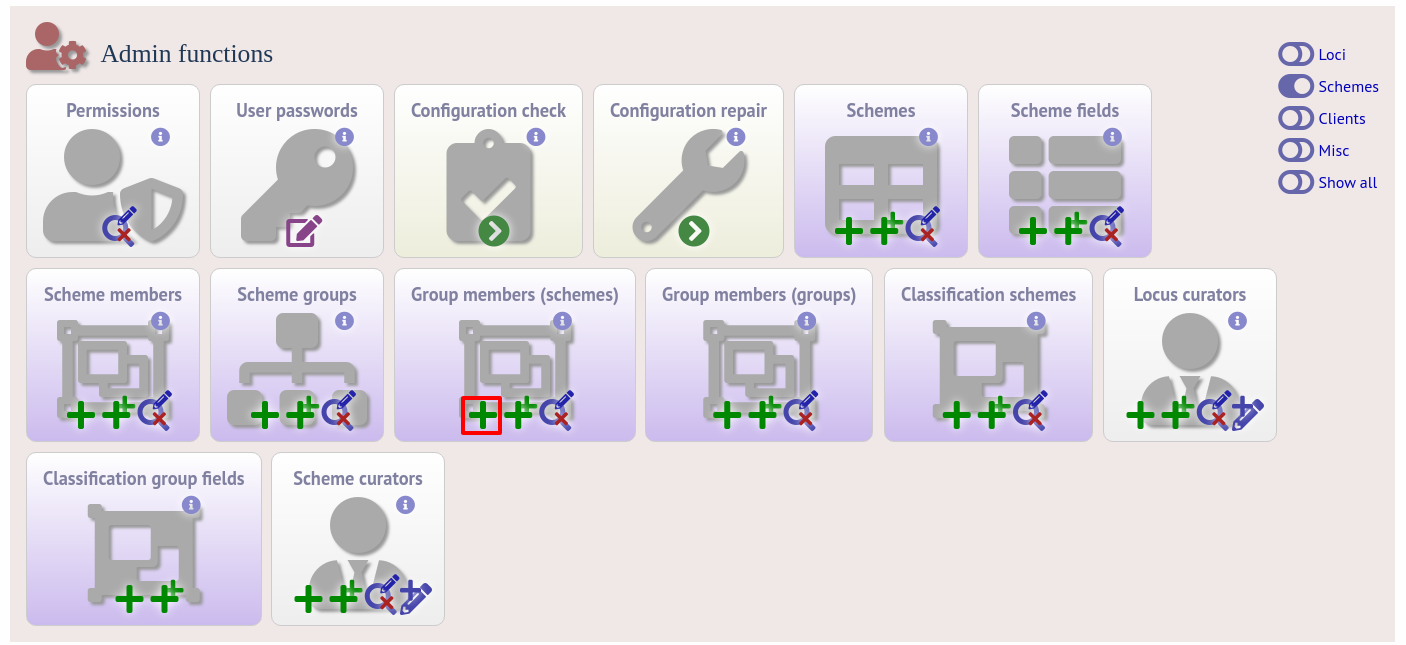
Schemes can be added to groups by clicking the add (+) group members (scheme) link.
Select the scheme and the group to add it to, then click ‘Submit’.

Scheme groups can be added to other scheme groups in the same way by clicking the add (+) scheme group group members link.
Setting up client databases
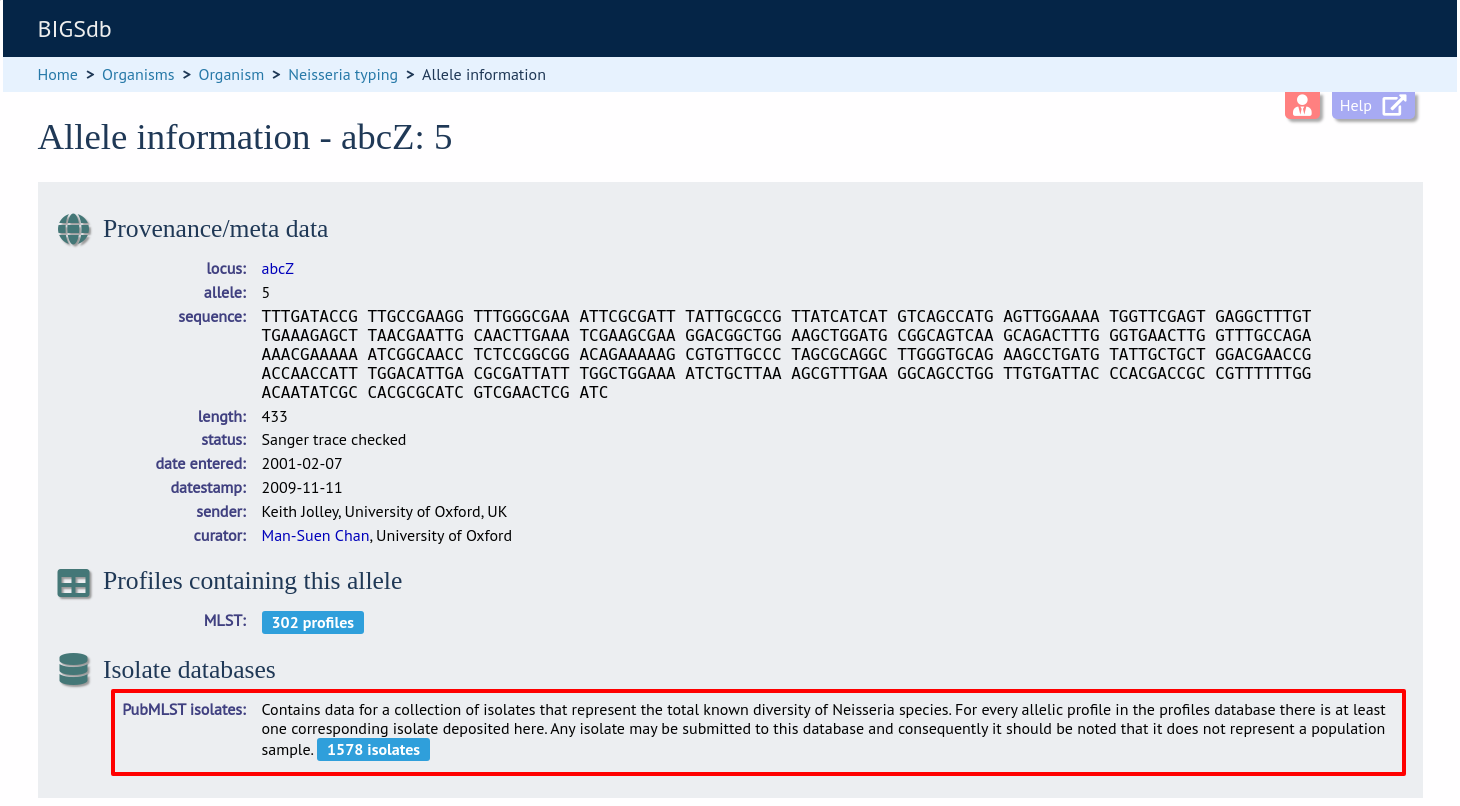
Sequence definition databases can have any number of isolate databases that connect as clients. Registering these databases allows the software to perform isolate data searches relevant to results returned by the sequence definition database, for example:
Determine the number of isolates that a given allele is found in and link to these.
Determine the number of isolates that a given scheme field, e.g. a sequence type, is found in and link to these.
Retrieve specific attributes of isolates that have a given allele, e.g. species that have a particular 16S allele, or penicillin resistance given a particular penA allele.
Multiple client databases can be queried simultaneously.
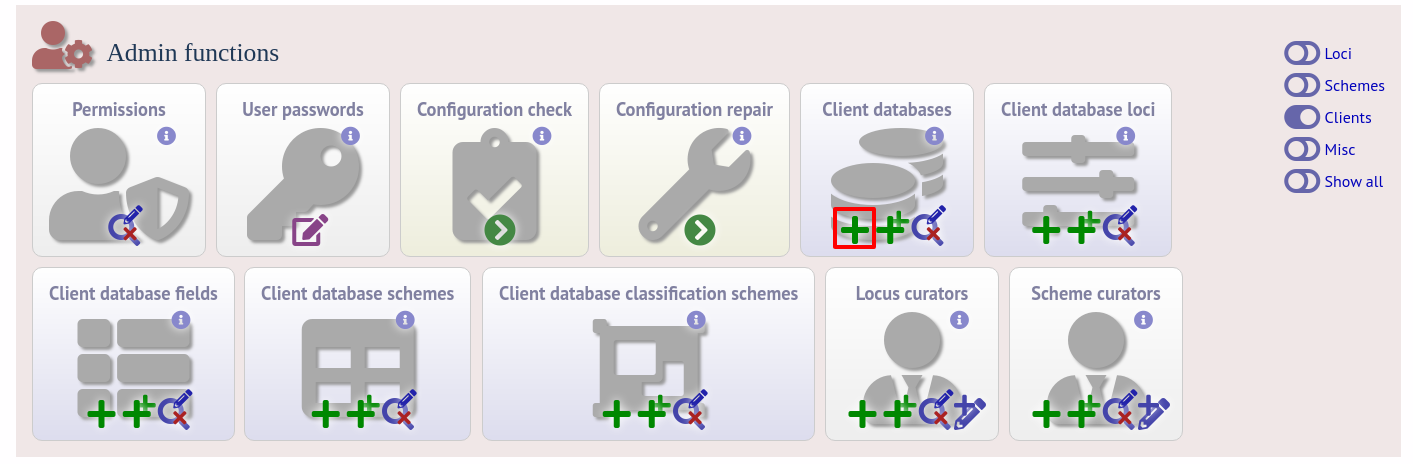
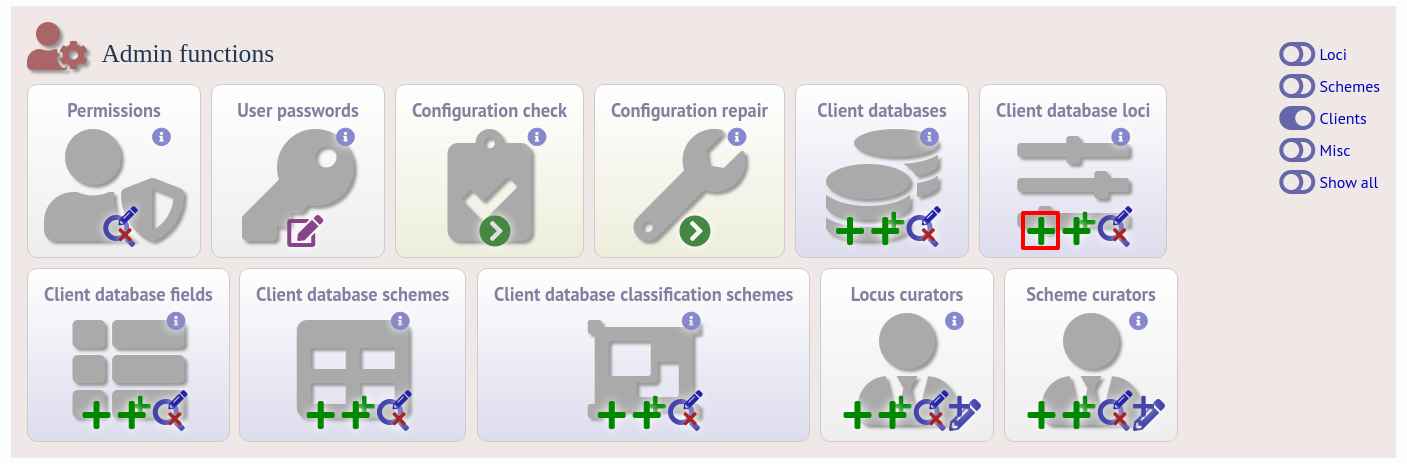
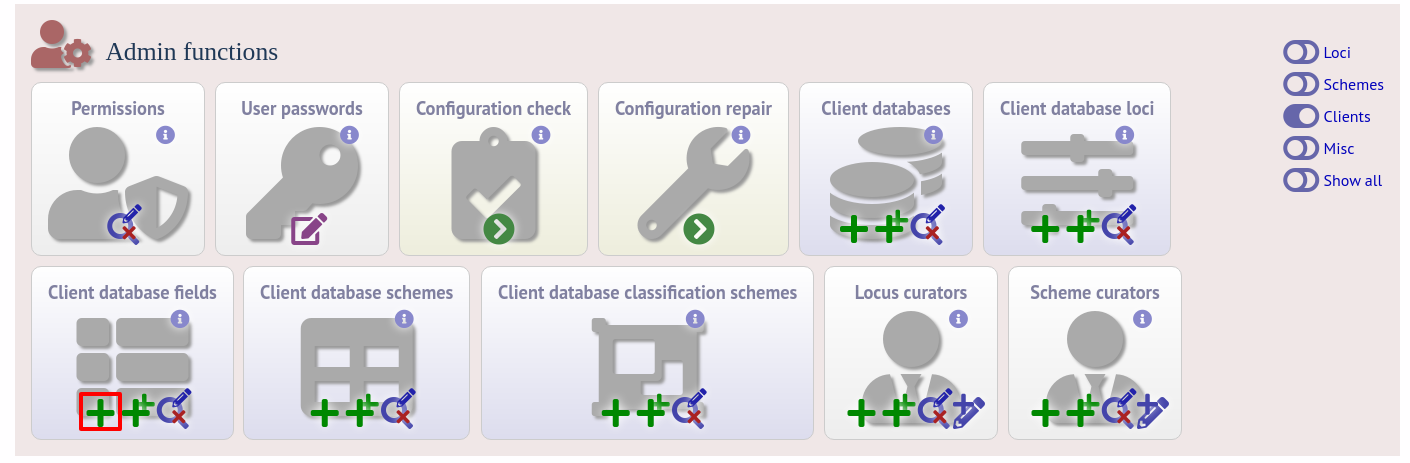
To register a client isolate database for a sequence definition database, click the add (+) client database link on the curator’s interface contents page. This function is normally hidden, so you may need to click the ‘Clients’ toggle to display it.
Fill in the web form with appropriate values. Required fields have an exclamation mark (!) next to them:
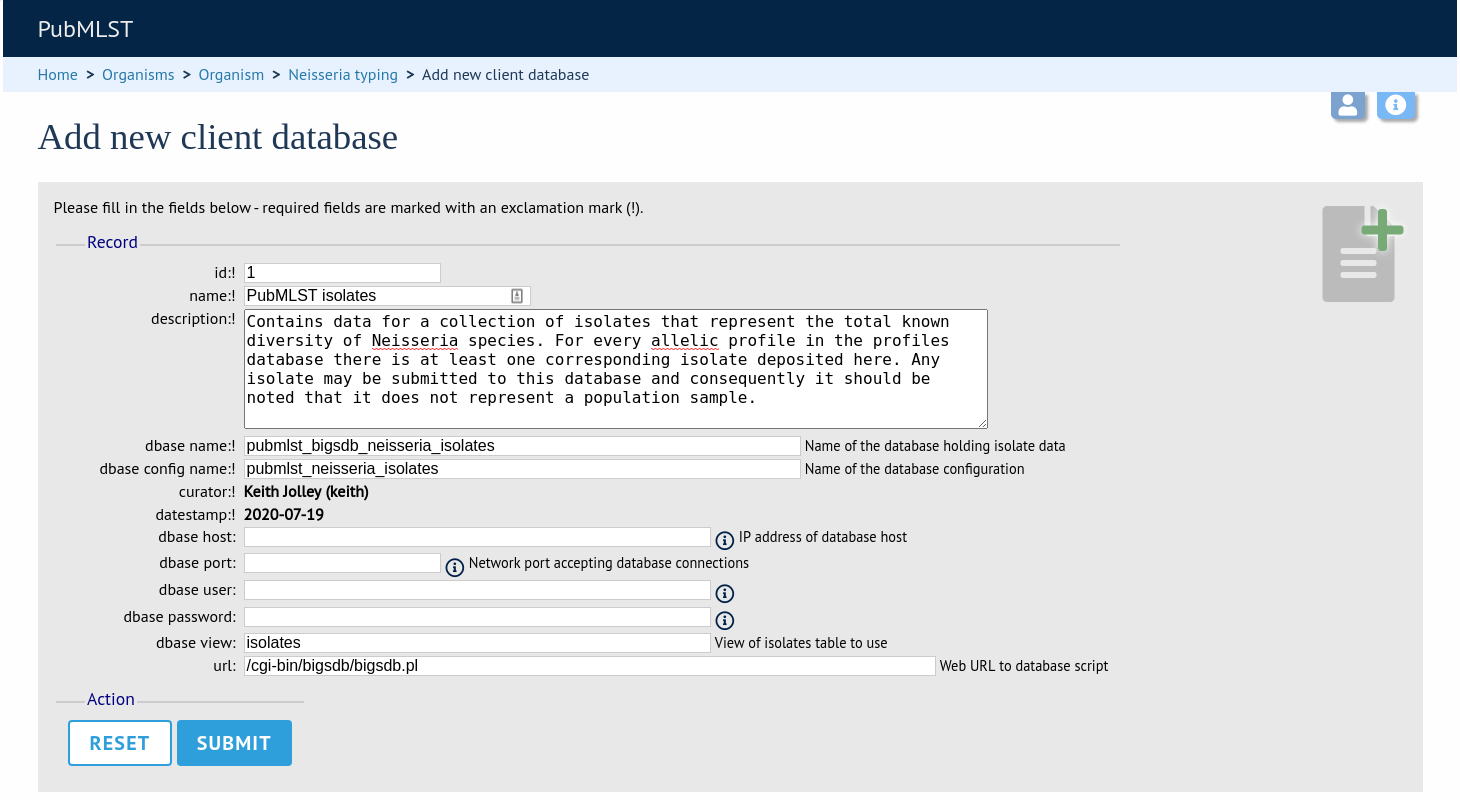
id - Index number of client database. The next available number is entered automatically but can be overridden.
Allowed: any positive integer.
name - Short description of database. This is used within the interface result tables so it is better to make it as short as possible.
Allowed: any text.
description - Longer description of database.
Allowed: any text.
dbase_name - Name of database (system name).
Allowed: any text.
dbase_config_name - Name of database configuration - this is the text string that appears after the db= part of script URLs.
Allowed: any text (no spaces)
dbase_host - Resolved name of IP address of database host (optional).
Allowed: Network address, e.g. 129.67.26.52 or zoo-oban.zoo.ox.ac.uk
Leave blank if running on the same machine as the seqdef database.
dbase_port - Network port on which the client database server is listening (optional).
Allowed: integer.
Leave blank unless using a non-standard port (5432).
dbase_user - Name of user with permission to access the client database.
Allowed: any text (no spaces).
Depending on the database configuration you may be able to leave this blank.
dbase_password - Password of database user
Allowed: any text (no spaces).
Depending on the database configuration you may be able to leave this blank.
url - URL of client database bigsdb.pl script
Allowed: valid script path.
This can be relative (e.g. /cgi-bin/bigsdb/bigsdb.pl) if running on the same machine as the seqdef database or absolute (including http://) if on a different machine.
Look up isolates with given allele
To link a locus, click the add (+) client database loci link on the curator’s interface contents page.
Link the locus to the appropriate client database using the dropdown list boxes. If the locus is named differently in the client database, fill this name in the locus_alias.
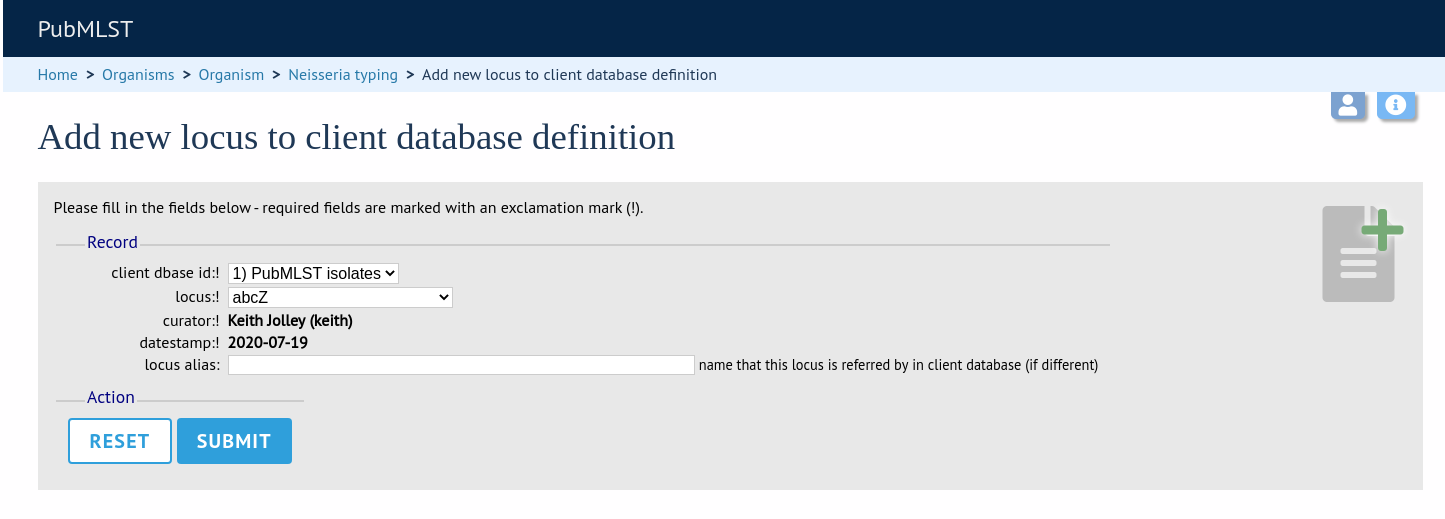
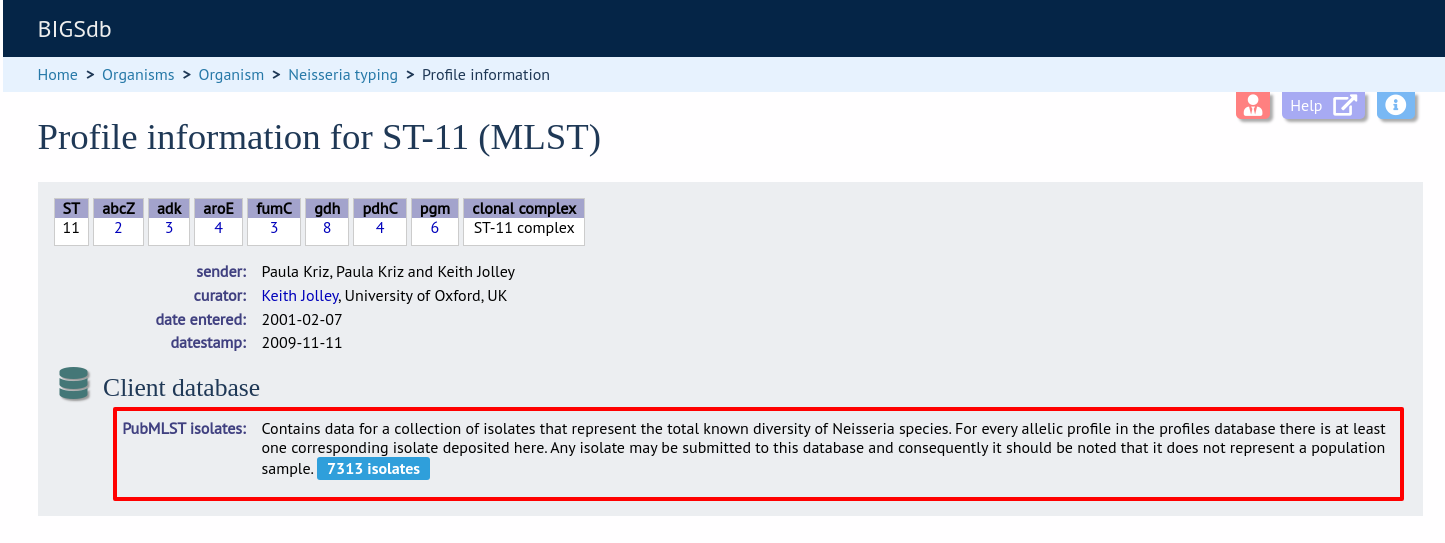
Now when information on a given allele is shown following a query, the software will list the number of isolates with that allele and link to a search on the database to retrieve these.
Look up isolates with a given scheme primary key
Setting this up is identical to setting up for alleles (see above) except you click on the add (+) client database schemes link and choose the scheme and client databases in the dropdown list boxes.
Now when information on a given scheme profile (e.g. MLST sequence type) is shown following a query, the software will list the number of isolates with that profile and link to a search on the database to retrieve these.
Look up specific isolate database fields linked to a given allele
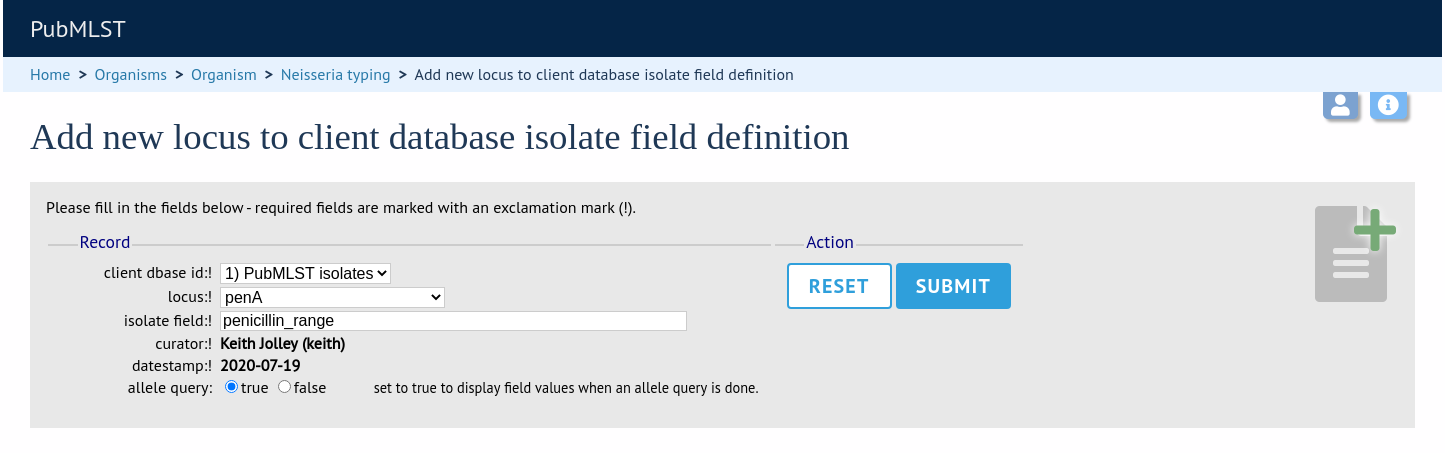
To link an allele to an isolate field, click the add (+) ‘client database fields linked to loci’ link on the curator’s interface contents page.
Select the client database and locus from the dropdown lists and enter the isolate database field that you’d like to link. The ‘allele_query’ field should be set to true.
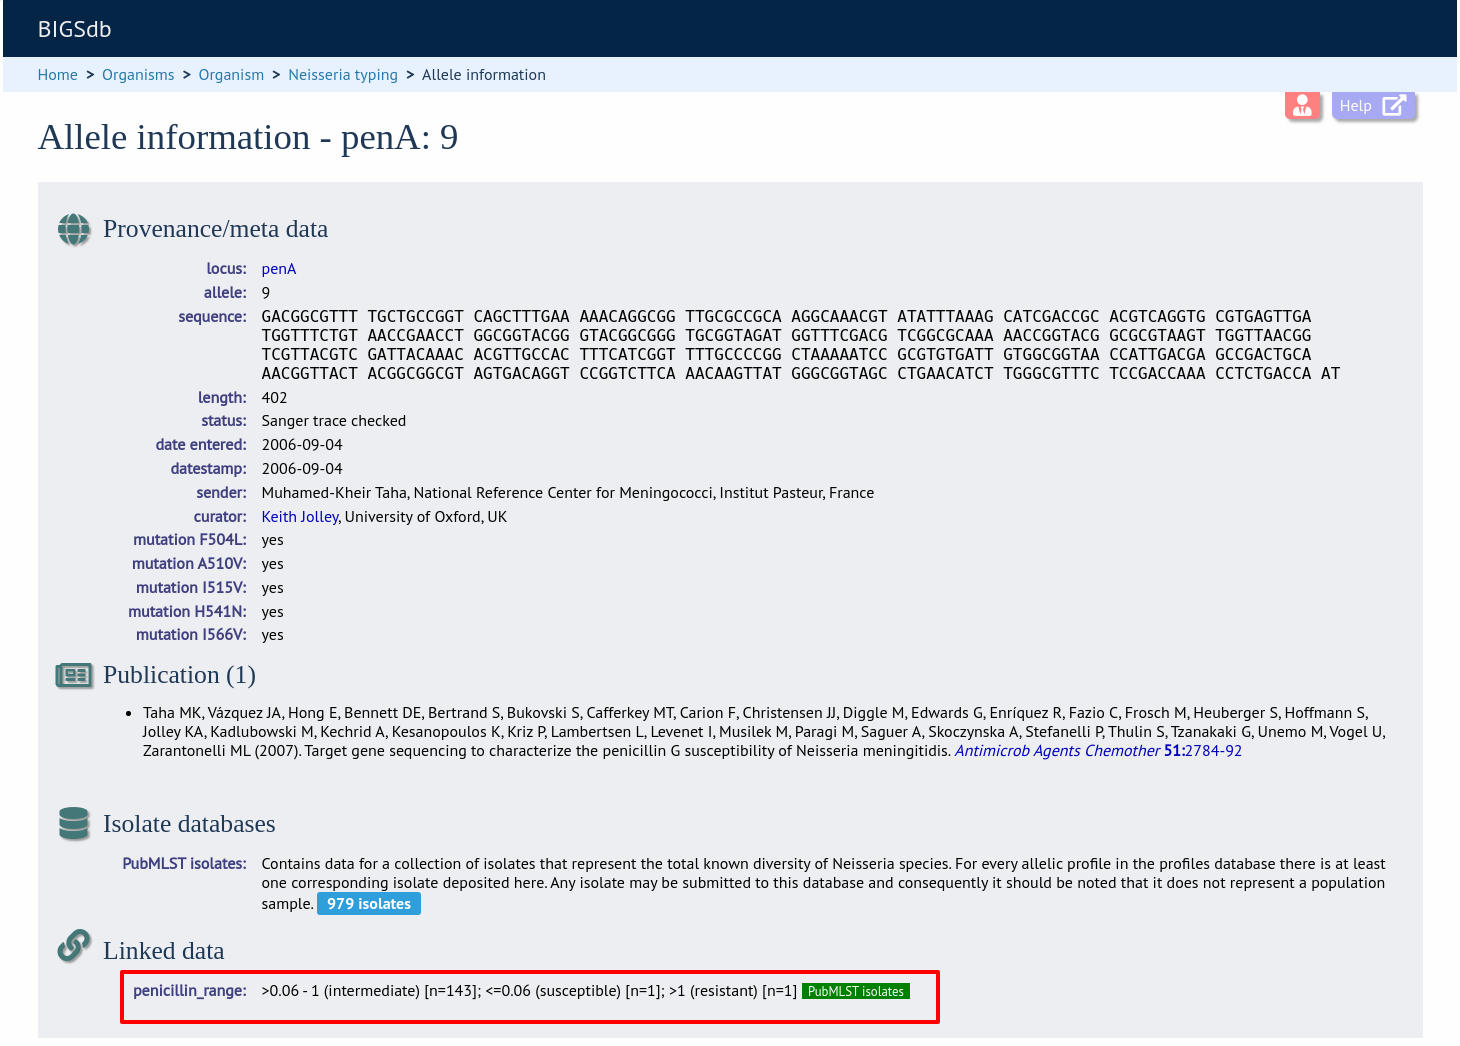
Now, in the allele record or following a sequence query that identifies an allele, all values for the chosen field from isolates with the corresponding allele are shown.
Workflow for setting up a MLST scheme
The workflow for setting up a MLST scheme is as follows (the example seqdef database is called seqdef_db):
Seqdef database
Create appropriate loci
Create new scheme ‘MLST’
Add scheme_field ‘ST’ with primary_key=TRUE (add clonal_complex if you want; set this with primary_key=FALSE)
Add each locus as a scheme_member
You’ll then be able to add profiles
Isolate database
Create the same loci with the following additional parameters (example locus ‘atpD’)
dbase_name: seqdef_db
dbase_id: atpD
url: something like /cgi-bin/bigsdb/bigsdb.pl?db=seqdef_db&page=alleleInfo&locus=atpD&allele_id=[?]
Create scheme ‘MLST’ with:
dbase_name: seqdef_db
dbase_id: 1 (or whatever the id of your seqdef scheme is)
Add scheme_field ST as before
Add loci as scheme_members
Automated assignment of scheme profiles
It is not practical to define cgMLST profiles via the web interface. A script is provided in the scripts/automation directory of the BIGSdb package called define_profiles.pl that can be used to scan an isolate database and automatically define cgMLST profiles in the corresponding sequence definition database.
The script is run as follows:
define_profiles.pl --database <name> --scheme <scheme_id>
A full list of options can be found by typing:
define_profiles.pl --help
NAME
    define_profiles.pl - Define scheme profiles found in isolate database

SYNOPSIS
    define_profiles.pl --database NAME --scheme SCHEME_ID [options]

OPTIONS

--cache
    Update scheme field cache in isolate database.

--database NAME
    Database configuration name.

--help
    This help page.

--exclude_isolates LIST
    Comma-separated list of isolate ids to ignore.

--exclude_projects LIST
    Comma-separated list of projects whose isolates will be excluded.

--ignore_multiple_hits
    Set allele designation to 'N' if there are multiple designations set for
    a locus. The default is to use the lowest allele value in the profile
    definition.

--isolates LIST
    Comma-separated list of isolate ids to scan (ignored if -p used).

--isolate_list_file FILE
    File containing list of isolate ids (ignored if -i or -p used).

--match_missing
    Treat missing loci as specific alleles rather than 'any'. This will
    allow profiles for every isolate that has <= threshold of missing alleles
    to be defined but may result in some isolates having >1 ST.

--max ID
    Maximum isolate id.

--min ID
    Minimum isolate id.

--min_size SIZE
    Minimum size of seqbin (bp) - limit search to isolates with at least this
    much sequence.

--missing NUMBER
    Set the number of loci that are allowed to be missing in the profile. If
    the remote scheme does not allow missing loci then this number will be set
    to 0.  Default=0.

--projects LIST
    Comma-separated list of project isolates to scan.

--scheme SCHEME_ID
    Scheme id number.

--view VIEW
    Limit isolates searched to specified view.
Scheme profile clustering - setting up classification schemes
Classification groups are a way to cluster scheme profiles using a specified threshold of pairwise allelic mismatches. Any number of different classification schemes can sit on top of a standard scheme (such as cgMLST), allowing different similarity thresholds to be pre-determined. Currently, single-linkage clustering is supported whereby each member of a group must have no more than the specified number of allelic differences with at least one other member of the group.
Defining classification scheme in sequence definition database
Once a scheme has been defined, add a classification scheme by clicking the add classification schemes (+) link on the curator’s interface contents page. This function is normally hidden, so you may need to click the ‘Schemes’ toggle to display it.
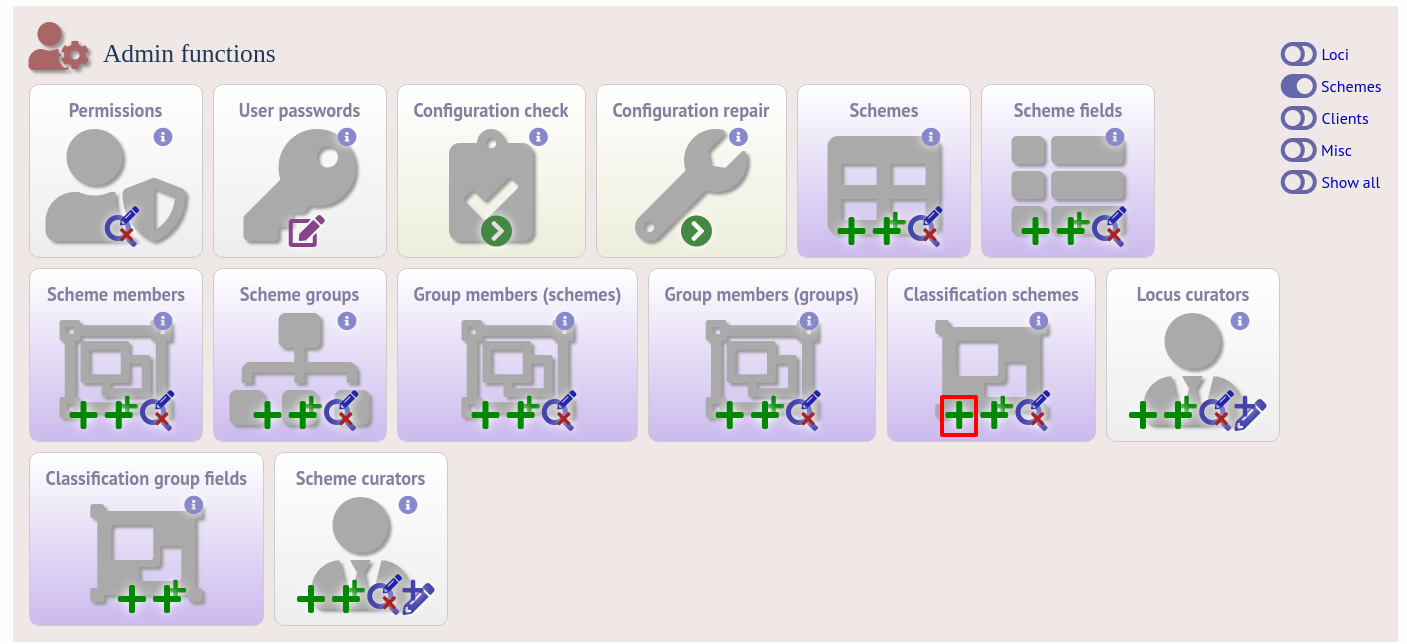
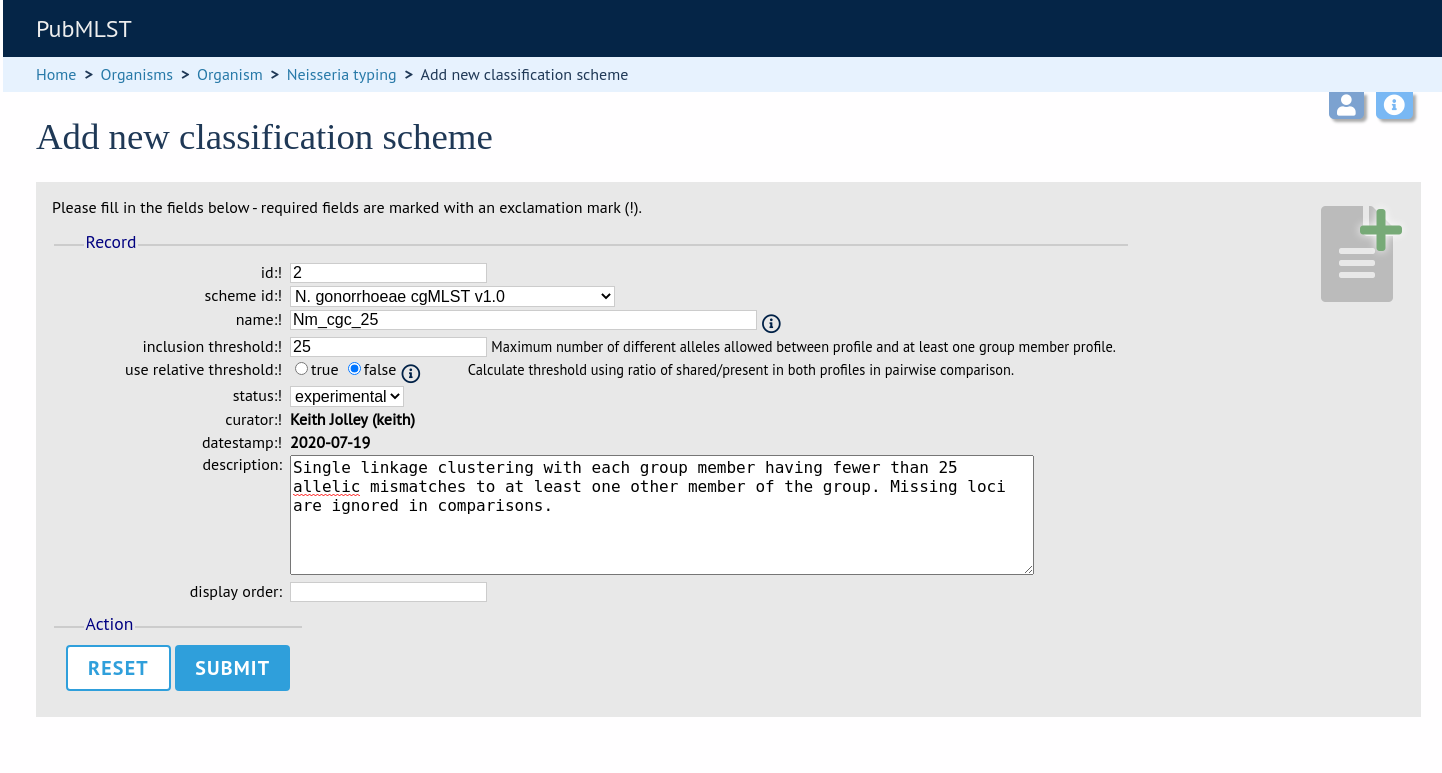
Select the underlying scheme and enter a name for the classification scheme, the number of mismatches allowed in order to include a scheme profile in a group, and a description. An example name for such a scheme could be ‘Nm_cgc_25’ indicating that this is a classification scheme for Neisseria meningitidis core genome cluster with a threshold of 25 mismatches.
You can additionally choose whether a relative threshold is used to calculate the number of mismatches to account for missing loci in pairwise comparisons. In this case, in order to be grouped, the number of matching alleles must exceed:
(number of common loci x (total loci - defined threshold)) / total loci
rather than
total loci - defined threshold
when an absolute threshold is used.
As this threshold has to be calculated for each pairwise comparison, clustering using relative thresholds is slower than using an absolute value, and probably makes little real world difference.
The status can be ‘experimental’ or ‘stable’. The status of a scheme will be shown in the web interface to indicate that any groupings are subject to change and do not form part of the stable nomenclature.
Press ‘Submit’ to create the classification scheme.
Defining classification scheme in isolate database
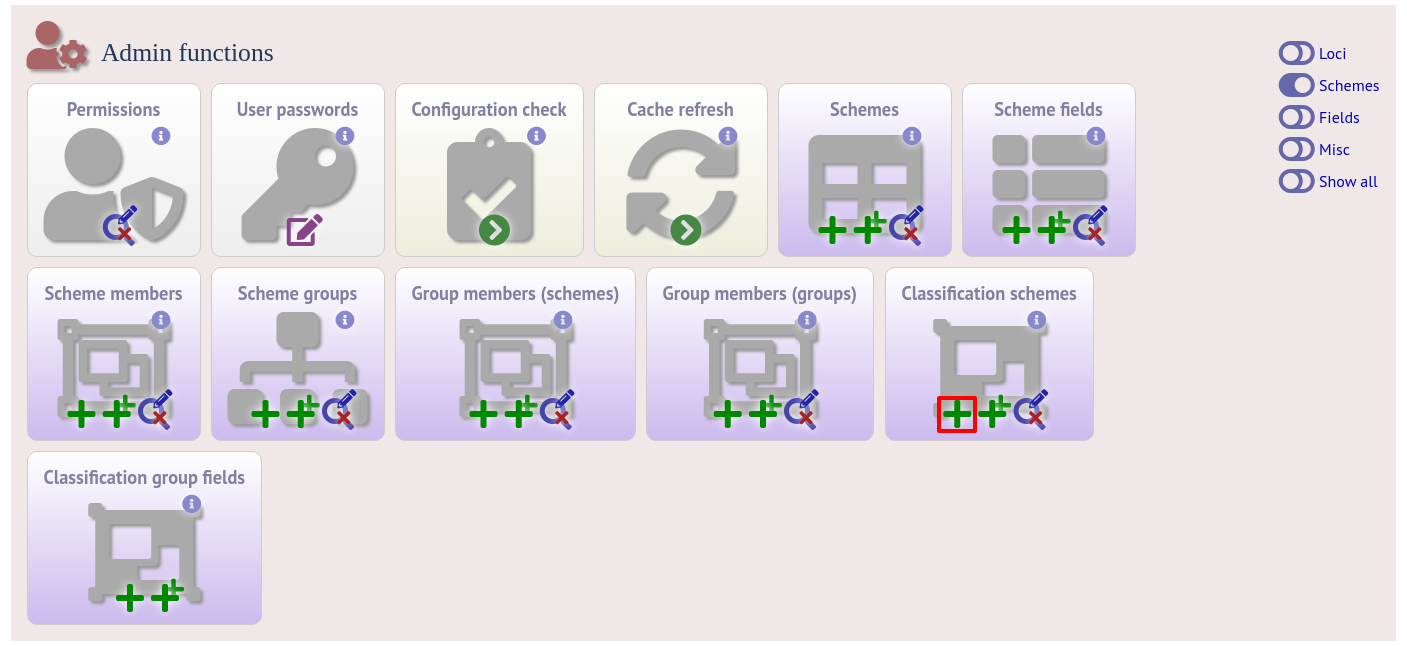
Duplicate the scheme definition from the sequence definition database. Click the add classification schemes (+) link on the curator’s interface contents page. This function is normally hidden, so you may need to click the ‘Schemes’ toggle to display it.
Enter the same details used in the sequence definition database. If a different id number is used in the isolate and sequence definition databases, you can set the seqdef id in the seqdef_cscheme_id field (the default is to use the same id).
You can also define a display order - this is an integer field on which the ordering of classification schemes is sorted when displayed in the isolate information page.
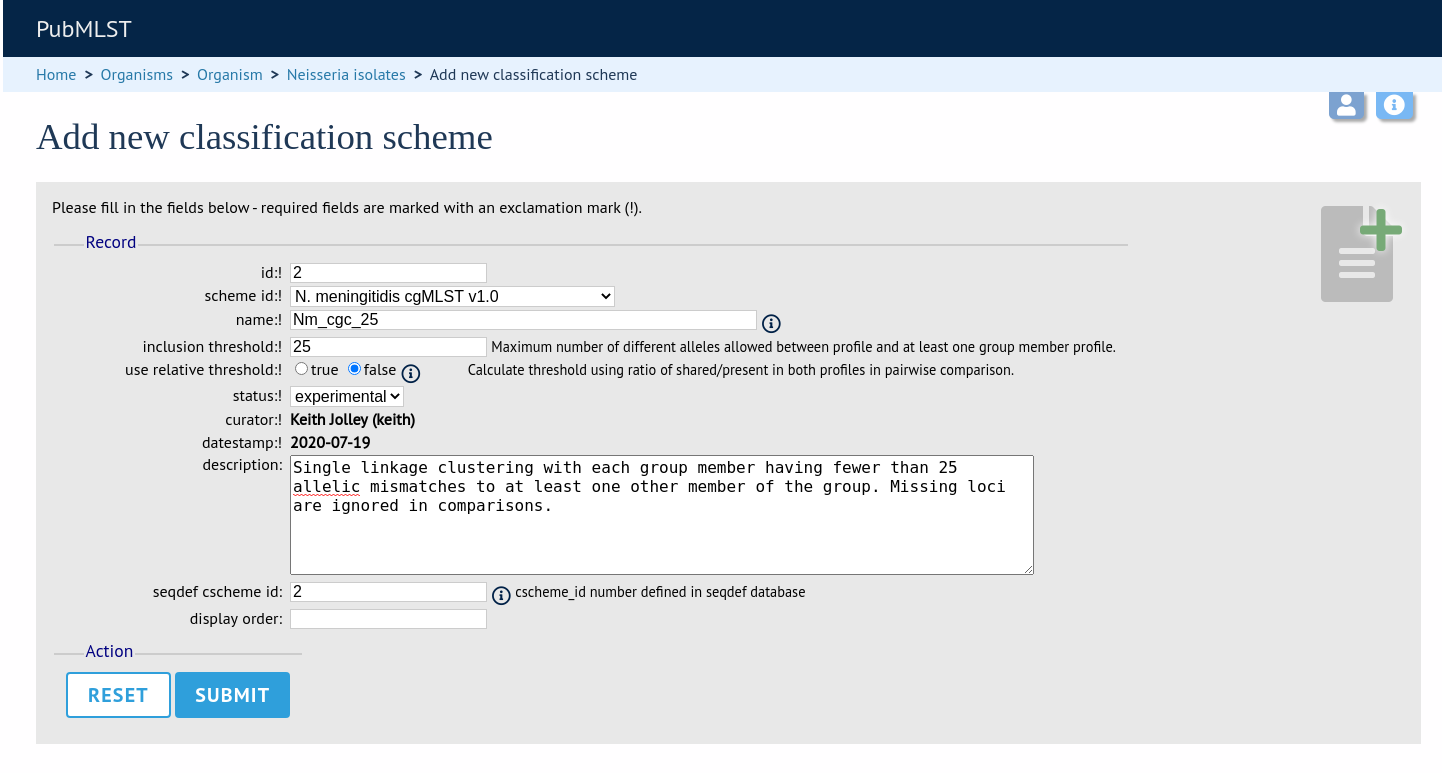
It is a good idea to check the configuration.
Clustering
Clustering is performed using the cluster.pl script found in the scripts/automation directory of the BIGSdb package. It should be run by the bigsdb user account (or any account with access to the databases).
Currently only single-linkage clustering is supported.
The script is run as follows from the command line:
cluster.pl --database <database configuration> --cscheme <classification scheme id>
A full list of options can be found by typing:
cluster.pl --help
NAME
    cluster.pl - Cluster cgMLST profiles using classification groups.

SYNOPSIS
    cluster.pl --database NAME --cscheme_id SCHEME_ID [options]

OPTIONS

--cscheme CLASSIFICATION_SCHEME_ID
    Classification scheme id number.

--database NAME
    Database configuration name.

--help
    This help page.

--reset
    Remove all groups and profiles currently defined for classification group.
Note
Note that for classification schemes to be accessible within the isolate database, scheme cache tables must be generated and kept up-to-date.
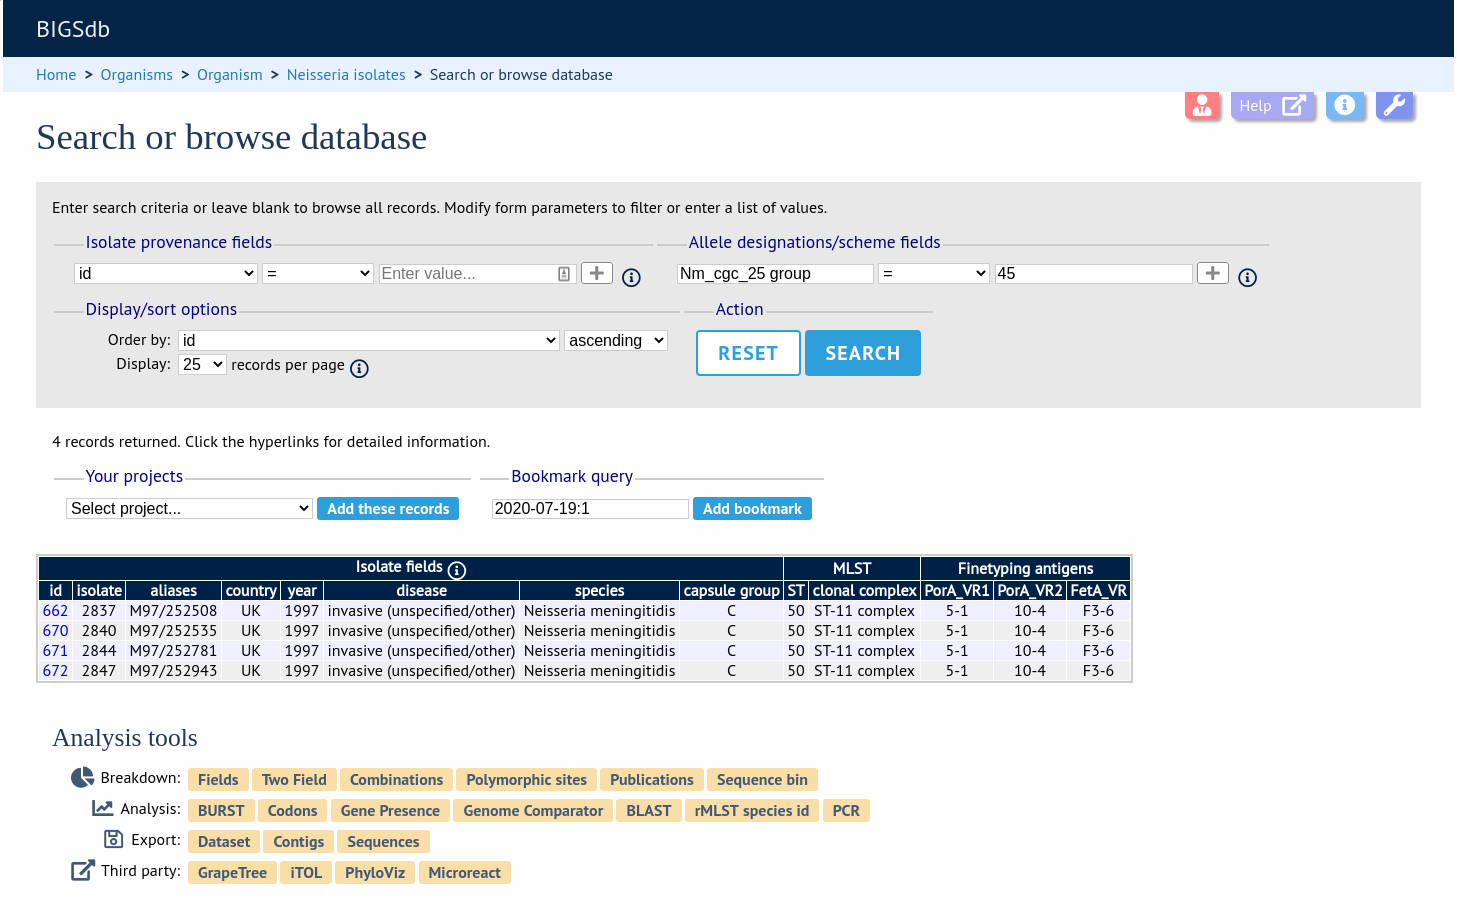
Where an isolate has been clustered in to a group with other isolates, this information is available in the isolate information page.
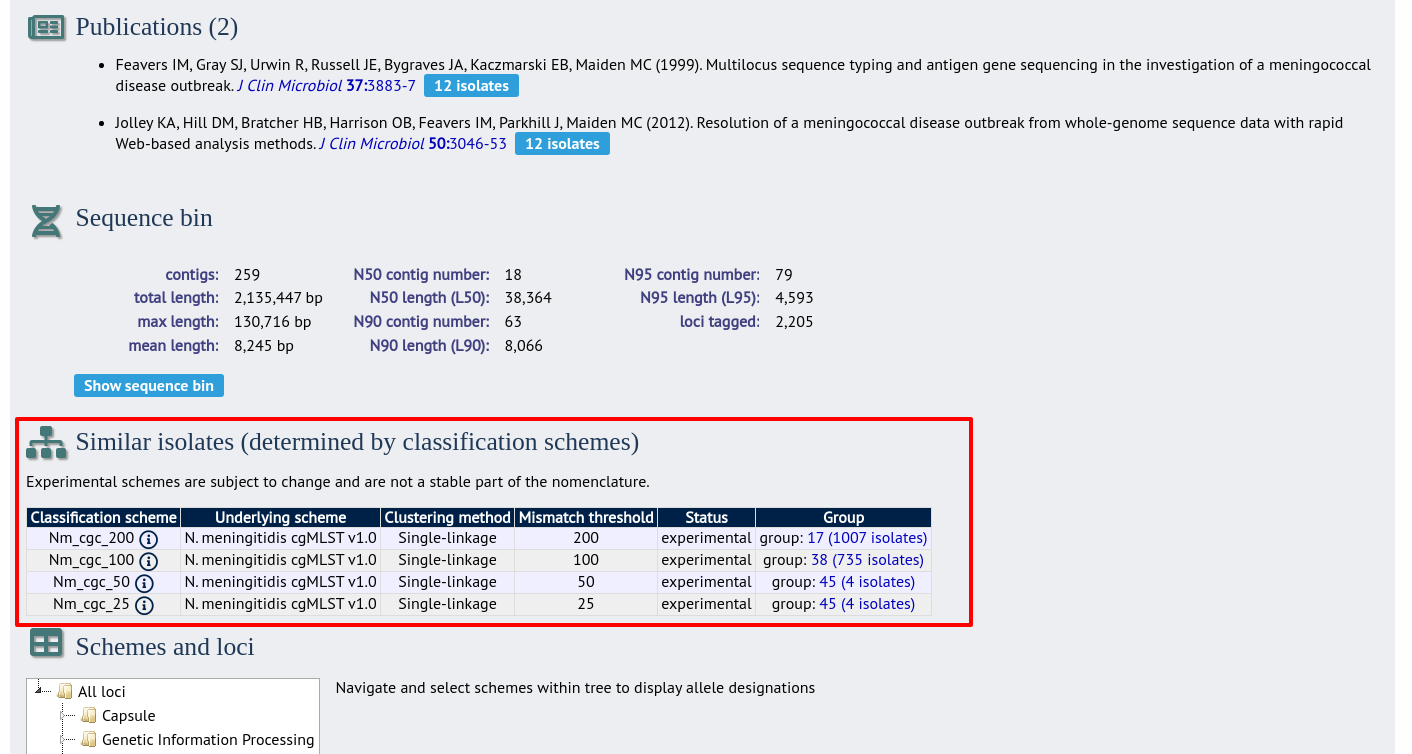
Clicking the hyperlinks will take you to a table containing matching isolates, from where standard analyses can be performed.
Defining new loci based on annotated reference genome
An annotated reference genome can be used as the basis of defining loci. The ‘Databank scan’ function will create an upload table suitable for pasting directly in to the batch locus add form of the sequence definition or isolate databases.
Click ‘Database scan’ within the ‘Loci’ group on the curator’s contents page. This function is normally hidden, so you may need to click the ‘Loci’ toggle to display it.

Enter an EMBL or Genbank accession number for a complete annotated genome and press ‘Submit’.
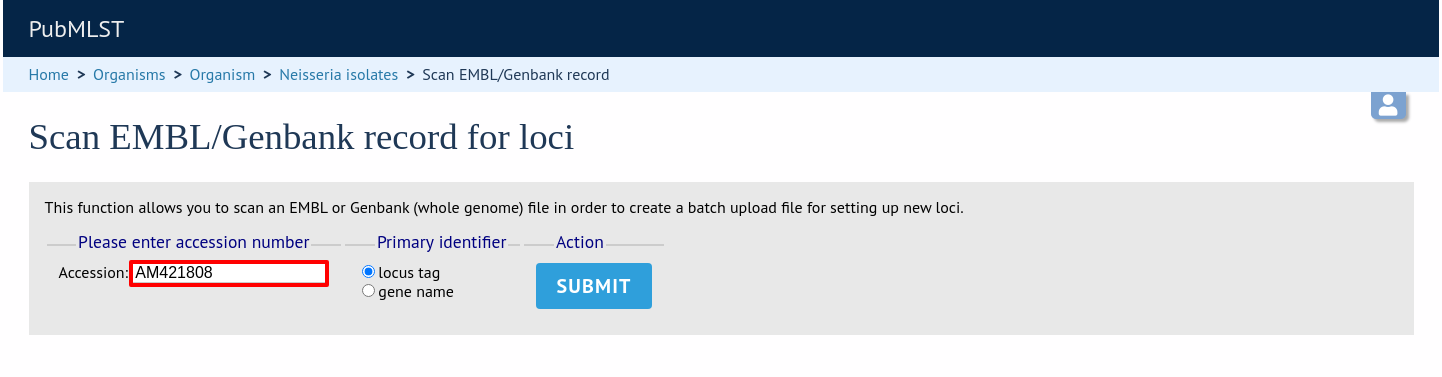
A table of loci will be generated provided a valid accession number is provided.
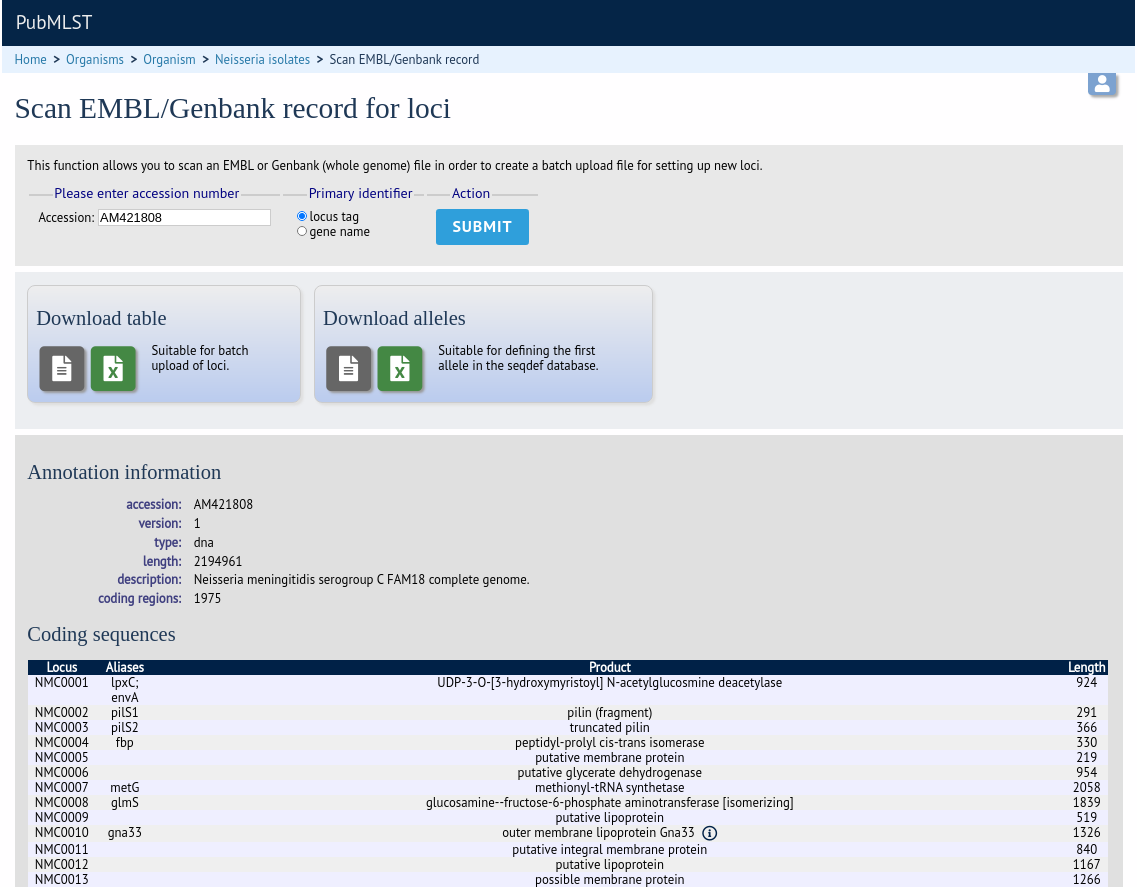
Tab-delimited text and Excel format files will be created to be used as the basis for upload files for the sequence definition and isolate databases. Batch sequence files, in text and Excel formats, are also created for defining the first allele once the locus has been set up in the sequence definition database.
Setting up LINcode definitions for cgMLST schemes
Note
The idea behind LINcodes is described in Hennart et al. 2021 bioRxiv 2021.07.26.453808.
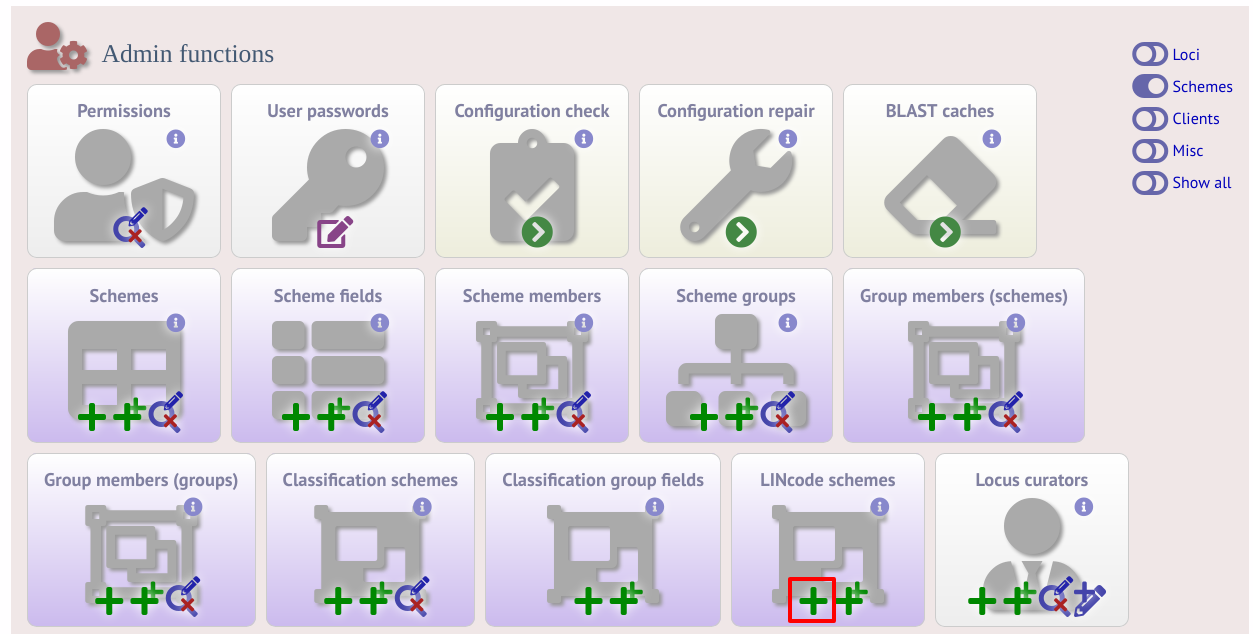
LINcode schemes can be defined by administrators by clicking the add LINcode scheme button within the ‘Schemes’ group on the curator index page of both the sequence definition and isolate databases. This function is normally hidden, so you may need to click the ‘Schemes’ toggle to display it. An indexed scheme, e.g. MLST or cgMLST whereby a field defines each unique combination of alleles, needs to be defined before the link will be enabled.
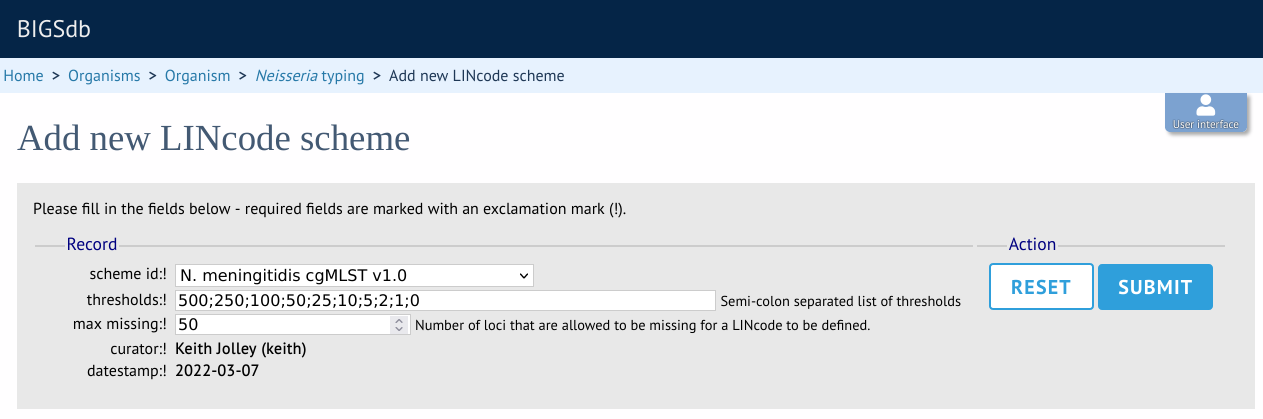
Select the indexed scheme from the dropdown list and enter your locus thresholds in descending order as a semi-colon separated list, e.g. 500;250;100;50;25;10;5;2;1;0. Also enter the number of missing alleles that are allowed within a profile for a LINcode to be assigned. Click ‘Submit’.
If LINcodes have been previously defined, the existing assignments can be uploaded by clicking the batch add LINcodes button (sequence definition database). This allows you to copy and paste assignments from a spreadsheet template. The template consists of the index field (e.g. cgST), and separate columns for each threshold level.
LINcodes can then be assigned automatically using the lincodes.pl script found within the scripts/maintenance directory. A full list of arguments can be found by typing:
lincodes.pl --help
NAME
    lincodes.pl - Define LINcodes from cgMLST profiles.

SYNOPSIS
    lincodes.pl --database DB_CONFIG --scheme SCHEME_ID [options]

OPTIONS

--batch_size NUMBER
    Sets a maximum number of profiles to use to initiate assignment order.
    The order of assignment is optimally determined using Prim's algorithm,
    but can take a long time if there are thousands of profiles. Up to the
    number of profiles set here will be ordered and assigned first before
    further batches are ordered and assigned. The default value is 10,000
    but it is recommended that you allow ordering to be determined from all
    defined profiles if LINcodes have not been previously determined, i.e.
    set this value to greater than the number of assigned profiles.

--database DATABASE CONFIG
    Database configuration name. This must be a sequence definition database.

--missing NUMBER
    Set the maximum number of loci that are allowed to be missing in a profile
    for LINcodes to be assigned. If not set, the value defined in the LINcode
    schemes table will be used.

--mmap
    Write distance matrix to disk rather than memory. Use this if calculating a
    very large distance matrix on a machine with limited memory. This may run
    slower.

--quiet
    Only output errors.

--scheme SCHEME ID
    Scheme id number for which a LINcode scheme has been defined.
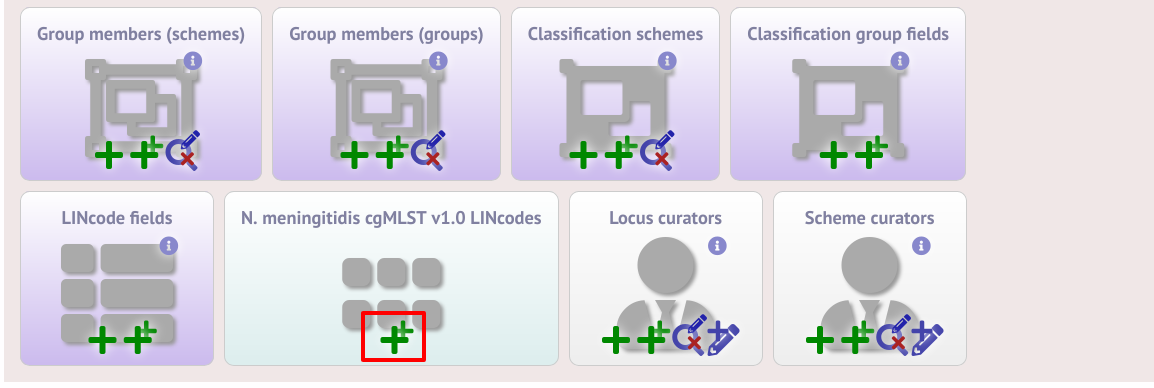
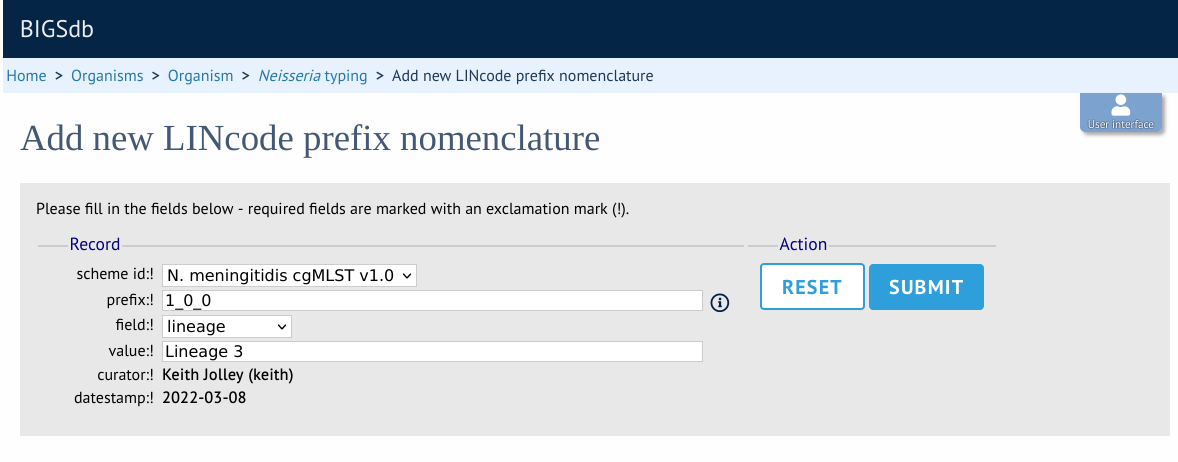
It is also possible to provide nomenclature for specific LINcode prefixes. These can be used to define lineages or sublineages. LINcode fields are first defined by clicking the add lincode field button.

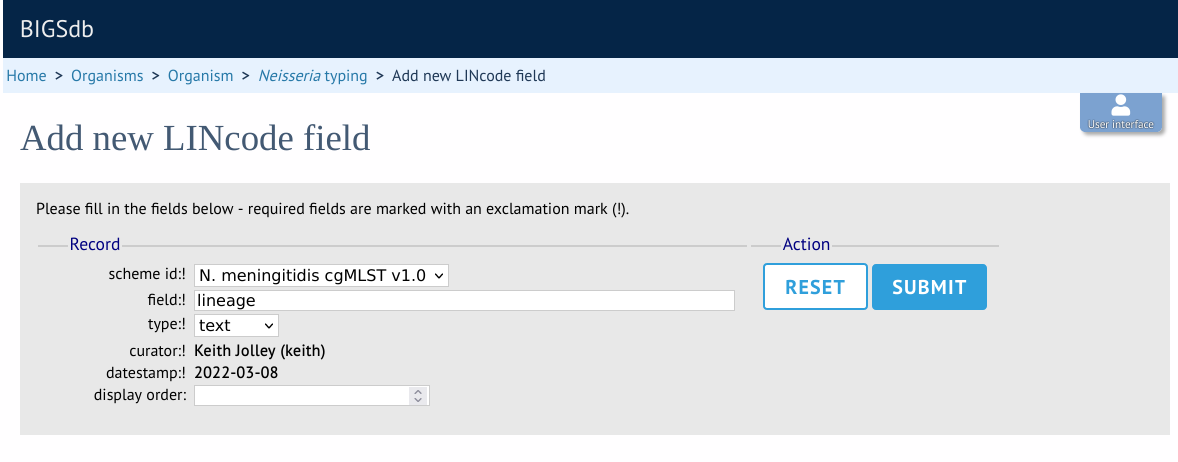
Enter the name of the field you wish to define, e.g. ‘lineage’ and the data type for any values (either text or integer).
A new menu item called ‘LINcode prefix nomenclature’ will appear in the curator part of the index page. It is hidden by default so you may need to click the ‘Show all’ button. Click the add button.

Enter a LINcode prefix (left-hand part of LINcode) and assign a name to it. Make sure you do the same in both the sequence definition and isolate databaase. You will then be able to search isolates based on these field values and they will appear in isolate records.
Genome filtering
Within a genome there may be multiple loci that share allele pools. If an allele sequence is tagged from a genome using only BLAST then there is no way to determine which locus has been identified. It is, however, possible to further define loci by their context, i.e. surrounding sequence.
Filtering by in silico PCR
Provided a locus can be predicted to be specifically amplifed by a PCR reaction, the genome can be filtered to only look at regions predicted to fall within amplification products of one or more PCR reactions. Since this is in silico we don’t need to worry about problems such as sequence secondary structure and primers can be any length.
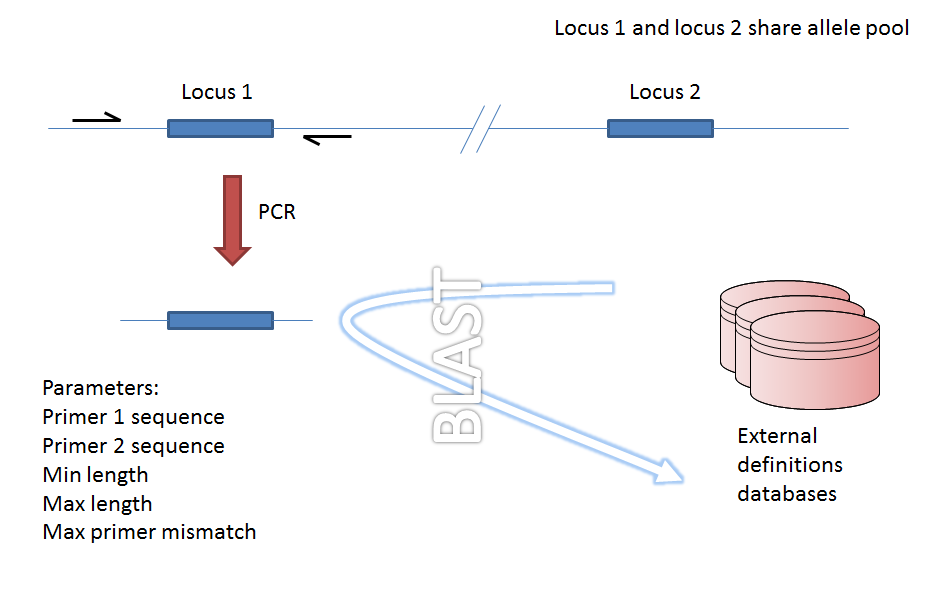
Genome filtering by in silico PCR.
To define a PCR reaction that can be linked to a locus definition, click the add (+) PCR reaction link on the curator’s main page. This function is normally hidden, so you may need to click the ‘Loci’ toggle to display it.
In the resulting web form you can enter values for your two primer sequences (which can be any length), the minimum and maximum lengths of reaction products you wish to consider and a value for the allowed number of mismatches per primer.
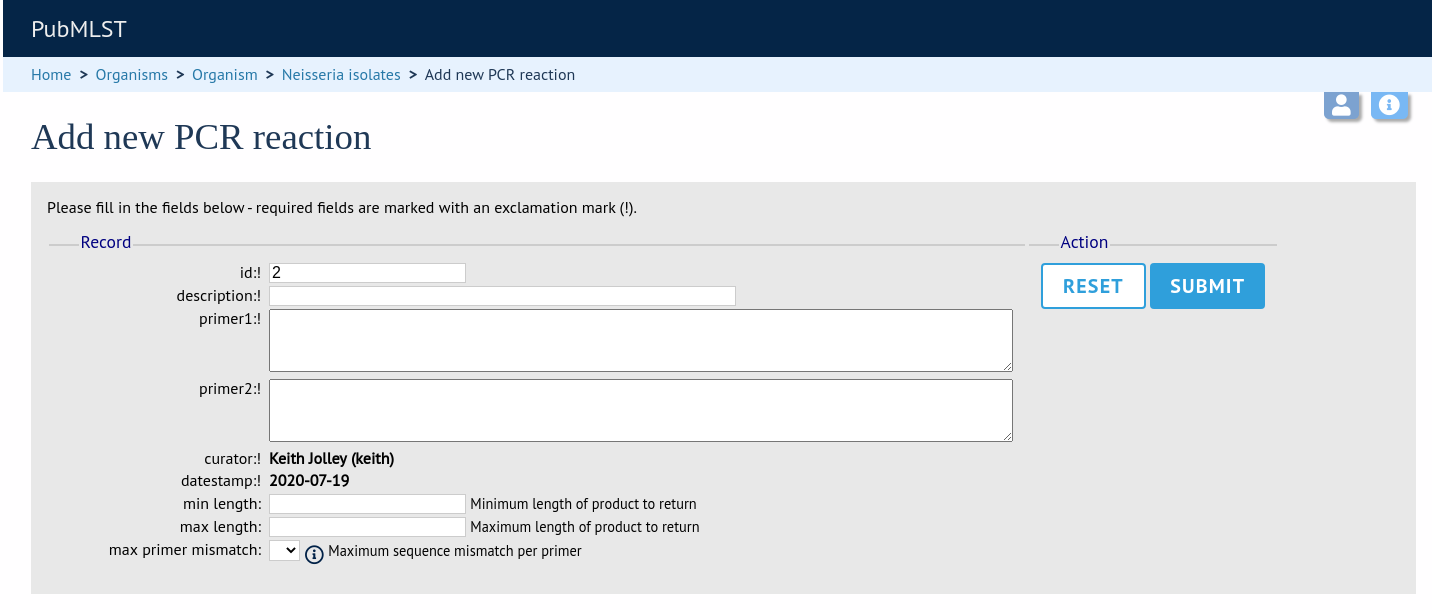
id - PCR reaction identifier number.
Allowed: integer.
description - Description of PCR reaction product.
Allowed: any text.
primer1 - Primer 1 sequences
Allowed: nucleotide sequence (IUPAC ambiguous characters allowed).
primer2 - Primer 2 sequence.
Allowed: nucleotide sequence (IUPAC ambiguous characters allowed).
min_length - Minimum length of predicted PCR product.
Allowed: integer.
max_length - Maximum length of predicted PCR product.
max_primer_mismatch - Number of mismatches allowed in primer sequence.
Allowed: integer.
Do not set this too high or the simulation will run slowly.
Associating this with a particular locus is a two step process. First, create a locus link by clicking the add (+) PCR locus link on the curator’s main page. This link will only appear once a PCR reaction has been defined.
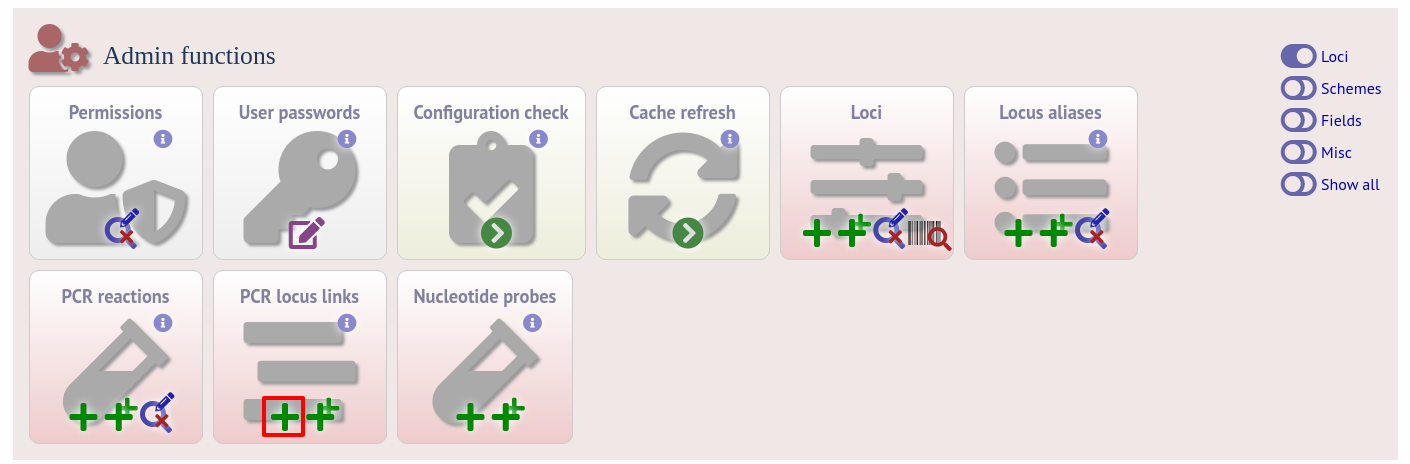
Select the locus and PCR reaction name from the dropdown lists to create the link. You also need to edit the locus table and set the pcr_filter field to ‘true’.
Now when you next perform tag scanning there will be an option to use PCR filtering.
Filtering by in silico hybridization
An alternative is to define a locus by proximity to a single probe sequence. This is especially useful if you have multiple contigs and the locus in question may be at the end of a contig so that it doesn’t have upstream or downstream sequence available for PCR filtering.
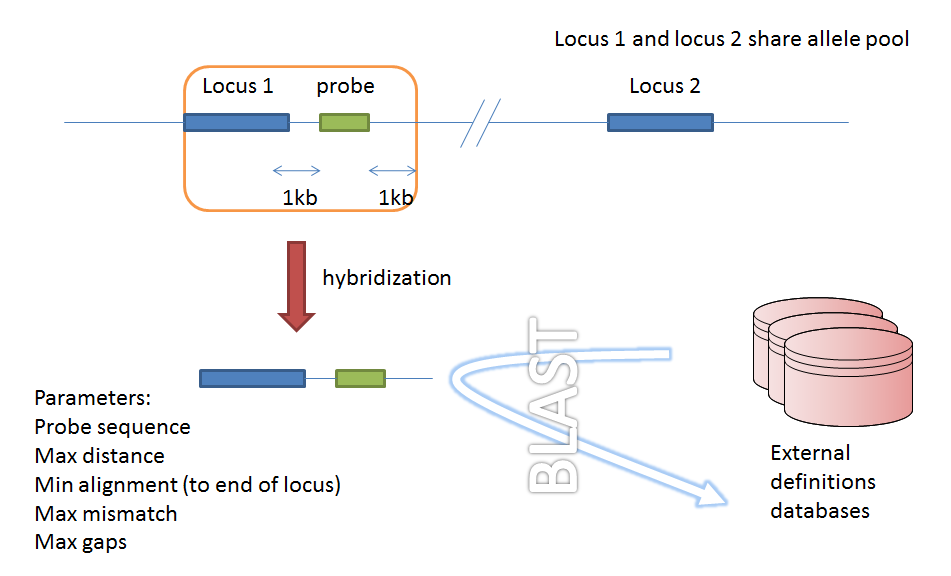
Filtering by in silico hybridization
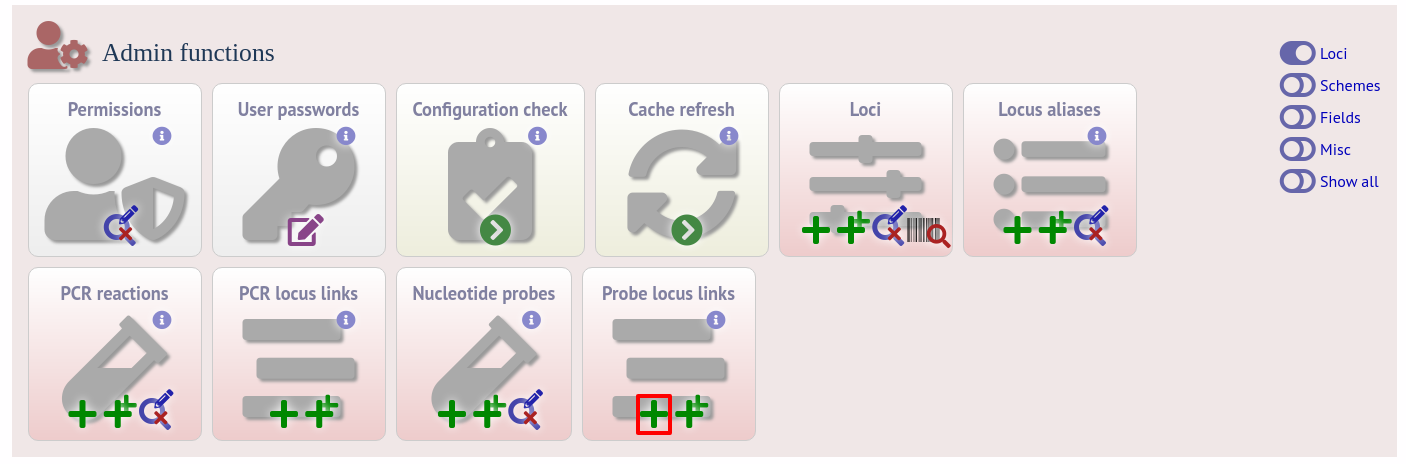
The process is very similar to setting up PCR filtering, but this time click the nucleotide probe link on the curator’s content page.

Enter the nucleotide sequence and a name for the probe. Next you need to link this to the locus in question. Click the add (+) probe locus links link on the curator’s main page. This link will only appear once a probe has been defined.
Fill in the web form with appropriate values. Required fields have an exclamation mark (!) next to them:
probe_id - Dropdown list of probe names.
Allowed: selection from list.
locus - Dropdown list of loci.
Allowed: selection from list.
max_distance - Minimum distance of probe from end of locus.
Allowed: any positive integer.
min_alignment - Minimum length of alignment allowed.
Allowed: any positive integer.
max_mismatch - Maximum number of mismatches allowed in alignment.
Allowed: any positive integer.
max_gaps - Maximum number of gaps allowed in alignment.
Allowed: any positive integer.
Finally edit the locus table and set the probe_filter field for the specified locus to ‘true’.
Now when you next perform tag scanning there will be an option to use probe hybridization filtering.
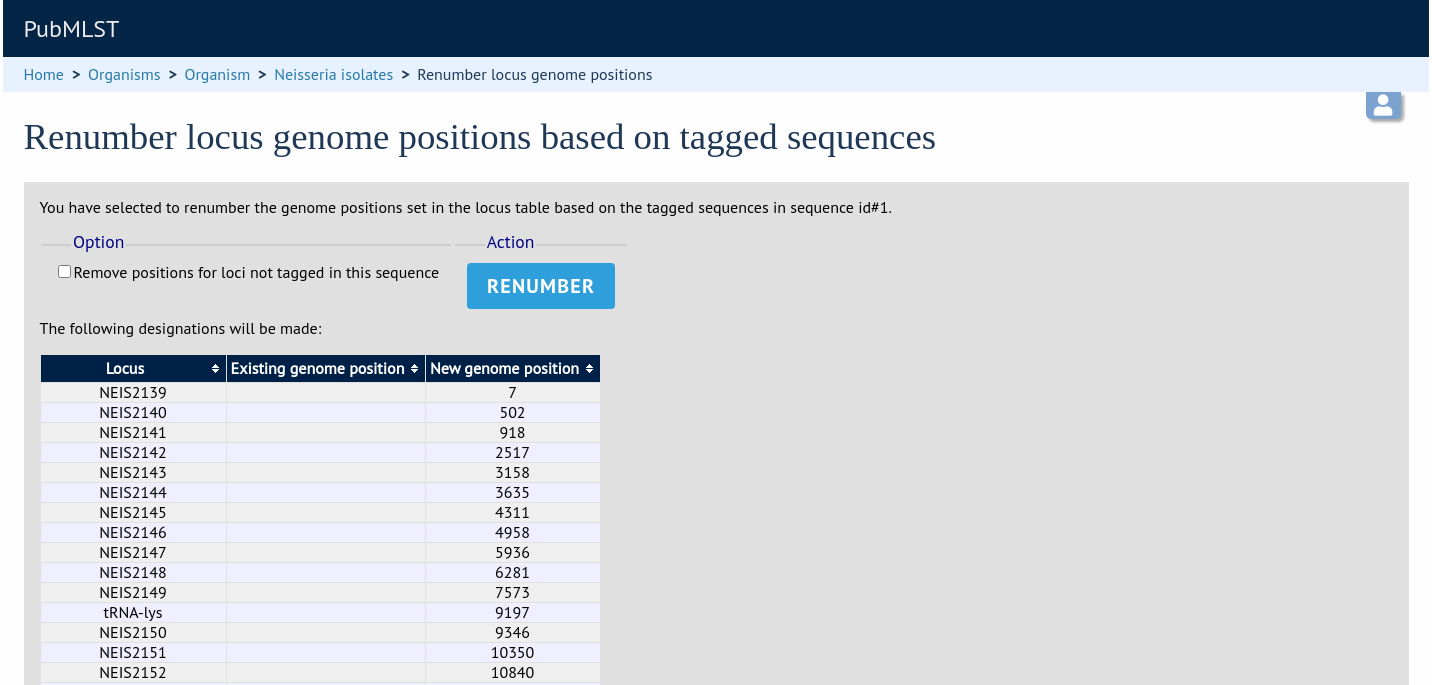
Setting locus genome positions
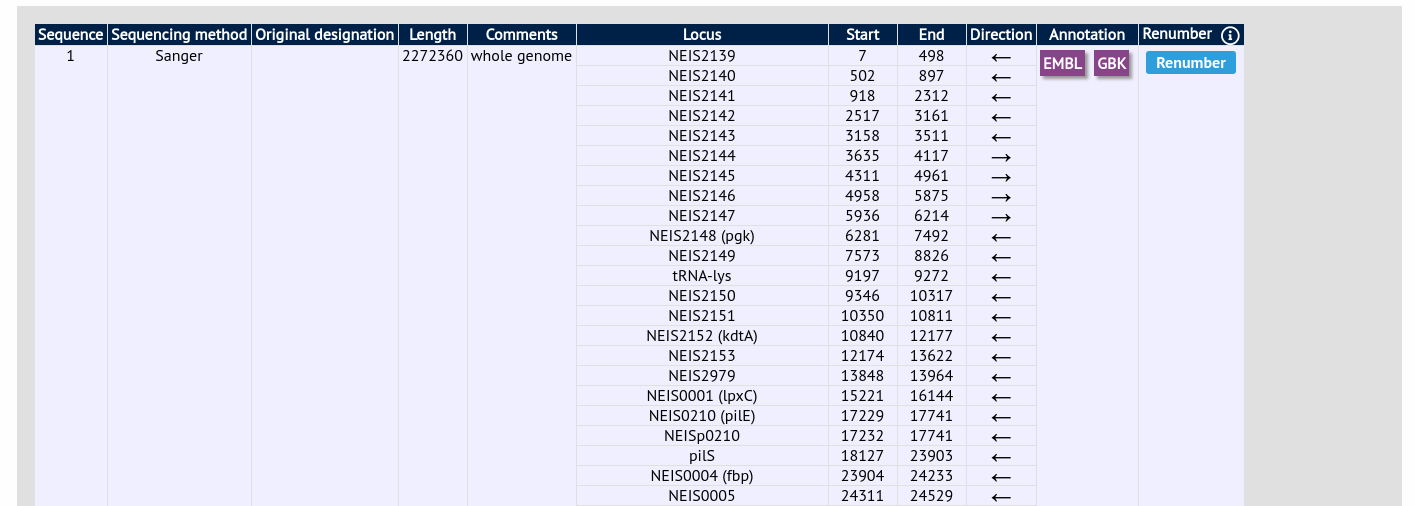
The genome position for a locus can be set directly by editing the locus record. To batch update multiple loci based on a tagged genome, however, a much easier way is possible. For this method to work, the reference genome must be represented by a single contig.
From the curator’s main page, you need to do a query to find the isolate that you will base your numbering on. Click ‘isolate query’ to take you to a standard query form.
Perform your search and click the hyperlinked id number of the record.
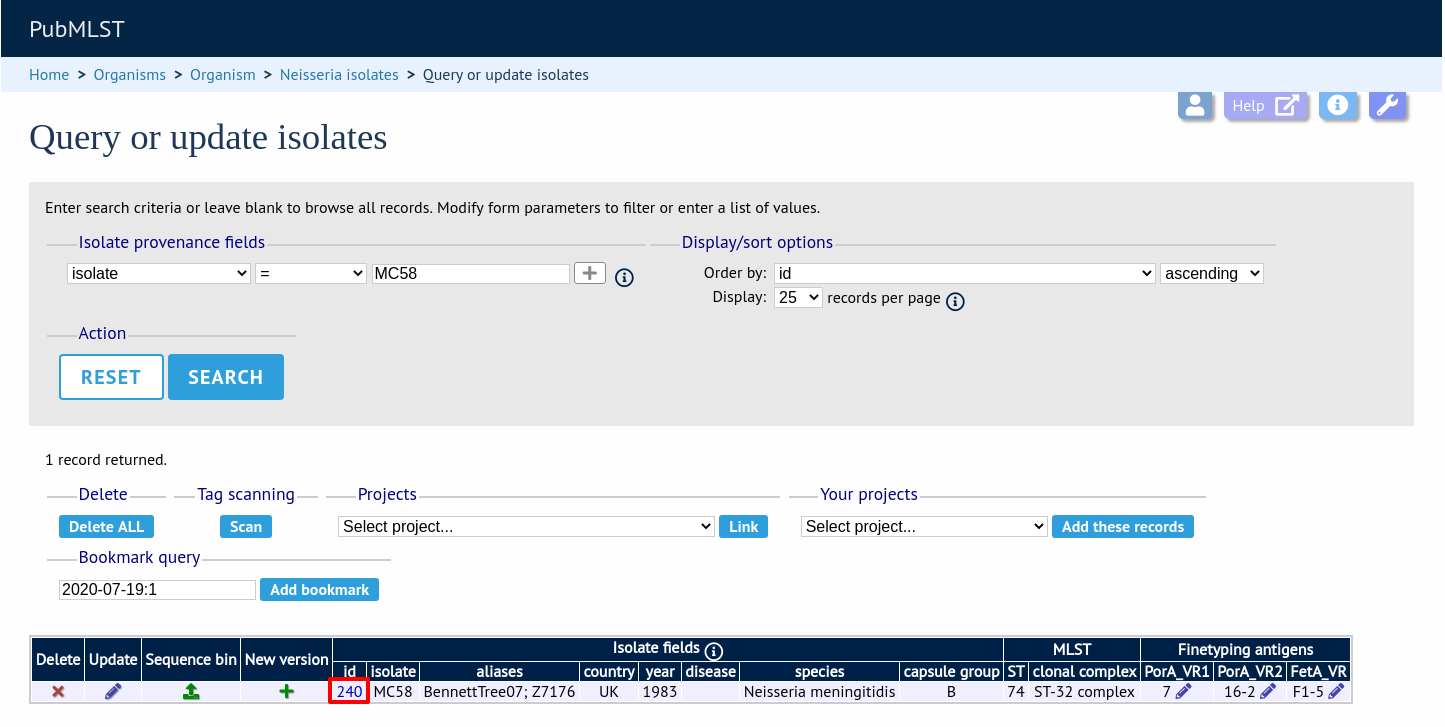
In the isolate record, click the ‘Show sequence bin’ button to bring up details of the isolate contigs.

Click the ‘Renumber’ button:
A final confirmation screen is displayed with the option to remove existing numbering that doesn’t appear within the reference genome. Click ‘Renumber’.
Defining composite fields
Composite fields are virtual fields that don’t themselves exist within the database but are made up of values retrieved from other fields or schemes and formatted in a particular way. They are used for display and analysis purposes only and can not be searched against.
One example of a composite field is used in the Neisseria PubMLST database which has a strain designation composite field made up of serogroup, PorA VR1 and VR2, FetA VR, ST and clonal complex designations in the format:
[serogroup]: P1.[PorA_VR1],[PorA_VR2]: [FetA_VR]: ST-[ST] ([clonal_complex])
e.g. A: P1.5-2,10: F1-5: ST-4 (cc4)
Additionally, the clonal complex field in the above example is converted using a regular expression from ‘ST-4 complex/subgroup IV’ to ‘cc4’.
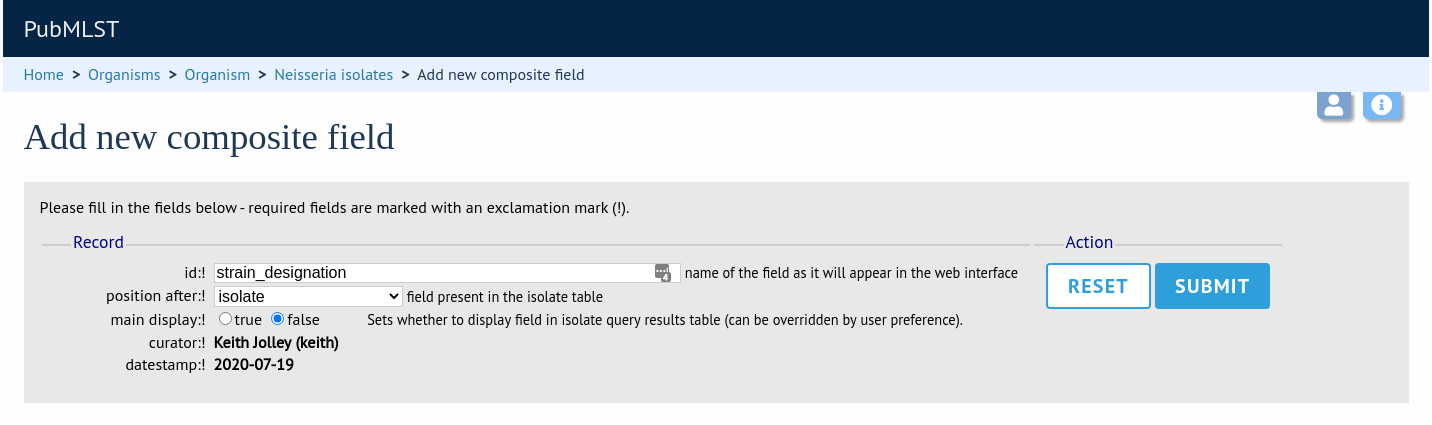
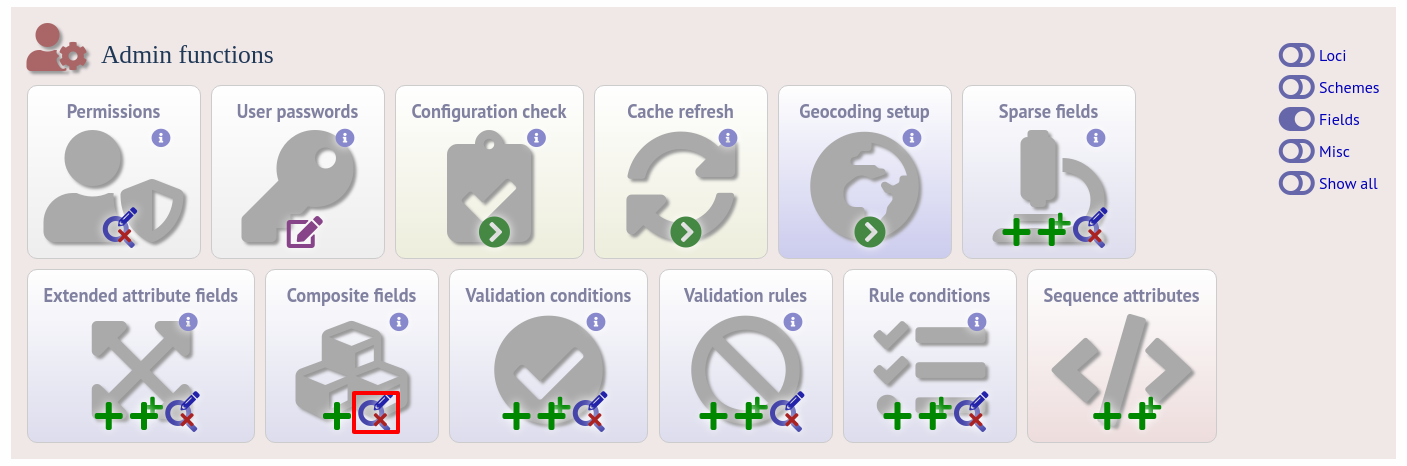
Composite fields can be added to the database by clicking the add (+) composite fields link on the curator’s main page. This function is normally hidden, so you may need to click the ‘Fields’ toggle to display it.

Initially you just enter a name for the composite field and after which field it should be positioned. You can also set whether or not it should be displayed by default in main results tables following a query - this is overrideable by user preferences.
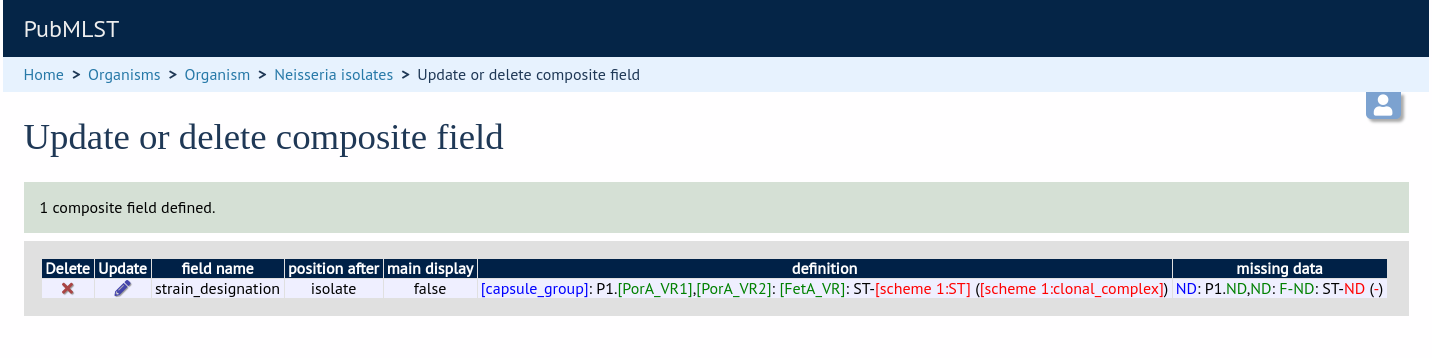
Once the field has been created it needs to be defined. This can be done from query composite field link on the main curator’s page.
Select the composite field from the list and click ‘Update’.
From this page you can build up your composite field from snippets of text, isolate field, locus and scheme field values. Enter new values in the boxes at the bottom of the page.
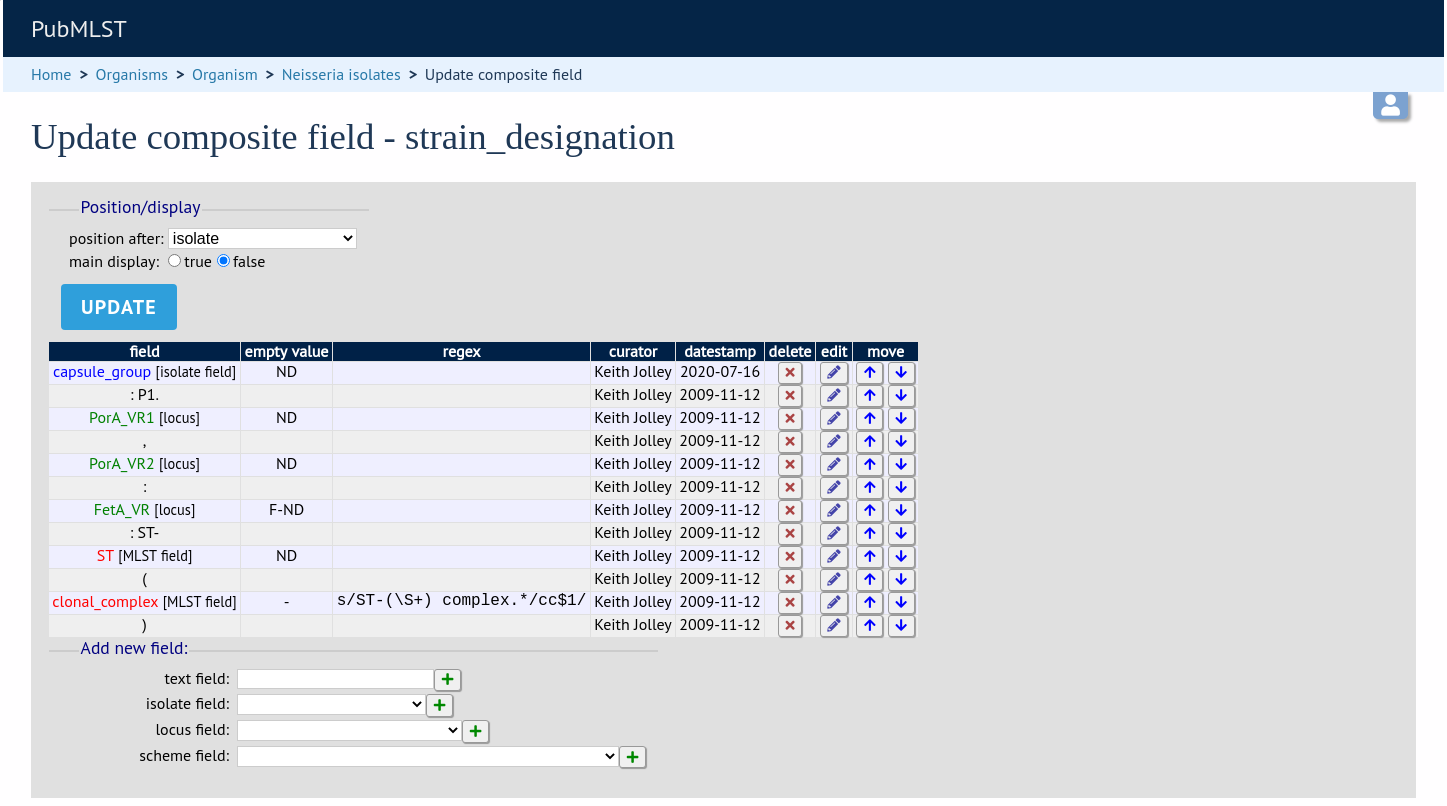
Once a field has been added to the composite field, it can be edited by clicking the ‘edit’ button next to it to add a regular expression to modify its value by specific rules, e.g. in the clonal complex field above, the regular expression is set as:
s/ST-(\S+) complex.*/cc$1/
which extracts one or more non-space characters following the ‘ST-’ in a string that then contains the work ‘complex’, and appends this to ‘cc’ to produce the final string.
This will convert ‘ST-4 complex/subgroup IV’ to ‘cc4’.
You can also define text to be used for when the field value is missing, e.g. ‘ND’.
Extended provenance attributes (lookup tables)
Lookup tables can be associated with an isolate database field such that the database can be queried by extended attributes. An example of this is the relationship between continent and country - every country belongs to a continent but you wouldn’t want to store the continent with each isolate record (not only could data be entered inconsistently but it’s redundant). Instead, each record may have a country field and the continent is then determined from the lookup table, allowing, for example, a search of isolates limited to those from Europe.
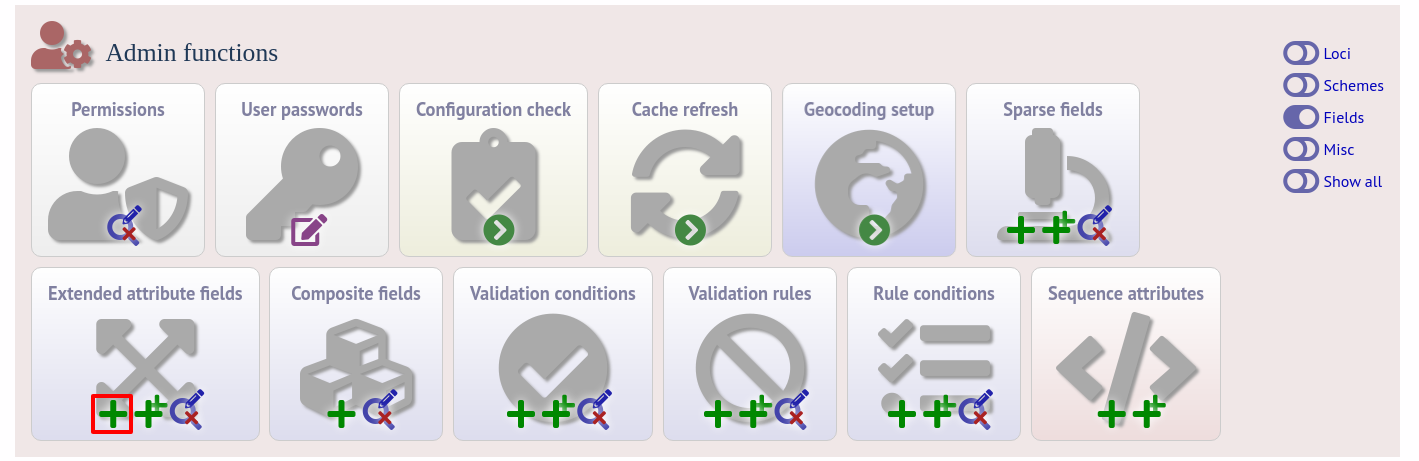
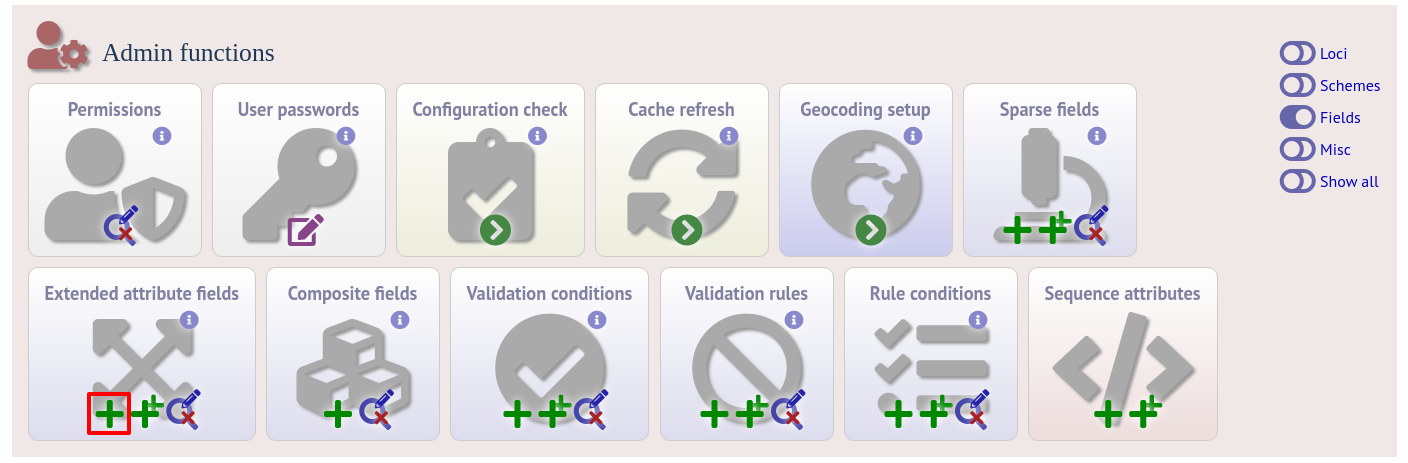
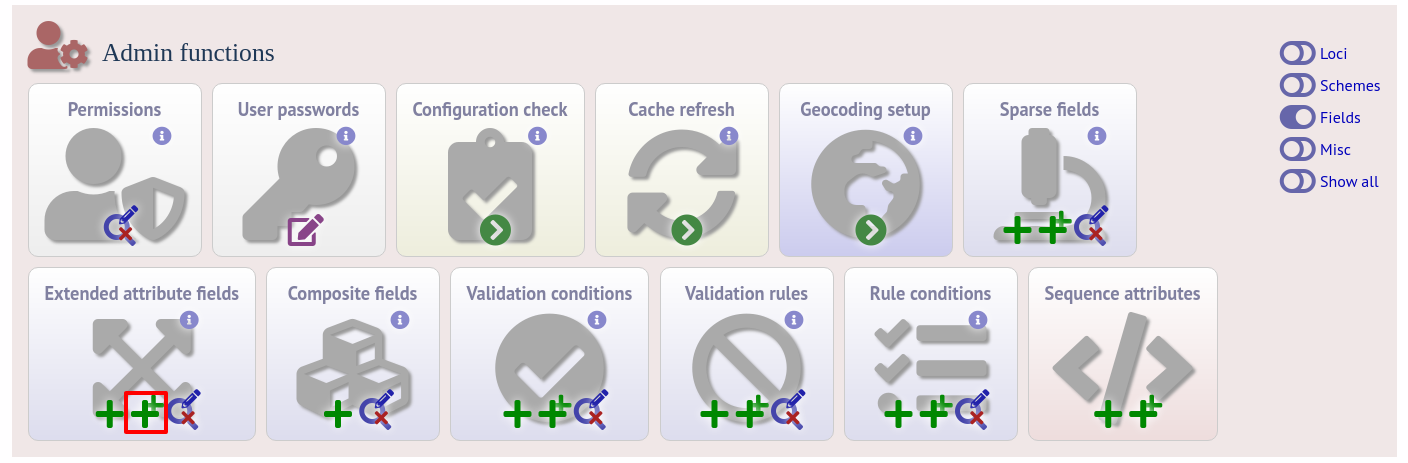
To set up such an extended attribute, click the add (+) isolate field extended attributes link on the curator’s main page. This function is normally hidden, so you may need to click the ‘Fields’ toggle to display it.
Fill in the web form with appropriate values. Required fields have an exclamation mark (!) next to them:
isolate_field - Dropdown list of isolate fields.
Allowed: selection from list.
attribute - Name of extended attribute, e.g. continent.
Allowed: any text (no spaces).
value_format - Format for values.
Allowed: integer/float/text/date.
value_regex - Regular expression to enforce allele id naming.
^: the beginning of the string
$:the end of the string
d: digit
D: non-digit
s: white space character
S: non white space character
w: alpha-numeric plus ‘_’
.: any character
*: 0 or more of previous character
+: 1 or more of previous character
e.g. ^Fd-d+$ states that a value must begin with a F followed by a single digit, then a dash, then one or more digits, e.g. F1-12
description - Long description - this isn’t currently used but may be in the future.
Allowed: any text.
url - URL used to hyperlink values in the isolate information page. Instances of [?] within the URL will be substituted with the value.
Allowed: any valid URL (either relative or absolute).
length - Maximum length of extended attribute value.
Allowed: any positive integer.
field_order - Integer that sets the order of the field following it’s parent isolate field.
Allowed: any integer.
The easiest way to populate the lookup table is to do a batch update copied from a spreadsheet. Click the batch add (++) isolate field extended attribute values link on the curator’s main page (this link will only appear once an extended attribute has been defined). This function is normally hidden, so you may need to click the ‘Show all’ toggle to display it.
Download the Excel template:
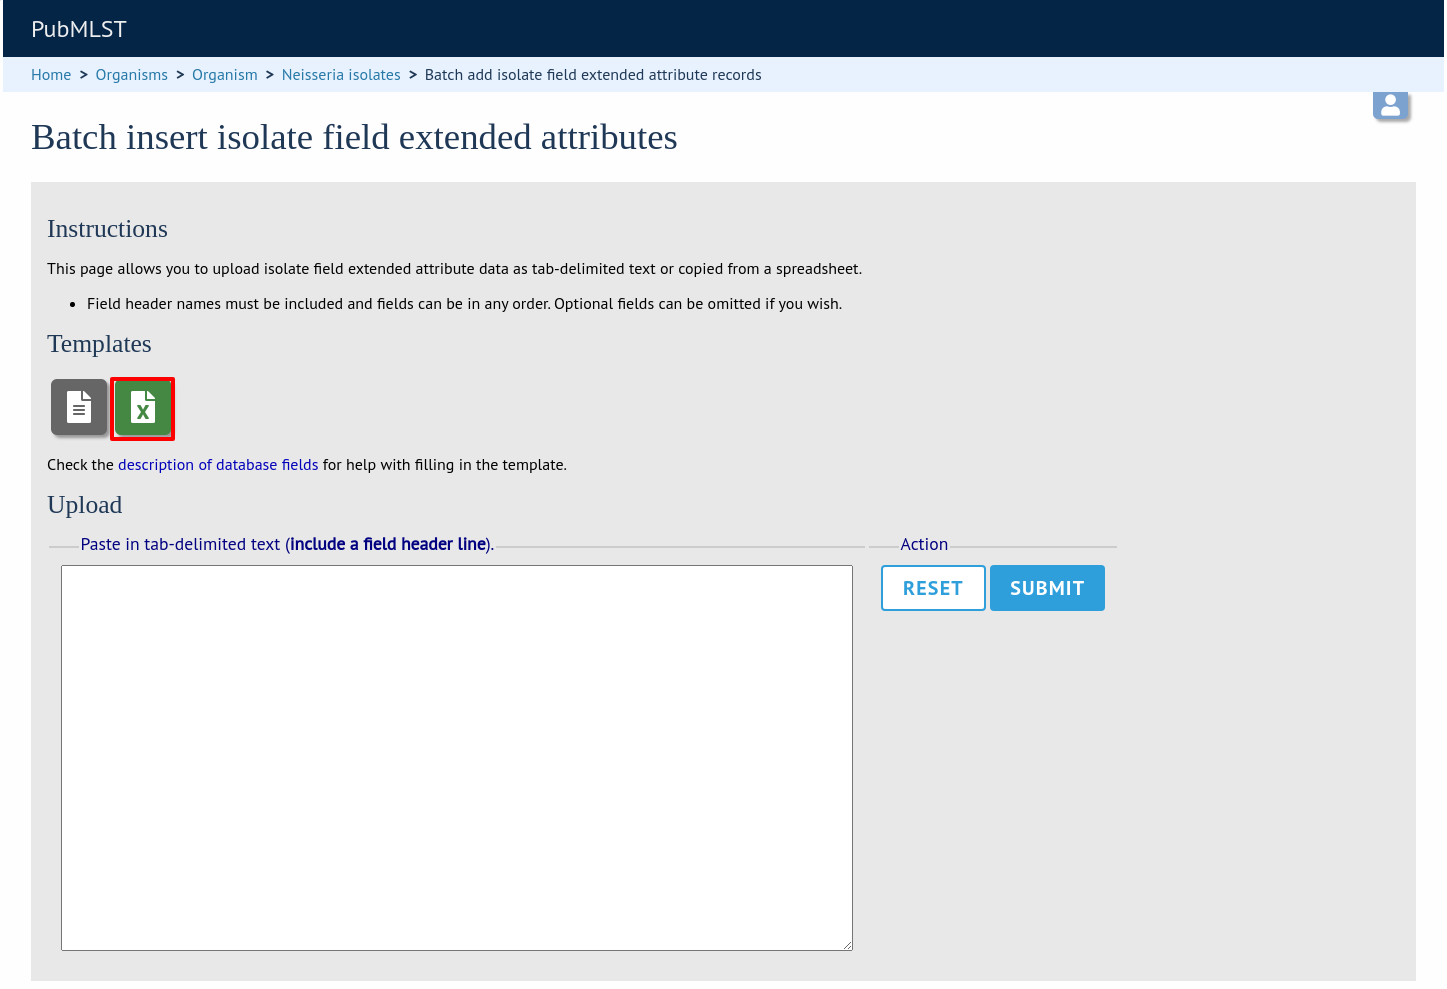
Fill in the columns with your values, e.g.
isolate_field
attribute
field_value
value
country
continent
Afghanistan
Asia
country
continent
Albania
Europe
country
continent
Algeria
Africa
country
continent
Andorra
Europe
country
continent
Angola
Africa
Paste from the spreadsheet in to the upload form and click ‘Submit’.
Sequence bin attributes
It is possible that you will want to store extended attributes for sequence bin contigs when you upload them. Examples may be read length, assembler version, etc. Since there are almost infinite possibilities for these fields, and they are likely to change over time, they are not hard-coded within the database. An administrator can, however, create their own attributes for a specific database and these will then be available in the web form when uploading new contig data. The attributes are also searchable.
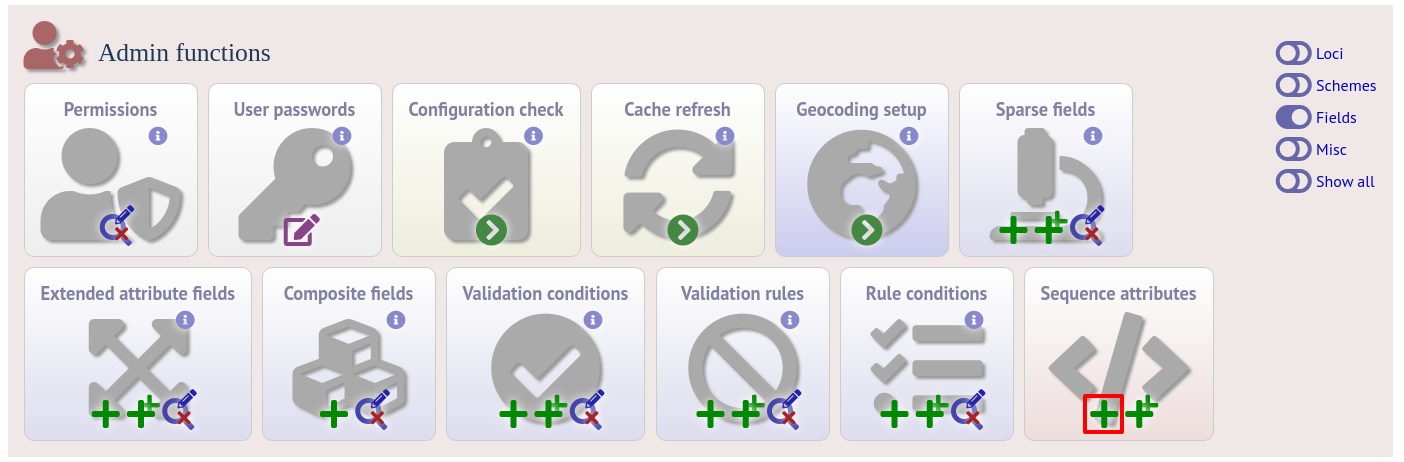
To set up new attributes, click the add (+) ‘sequence attributes’ link on the isolate database curator’s index page. This function is normally hidden, so you may need to click the ‘Fields’ toggle to display it.
Enter the name of the attribute as the ‘key’, select the type of data (text, integer, float, date) and an optional short description. Click ‘Submit’.
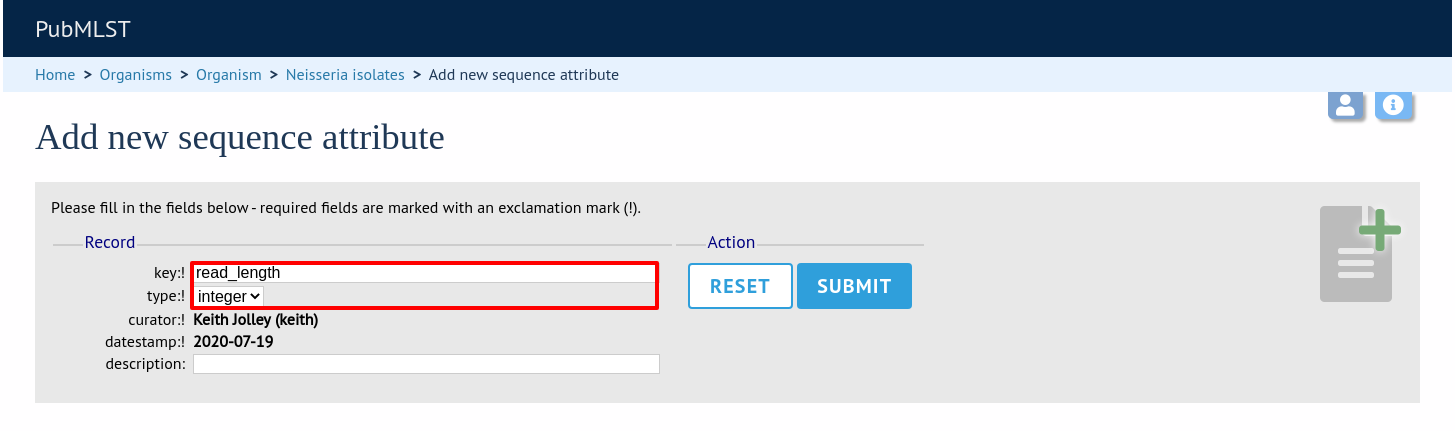
This new attribute will then be available when uploading contig data.
Checking external database configuration settings
Click the ‘Configuration check’ link on the curator’s index page.

The software will check that required helper applications are installed and executable and, in isolate databases, test every locus and scheme external database to check for connectivity and that data can be retrieved. By default, only loci which have an issue will be displayed but you can click the ‘show all loci’ link to display them all.
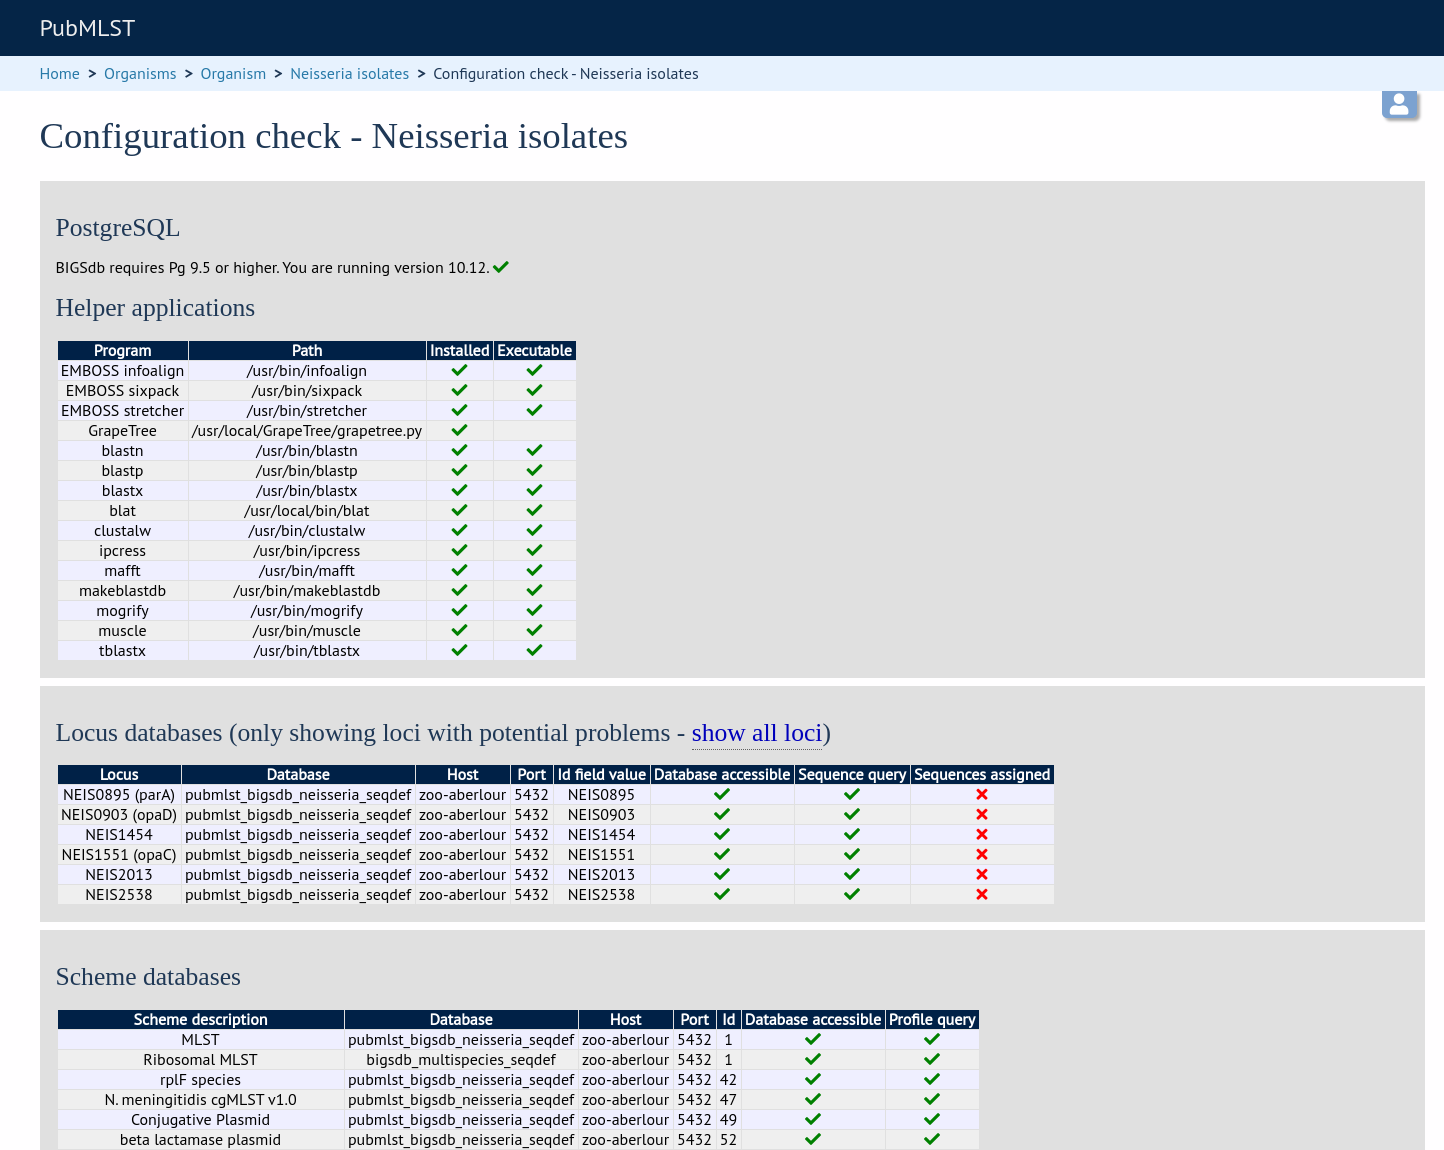
Any problems will be highlighted with a red X.
Exporting table configurations
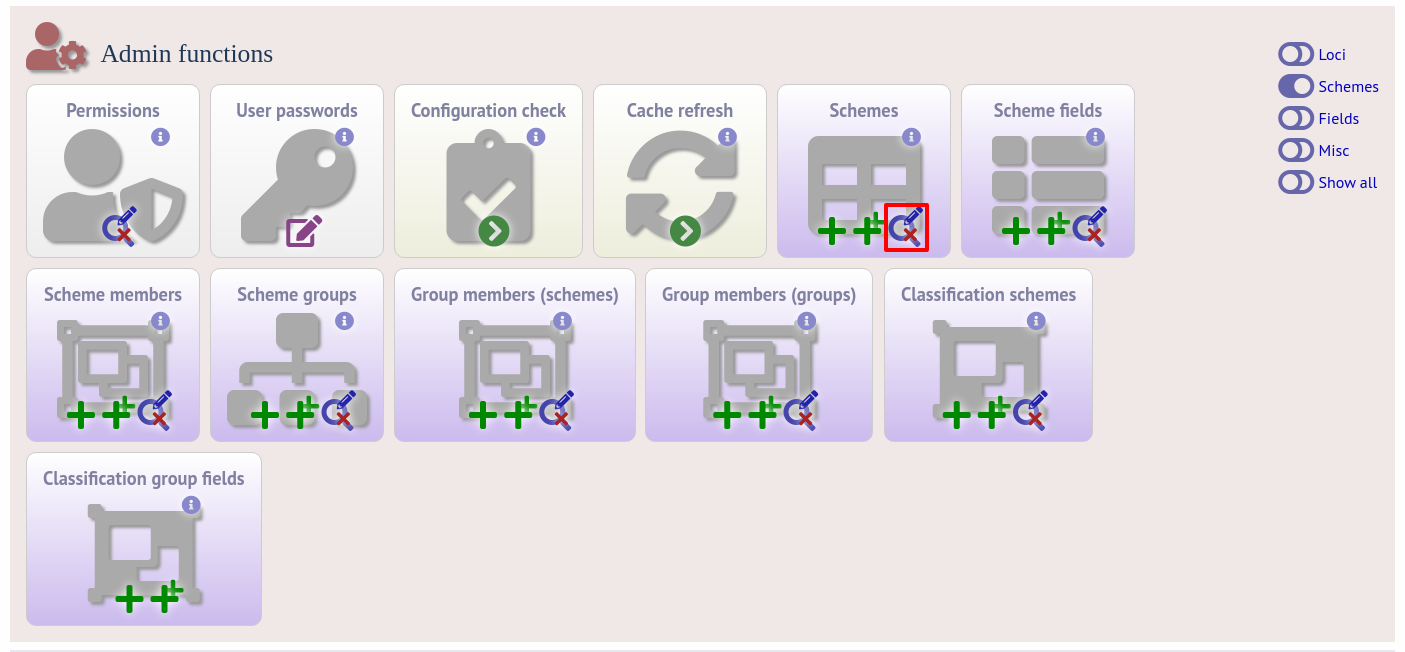
Sometimes it is useful to transfer configurations between different databases or to export a configuration for troubleshooting. Data from most of the tables can be exported in tab-delimited text format suitable for batch uploading. For example, to export scheme configuration data, click the query link (Update or delete) next to schemes in the curator’s interface. This function is normally hidden, so you may need to click the ‘Schemes’ toggle to display it.
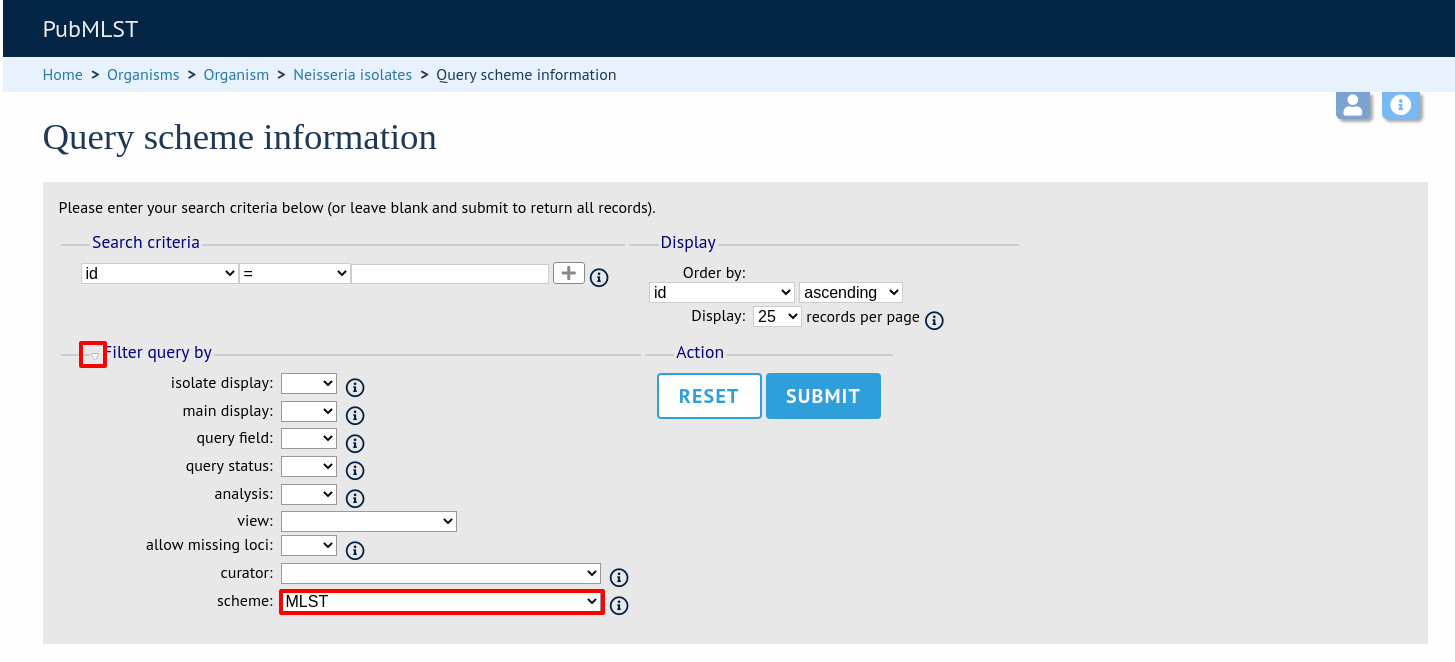
Expand the filters and select the required scheme in the dropdown box, then press submit.
Click the button ‘Export configuration/data’.
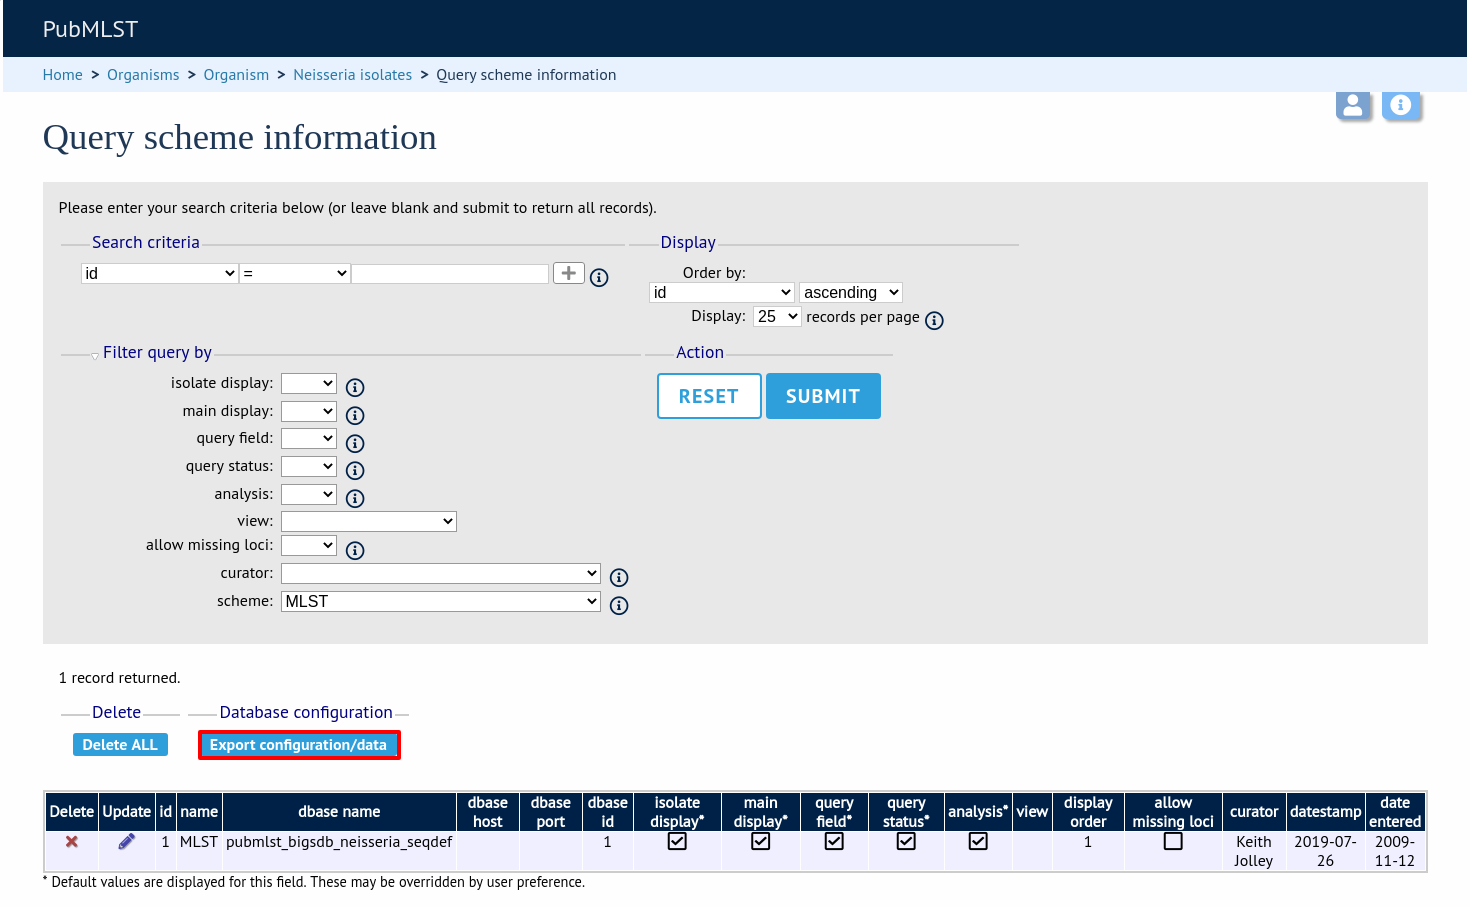
The three tables that are used to define a scheme (schemes, scheme_members and scheme_fields) are displayed in a format suitable for copy and pasting.
schemes
-------
id description dbase_name  dbase_host  dbase_port  dbase_user  dbase_password dbase_table isolate_display   main_display   query_field query_status   analysis display_order  allow_missing_loci   curator  datestamp   date_entered
1  MLST  pubmlst_bigsdb_neisseria_seqdef              mv_scheme_1 1  1  1  1  1  1     2  2012-03-22  2009-11-12

scheme_members
--------------
scheme_id   locus profile_name   field_order curator  datestamp
1  abcZ     1  2  2009-11-12
1  adk      2  2  2009-11-12
1  aroE     3  2  2009-11-12
1  fumC     4  2  2009-11-12
1  gdh      5  2  2009-11-12
1  pdhC     6  2  2009-11-12
1  pgm      7  2  2009-11-12

scheme_fields
-------------
scheme_id   field type  primary_key description field_order url   isolate_display   main_display   query_field dropdown curator  datestamp
1  ST integer  1     1  /cgi-bin/bigsdb/bigsdb.pl?page=profileInfo&db=pubmlst_neisseria_seqdef&scheme_id=1&profile_id=[?]  1  1  1  0  2  2010-01-20
1  clonal_complex text  0     2     1  1  1  1  2  2009-11-16
BLAST caches
Sequence definition databases cache any BLAST databases that they create in order to perform sequence queries. These caches can be found in subdirectories named with the database name in the temp directory defined by the secure_tmp_dir attribute in bigsdb.conf, e.g. /var/tmp/pubmlst_bigsdb_neisseria_seqdef.
These BLAST databases will be marked stale if new alleles are added to the BIGSdb database for any locus covered by the cache. A cache marked stale will be recreated the next time a matching sequence query needs to use it. BLAST databases will also be marked stale if they are older than the cache_days setting in bigsdb.conf (default = 7 days).
It is possible to also manually create and refresh these caches using the update_blast_caches.pl script found in the scripts/maintenance directory.
A full list of options can be found by typing:
update_blast_caches.pl --help

NAME
    update_cached_blast_dbs.pl - Refresh BLAST database caches

SYNOPSIS
    update_cached_blast_dbs.pl --database DB_CONFIG [options]

OPTIONS
--all_loci
    Refresh or create cache for all loci.

--database DATABASE CONFIG
    Database configuration name.

--delete_all
    Remove all cache files.

--delete_old
    Remove cache files older than the cache_days setting in bigsdb.conf or
    that have been marked stale.

--delete_single_locus
    Remove caches containing only one locus. There can be many of these and
    they can clutter the cache directory. They are generally quick to recreate
    when needed.

--help
    This help page.

--quiet
    Only show errors.

--refresh
    Refresh existing caches.

--scheme SCHEME_ID
    Refresh or create cache for specified scheme.
Config-specific file downloads
You can make files available on a static website but restrict their access only to users who can authenticate for access to the current database configuration.
This can be done by adding a file called download_files.conf to the database configuration directory within /etc/bigsdb/dbases. This file consists of three columns in tab-delimited format:
The full path of the file in the file system
Label which will be used to hyperlink to the file
A description of the file
The file type (docx, html, gif,jpg, pdf, png, tar, tar, xlsx currently supported)
The files can be downloaded directly from a BIGSdb URL: /cgi-bin/bigsdb.pl?db=CONFIG&page=downloadFiles&file=LABEL (where CONFIG is the database config name and LABEL is the label used in the download_files.conf file. These URLs can be used as standard links within a web page.
You can also list all available files with the URL: /cgi-bin/bigsdb.pl?db=CONFIG&page=downloadFiles
Navigating to these links will prompt the user to log-in if they are not already (if the database config requires this).