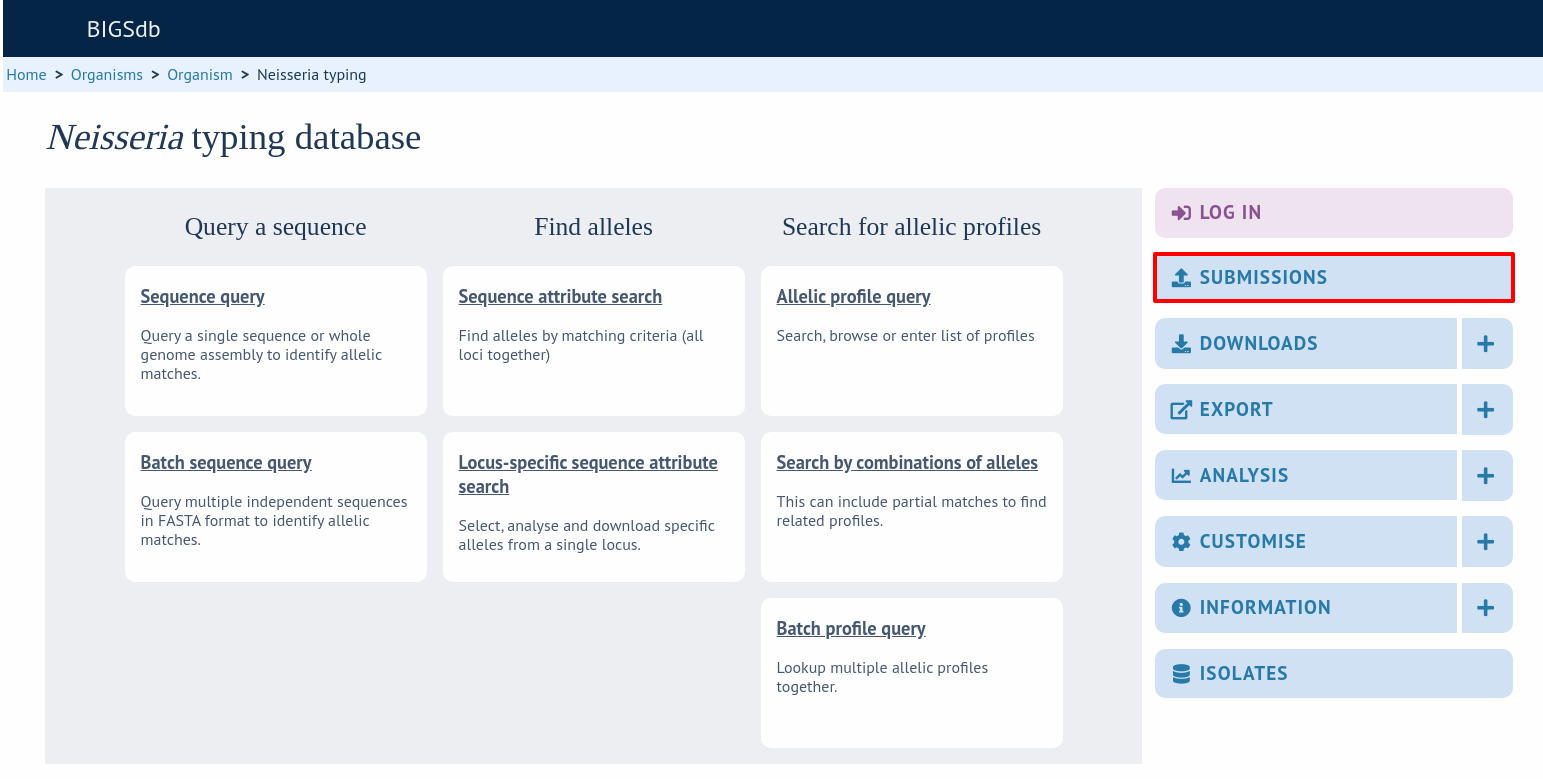
Submitting data using the submission system
The automated submission system allows users to submit data (new alleles, profiles, or isolates) to the database curators for assignment and upload to the database. The submission system is enabled on a per-database basis so will not always be available.
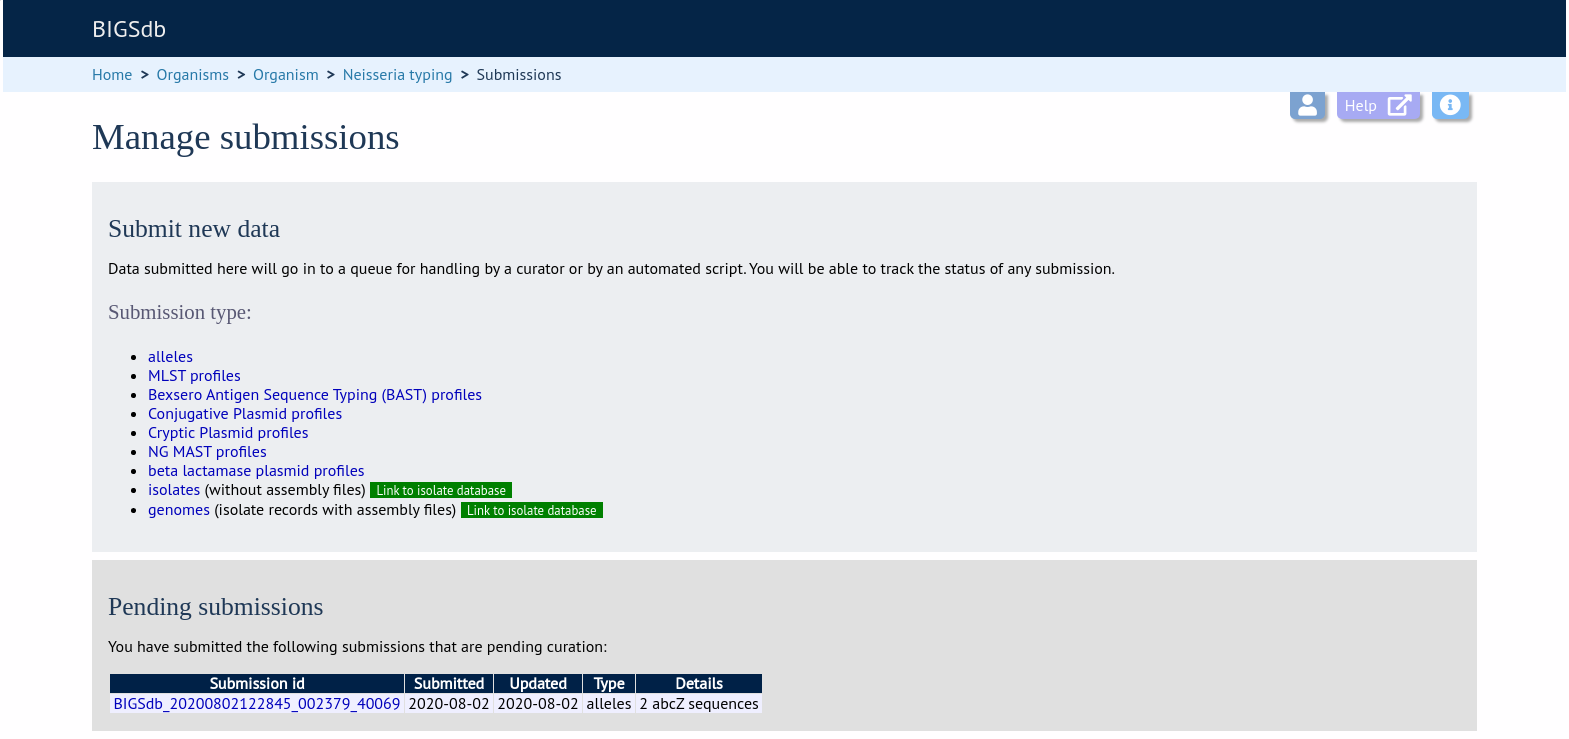
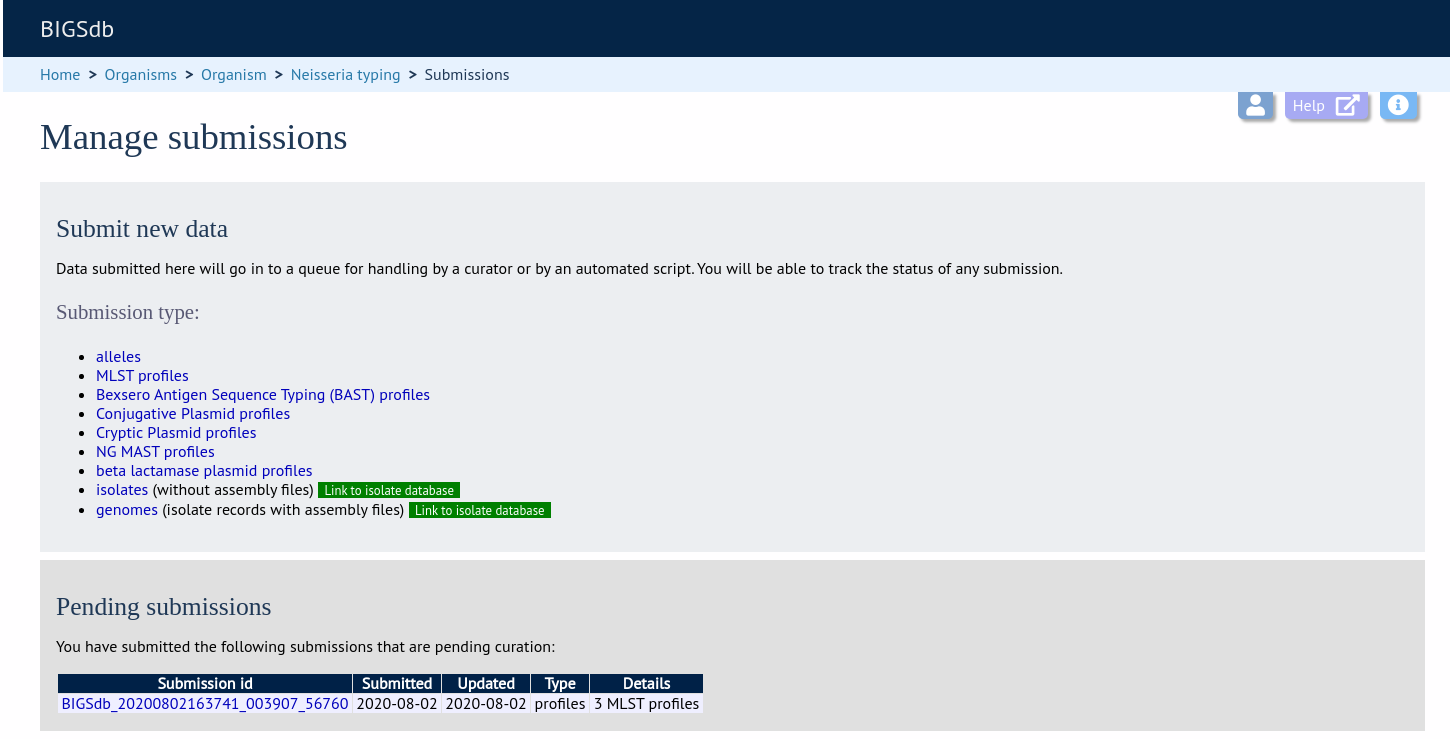
If the system is enabled, new submissions can be made by clicking the ‘Manage submissions’ link on the database front page.
Registering a user account
You must have an account for the appropriate database in order to use the submission system. On systems utilizing site-wide databases, such as PubMLST, this can be done automatically via the web. Other sites may require you to contact a curator to set this up.
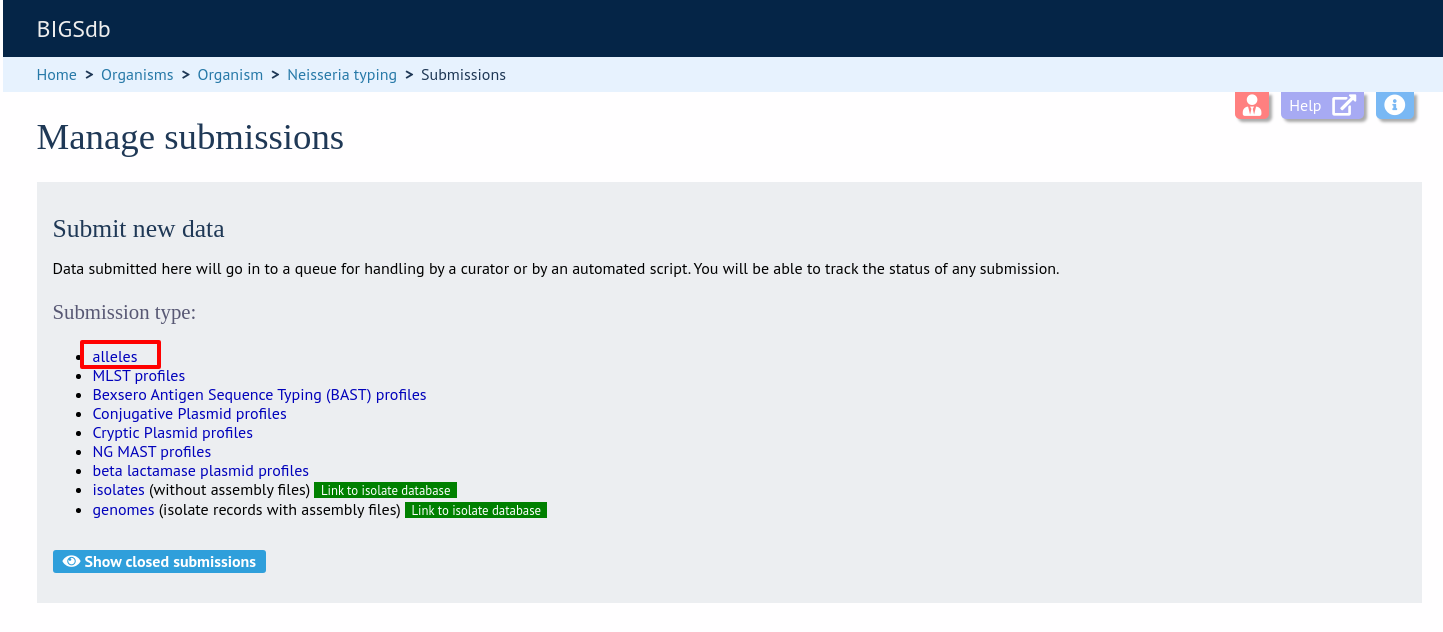
Allele submission
New allele data can only be submitted from within the appropriate sequence definition database. Submissions consist of one or more new allele sequences for a single locus. You will need to create separate submissions for each locus - this is because different loci may be handled by different curators.
Start
Click the ‘alleles’ link under submission type on the submission management page.
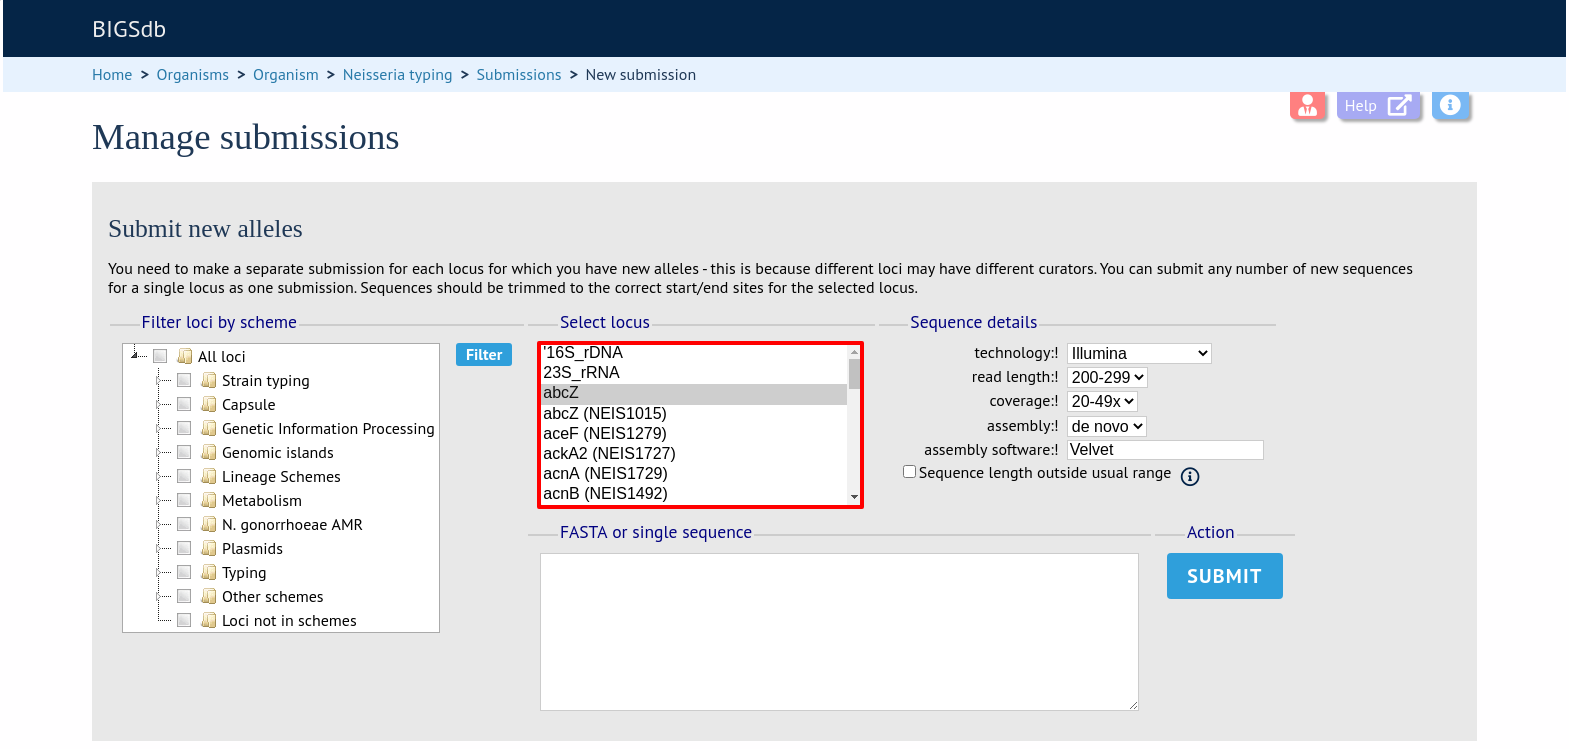
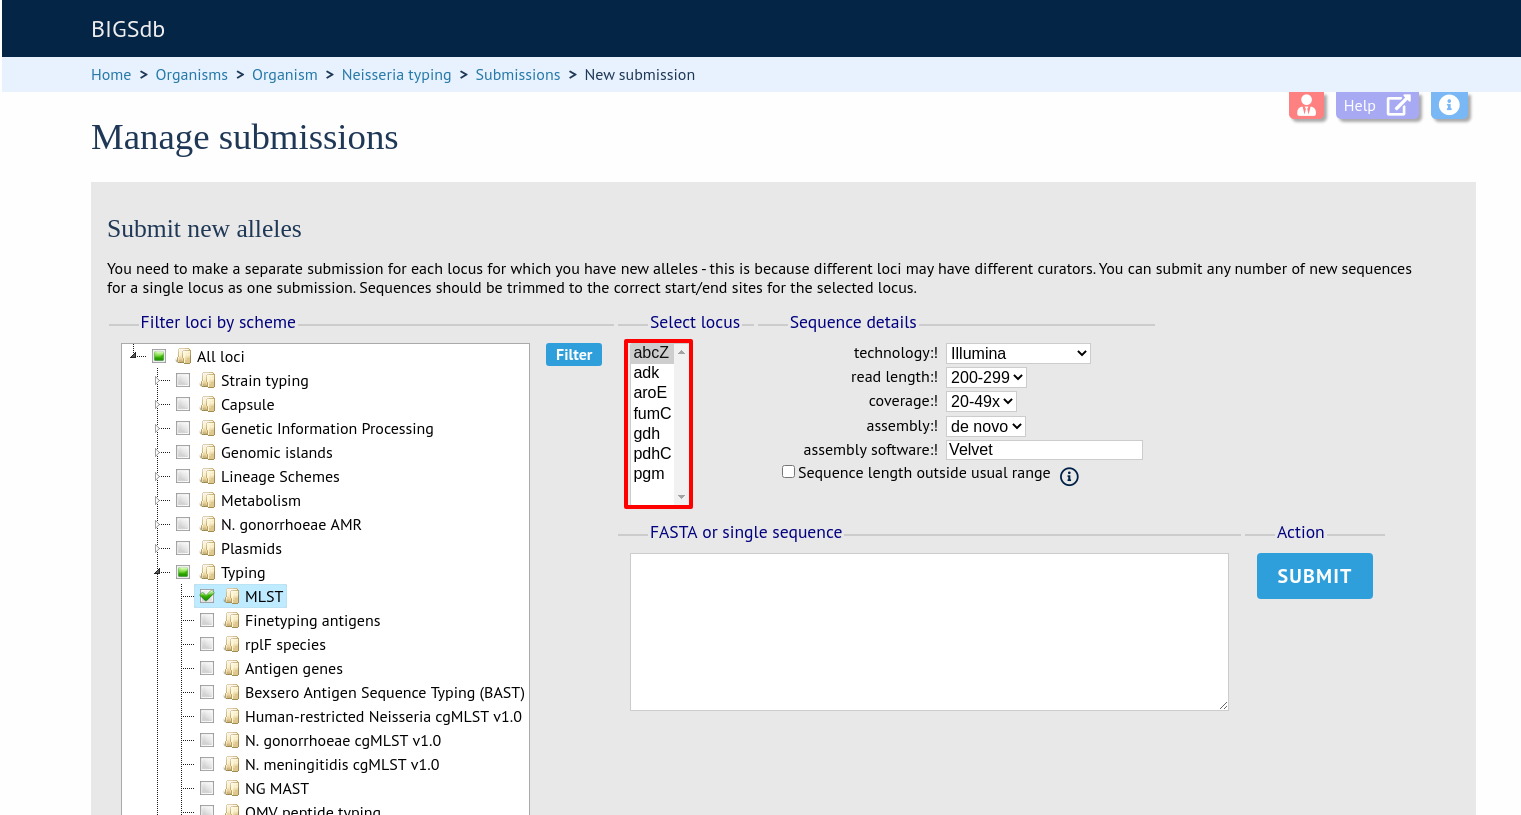
Select the submission locus
Select the locus from the locus list box:
The locus list may be very long in some databases. It may be possible to filter these to those belonging to specific schemes. If the scheme tree is shown, select the appropriate scheme, e.g. ‘MLST’ and click ‘Filter’.
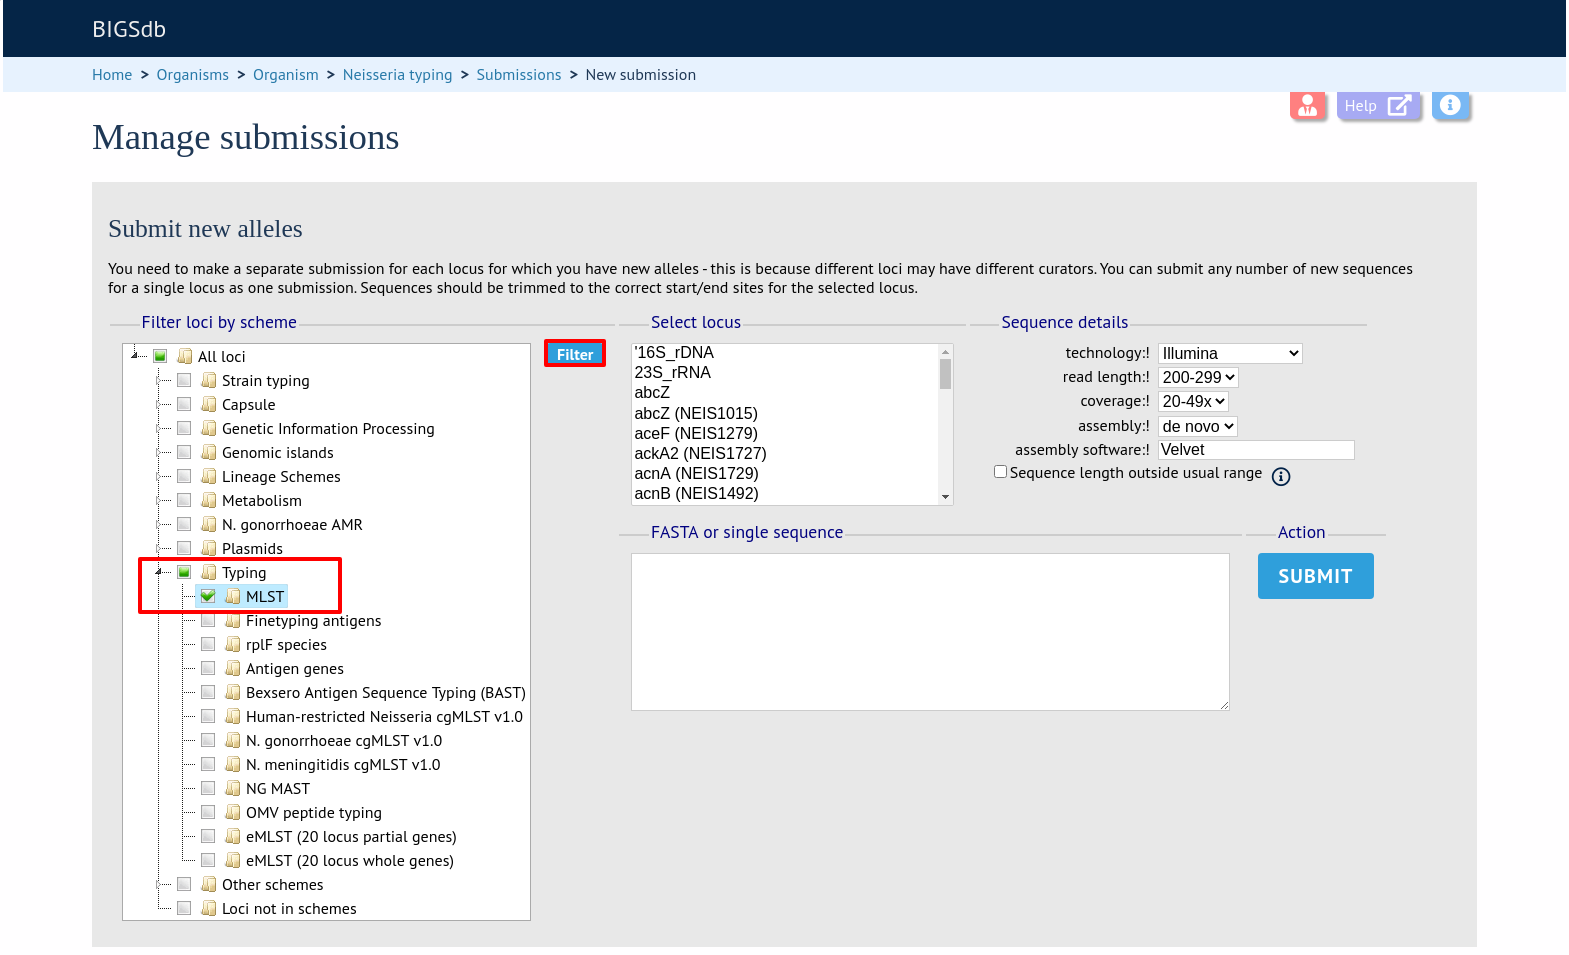
The locus list is now constrained making selection easier.
Enter details of sequencing method
There are a number of fields that must be filled in so that the curator knows how the sequence was obtained:
technology - the sequencing platform used, allowed values are:
454
DNBSEQ
Illumina
Ion Torrent
PacBio
Oxford Nanopore
Sanger
Solexa
SOLiD
other
unknown
read length - this is the length of sequencing reads. This is a required field for Illumina data, and not relevant to Sanger sequencing. Allowed values are:
<100
100-199
200-299
300-499
>500
coverage - the mean number of reads covering each nucleotide position of the sequence. This is not relevant to Sanger sequencing, Allowed values are:
<20x
20-49x
50-99x
>100x
assembly - the means of generating the submitted sequence from the sequencing reads. Allowed values are:
de novo
mapped
assembly software - this is a free text field where you should enter the name of the software used to generate the submitted sequence.
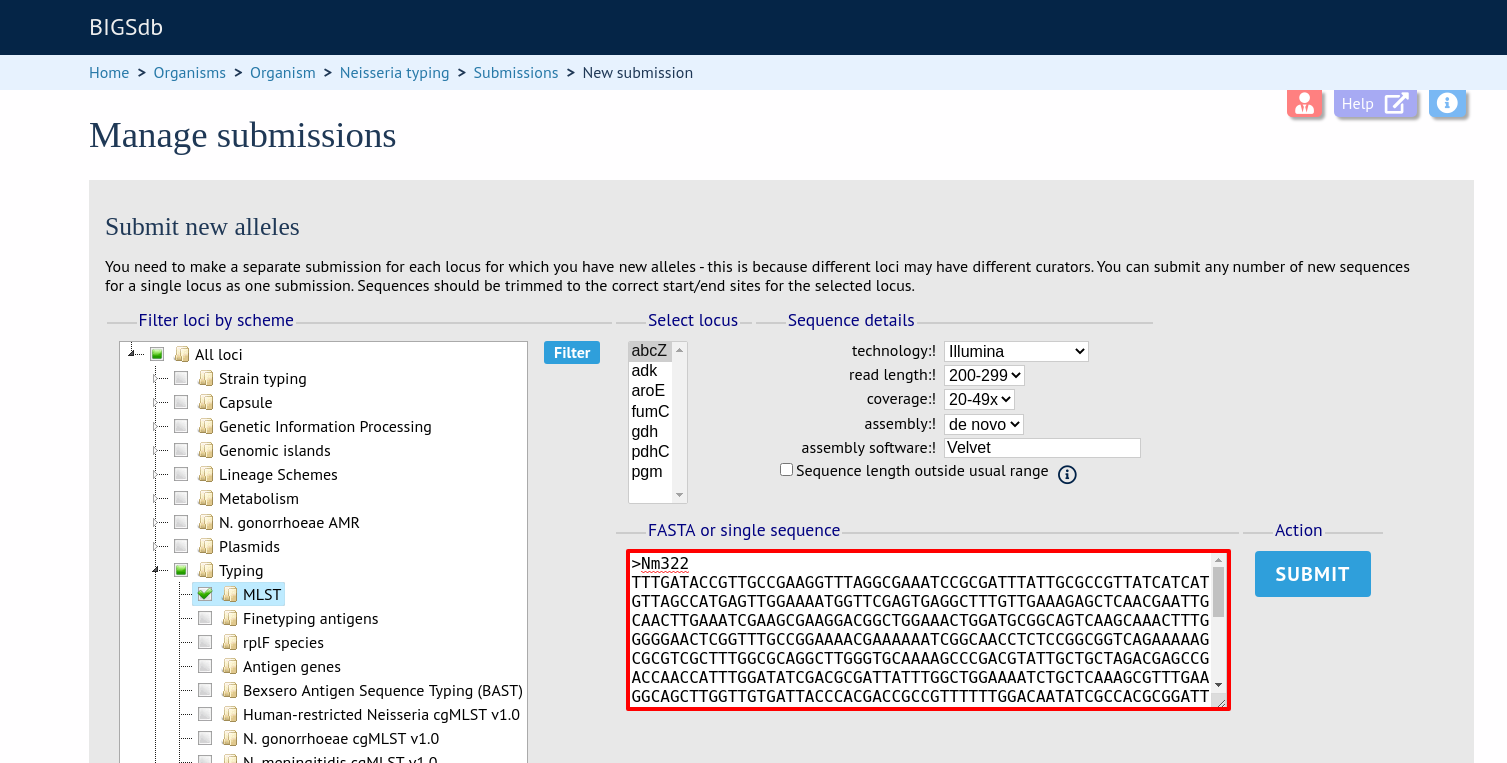
Paste in sequence(s)
Paste in the new variant sequences to the box. This can either be a stand- alone sequence or multiple sequences in FASTA format. The sequences must be trimmed to the start and end points of the loci - check existing allele definitions if in doubt. The submission is likely to be rejected if sequences are not trimmed. Click submit.
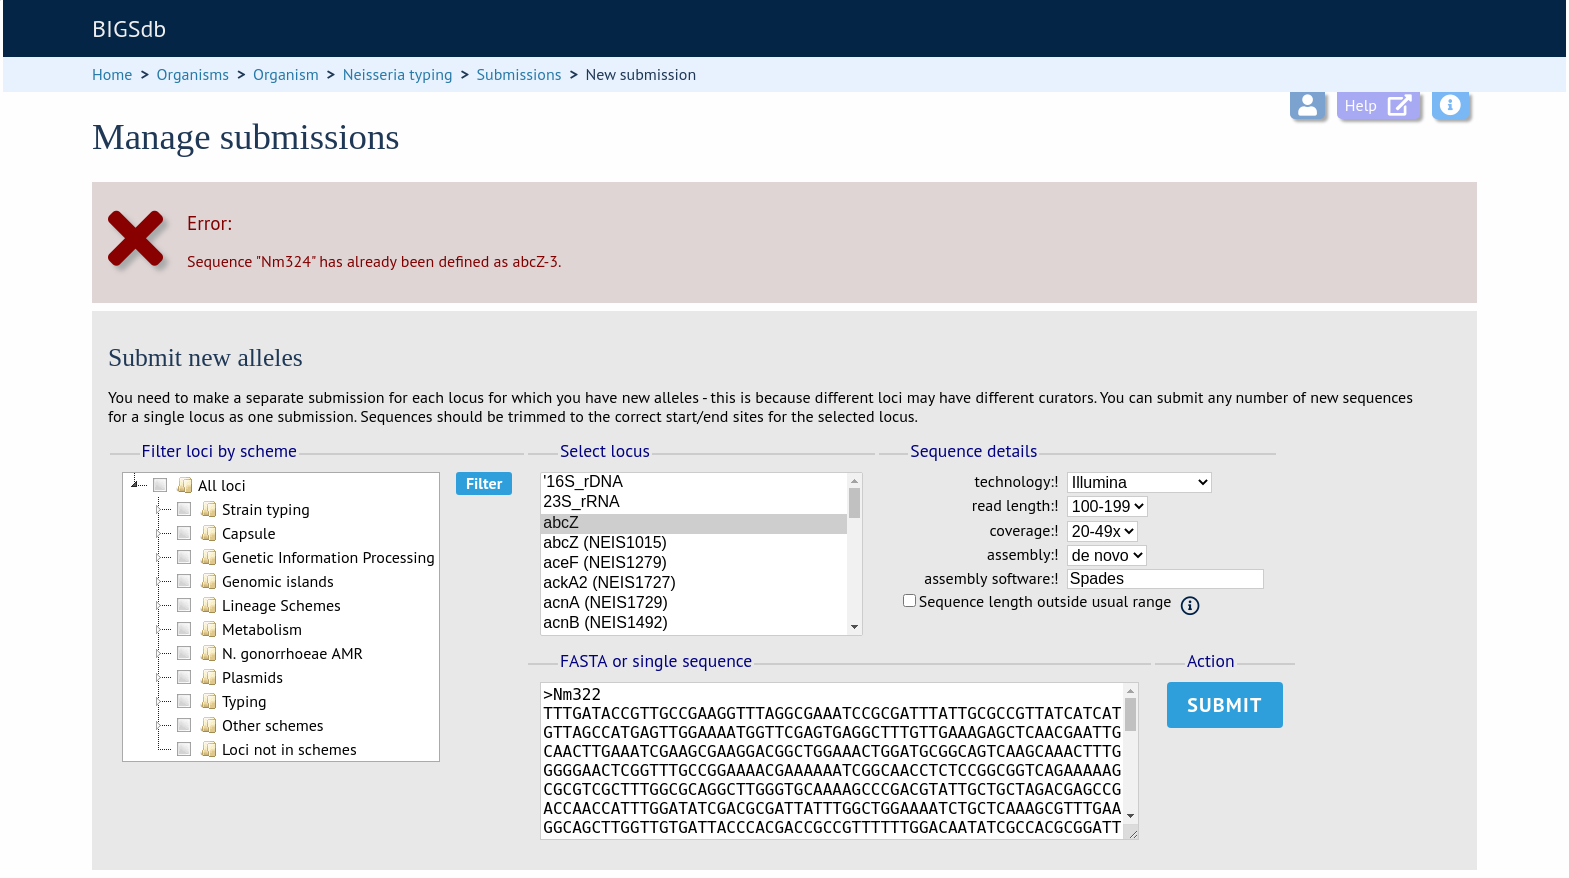
The system will perform some basic checks on the submitted sequences. If any of the sequences have been defined previously they must be removed from the submission before you can proceed. Curators do not want to waste their time dealing with previously defined sequences.
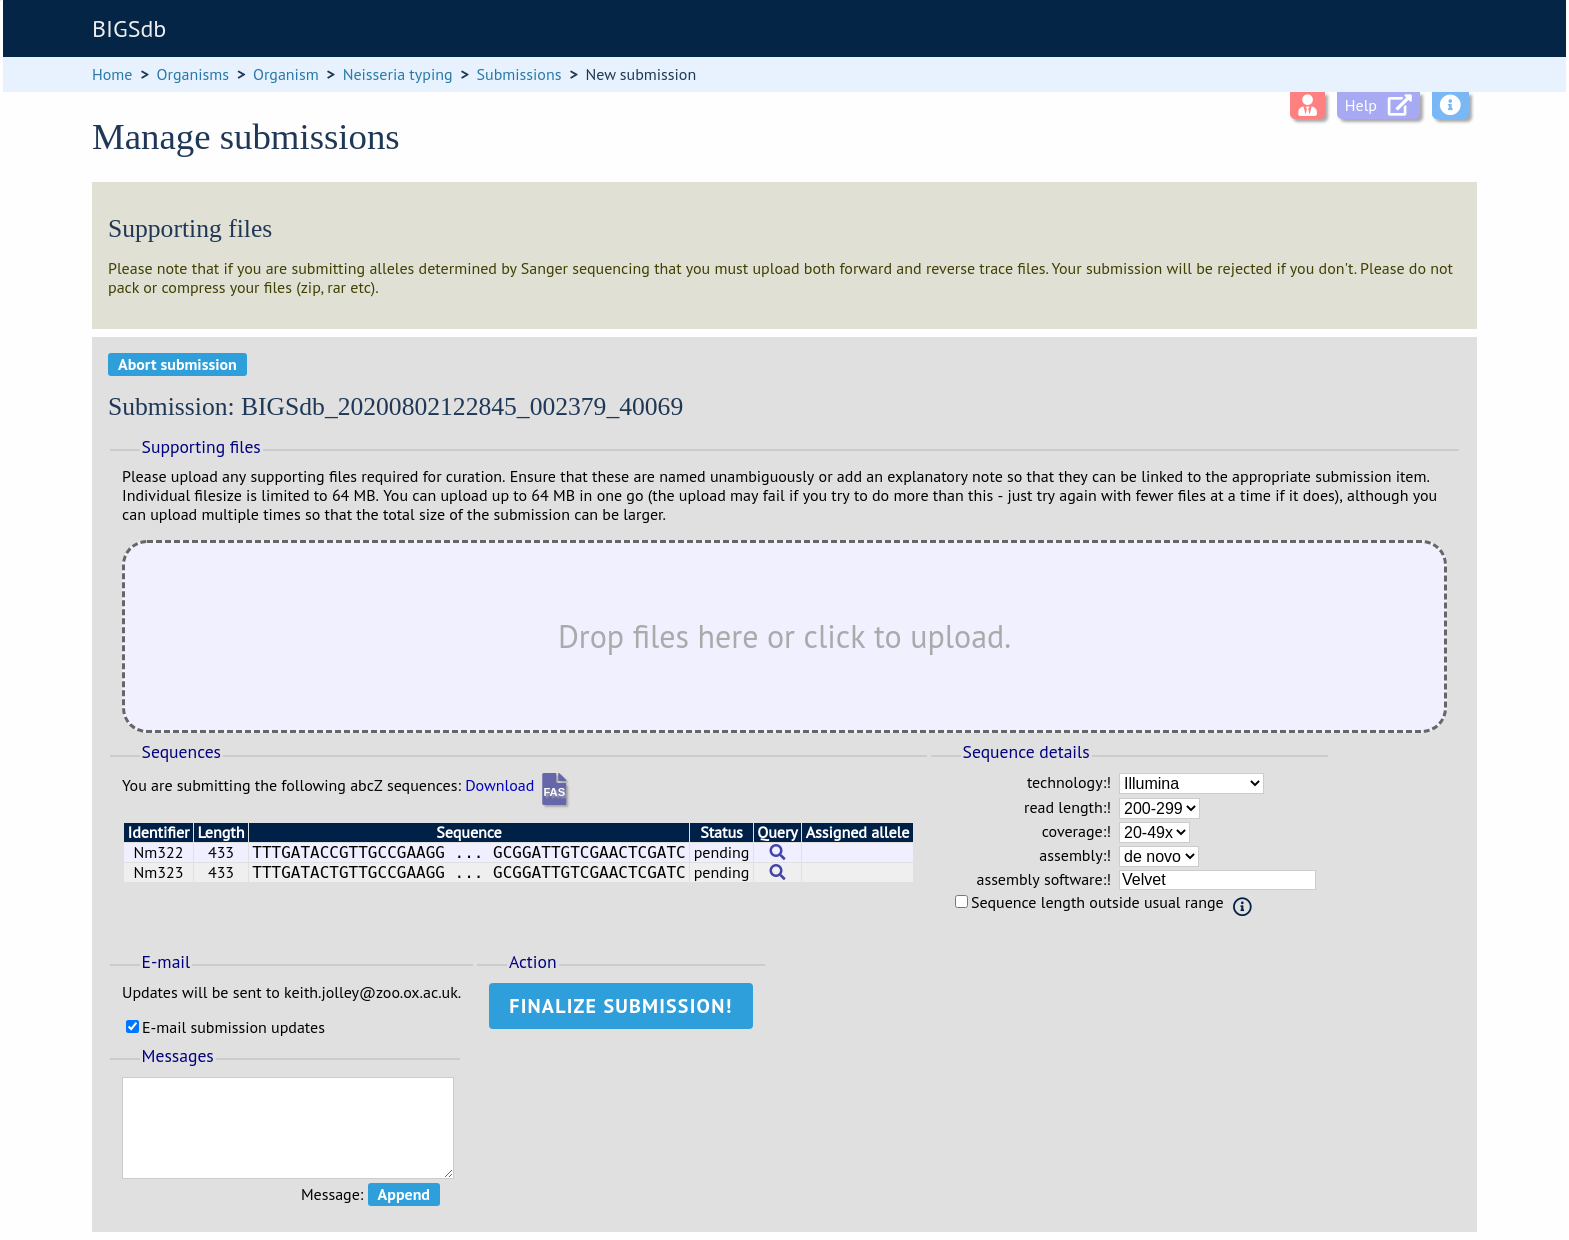
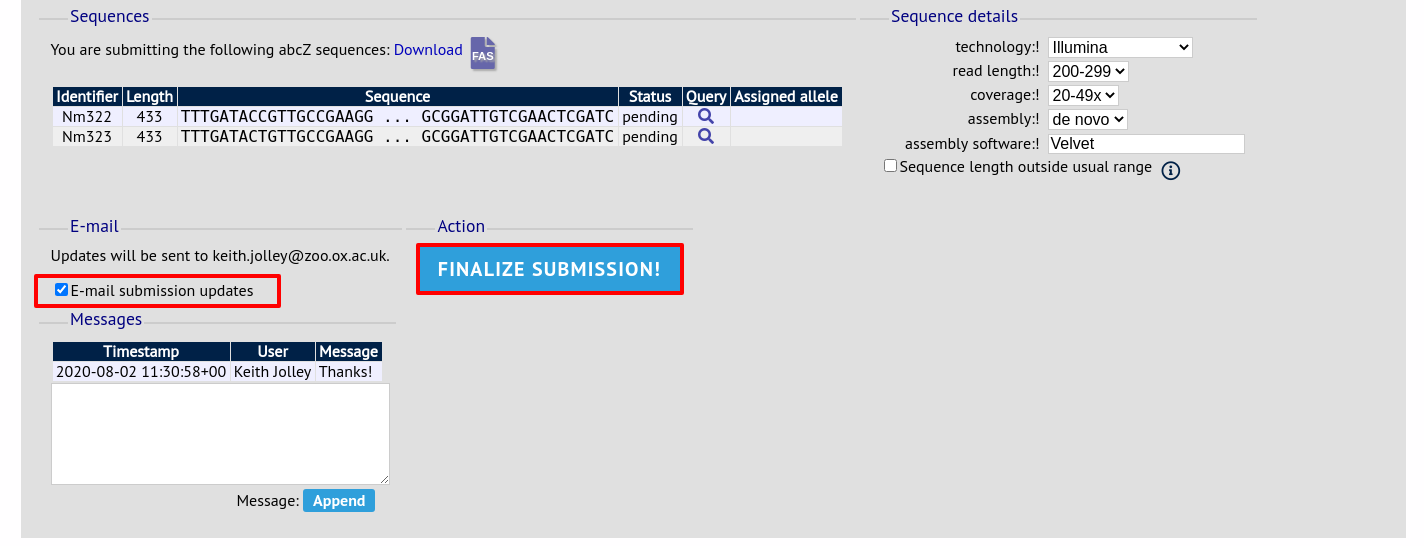
Assuming the preliminary checks have passed you will then be able to add additional information to your submission.
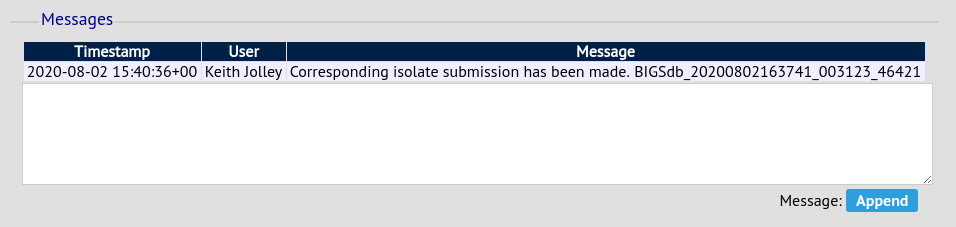
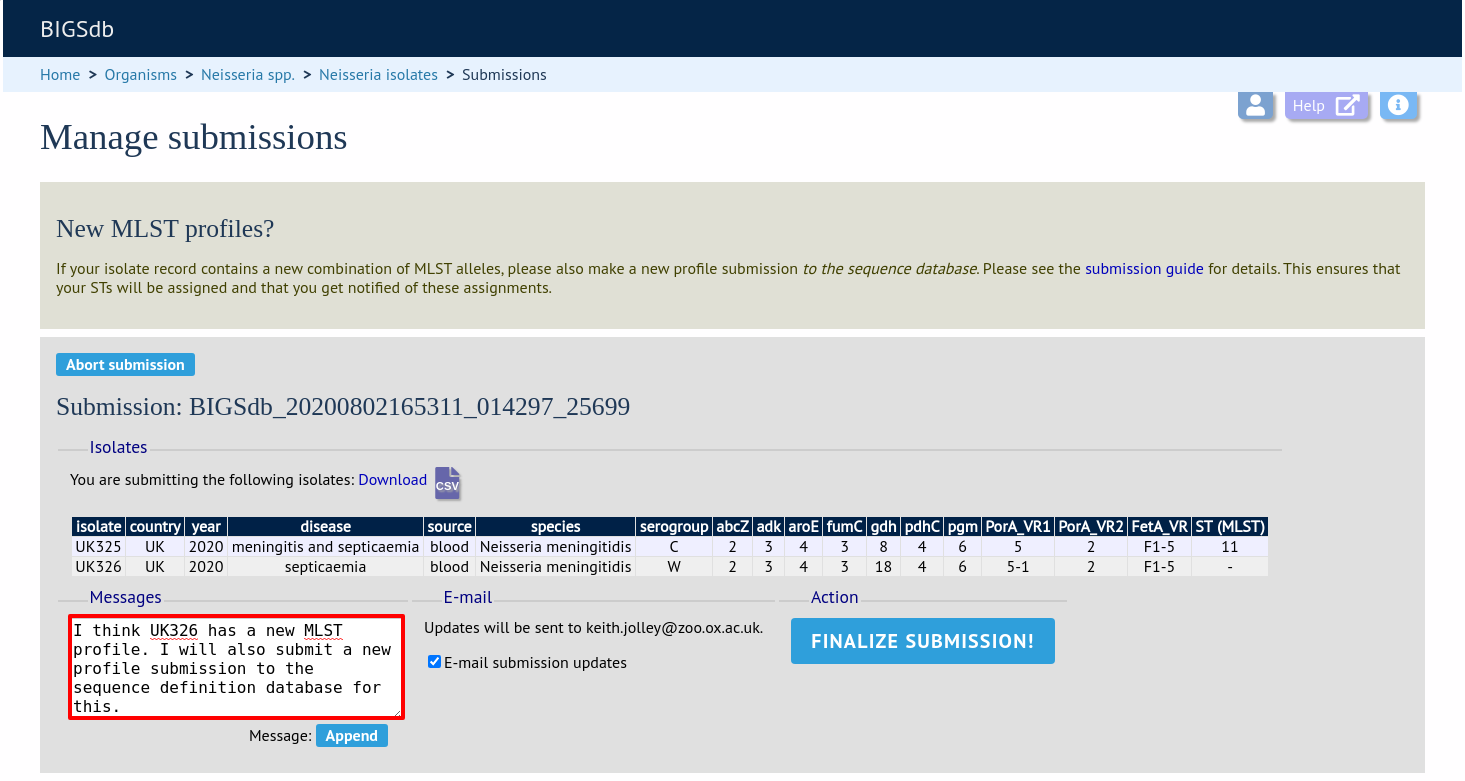
Add message to curator
If you wish to enter a message to the curator, enter this in the messages box and click ‘Append’. This is not normally necessary for routine submissions.
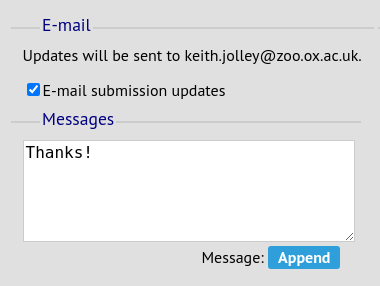
The message will be attached. Note that you can delete the last message in the conversation if it was you that added it and it was added on the same day. A curator may respond to the message and attach their own, with the full conversation becoming part of the submission record.

Add supporting files
Some submissions will require the attachment of supporting files. This will depend on the policies of the individual databases. Sequences determined by Sanger sequencing should normally have forward and reverse trace files attached.
Files can be added to the submission by dragging and dropping in to the large dotted area in the ‘Supporting files’ section. Alternatively, you can click this area and select files from the local file system.
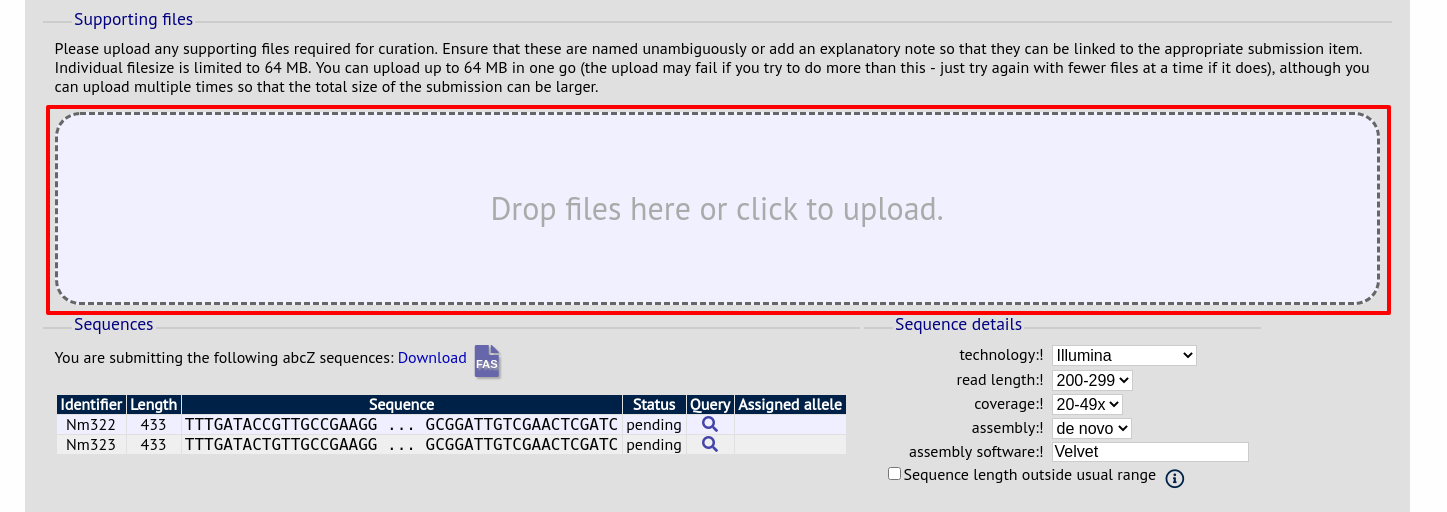
The files will be uploaded and shown in a table.

Files can be removed from the submission by checking the appropriate ‘Delete’ box and clicking ‘Delete selected files’.
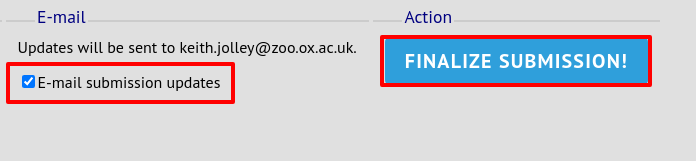
Finalize submission
Make sure the ‘E-mail submission updates’ box is checked if you wish to receive E-mail notification of the result of your submission. This setting is remembered between submissions.
Click ‘Finalize submission!’.
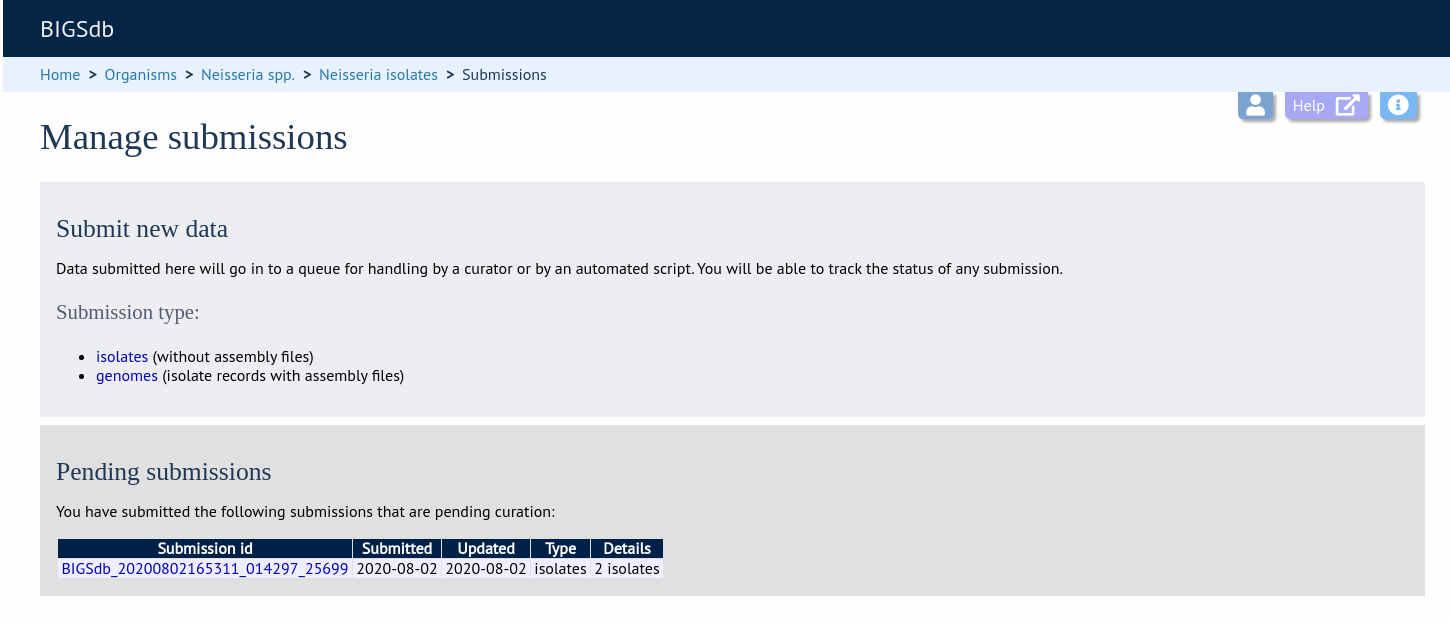
Your submission will then be listed under ‘Pending submissions’ on your submission page.
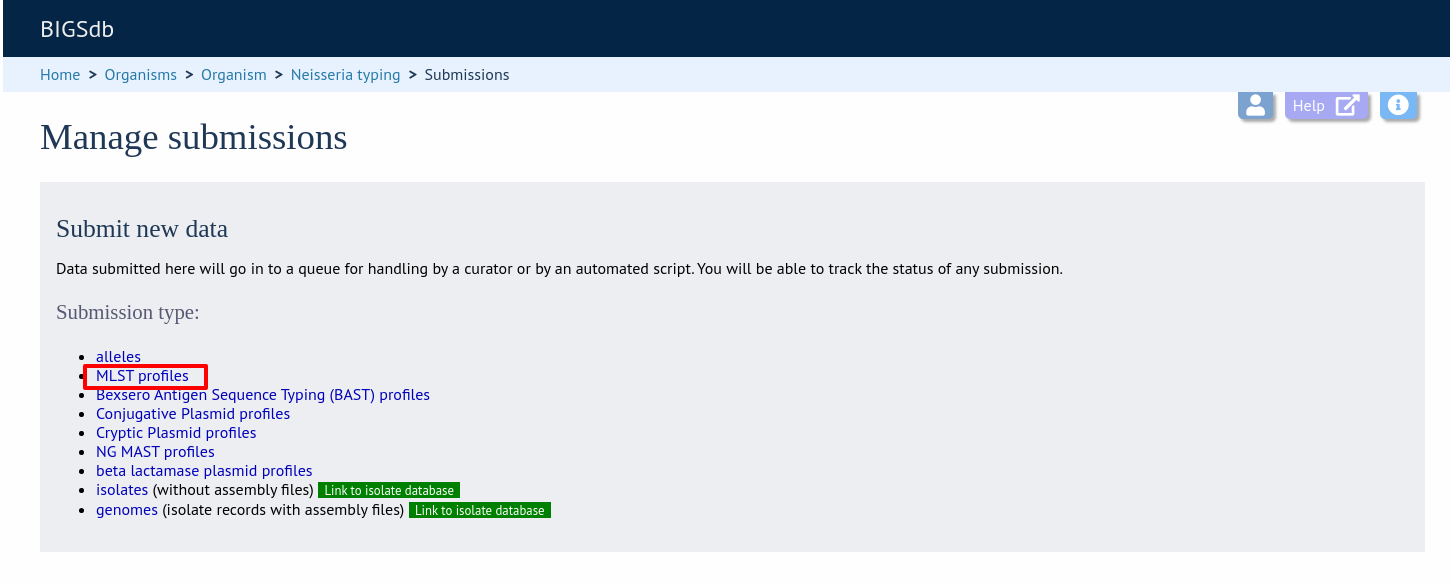
Profile submission
Start
Note
Most MLST databases on PubMLST.org require you to submit an isolate record for each new ST that you wish to be defined. In these cases, you should add the isolate name to the id field of your profile submission and make a corresponding isolate submission containing the allelic profile.
Click the appropriate profiles link under submission type on the submission management page.
Download the Excel submission template.
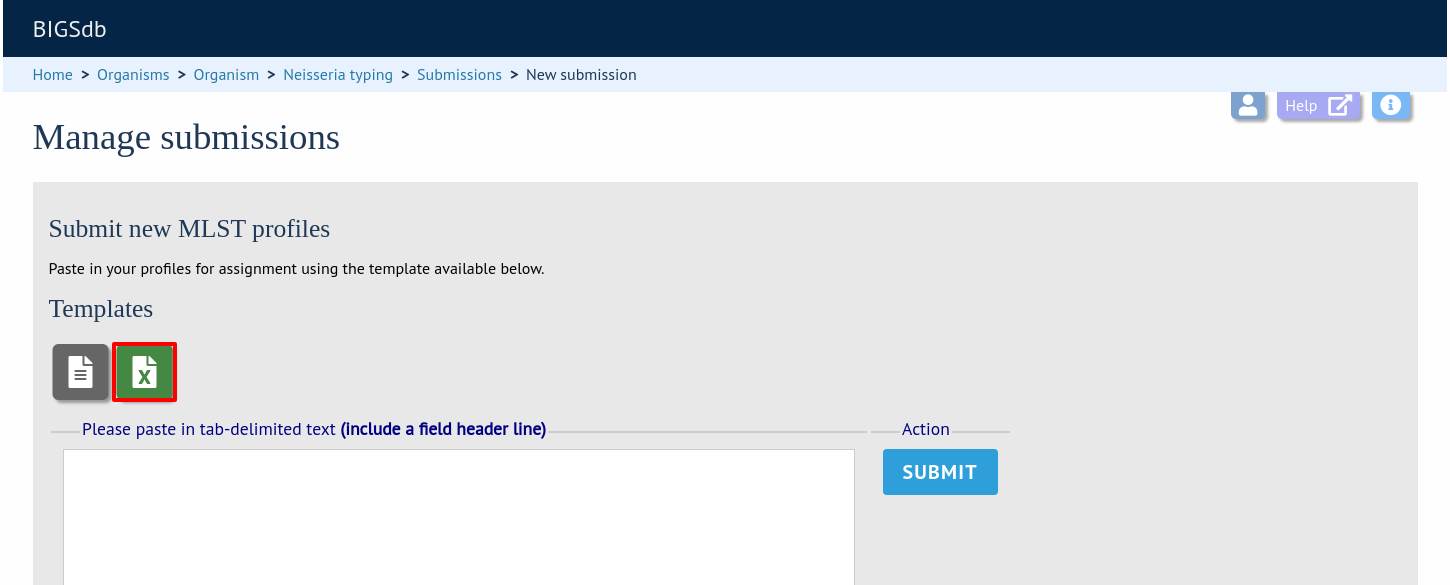
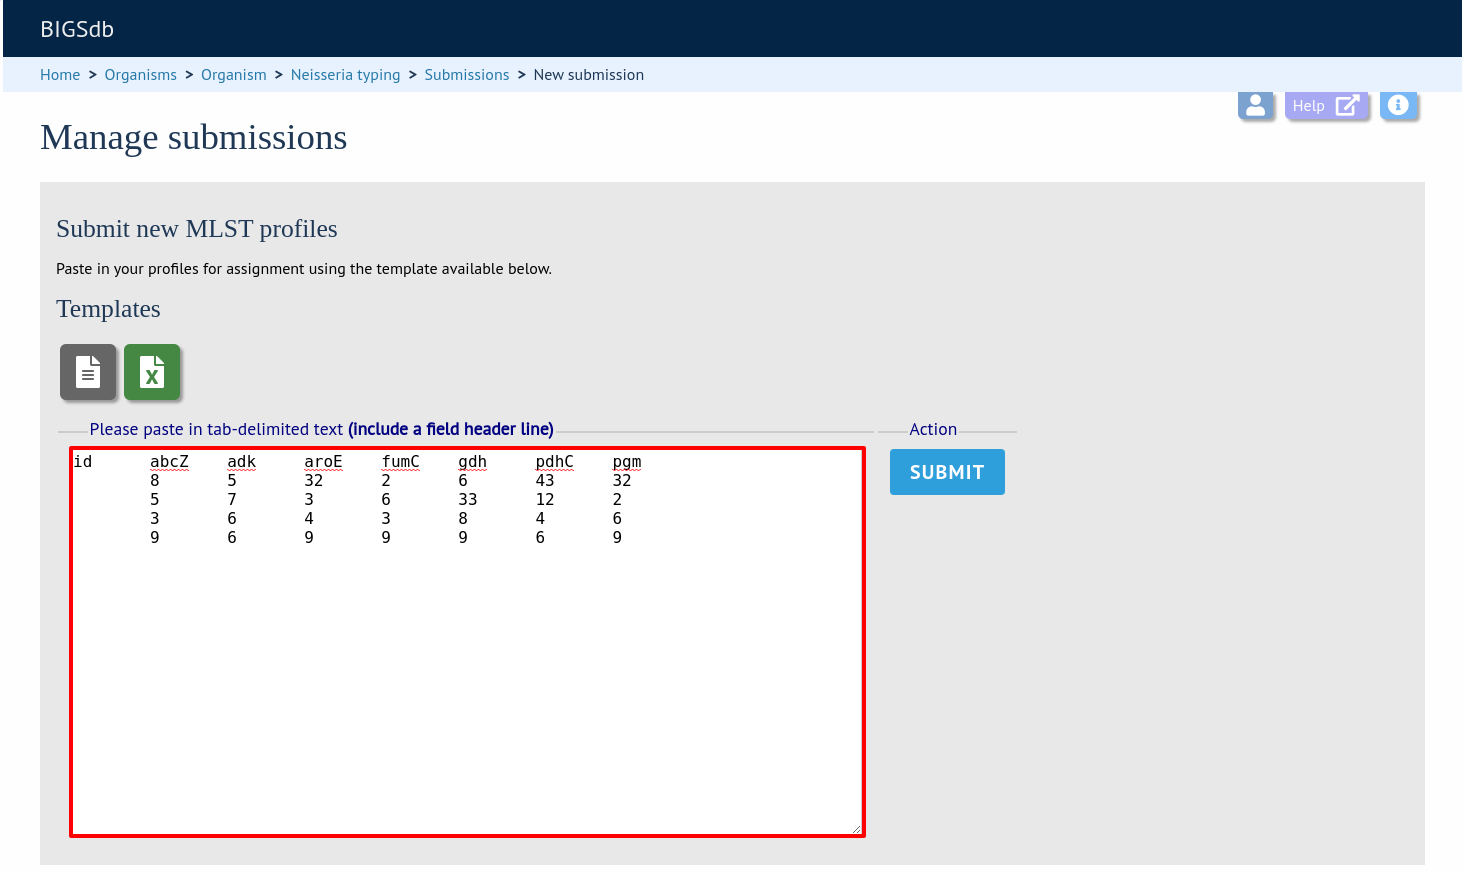
Paste in profile(s)
Fill in the template. The first column ‘id’ can be used to enter an identifier that is meaningful to you - it is used to report back the results but is not uploaded to the database. It can be left blank, or the entire column can be removed - in which case individual profiles will be identified by row number.
Copy and paste the entire contents of the submission worksheet. Click submit.
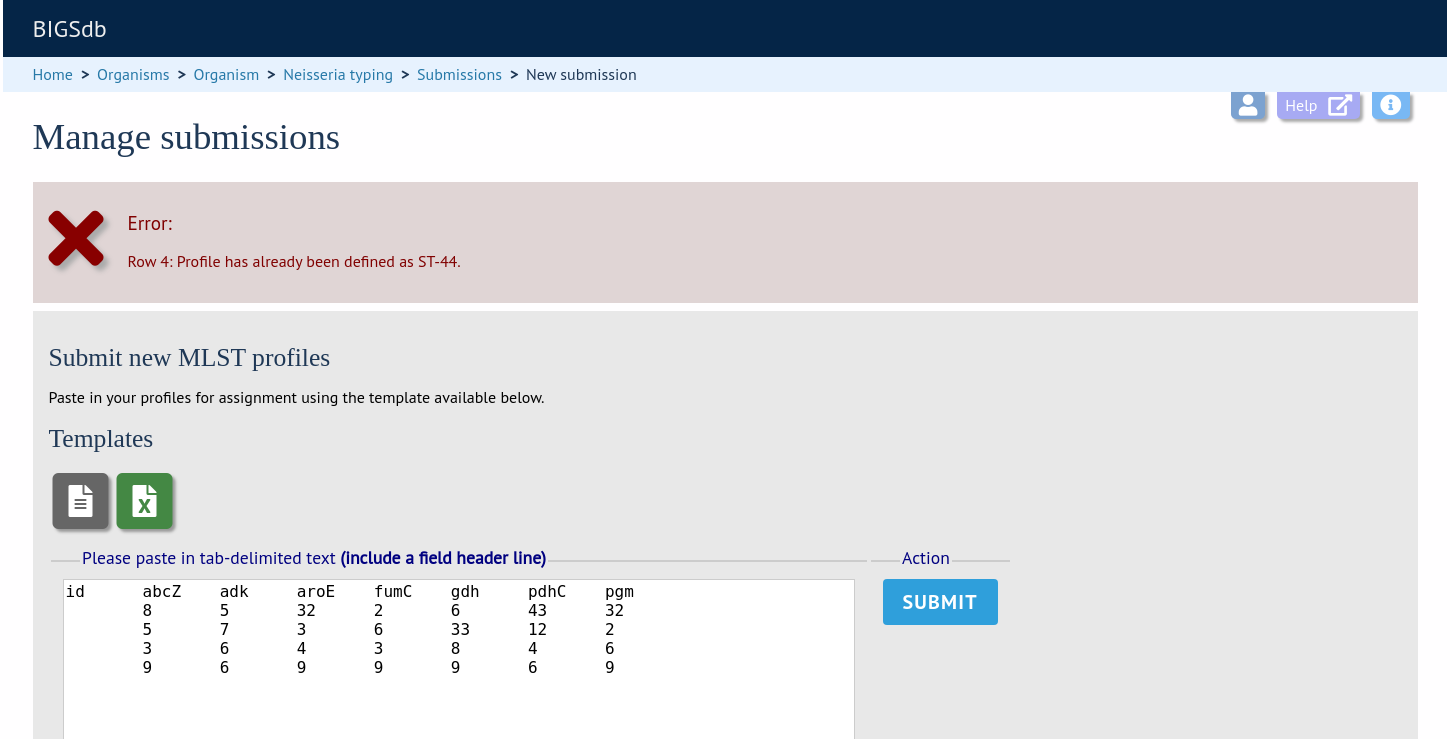
Some basic checks will be performed. These include whether the profile has already been assigned and whether each allele identifier exists. The submission cannot proceed if the checks fail.
Provided the checks pass, you will then be able to add additional information to your submission. New profile submissions usually don’t require supporting files directly in the submission. You generally will need to make a corresponding submission to the isolate database though.
Add message to curator
If you wish to enter a message to the curator, enter this in the messages box and click ‘Append’.
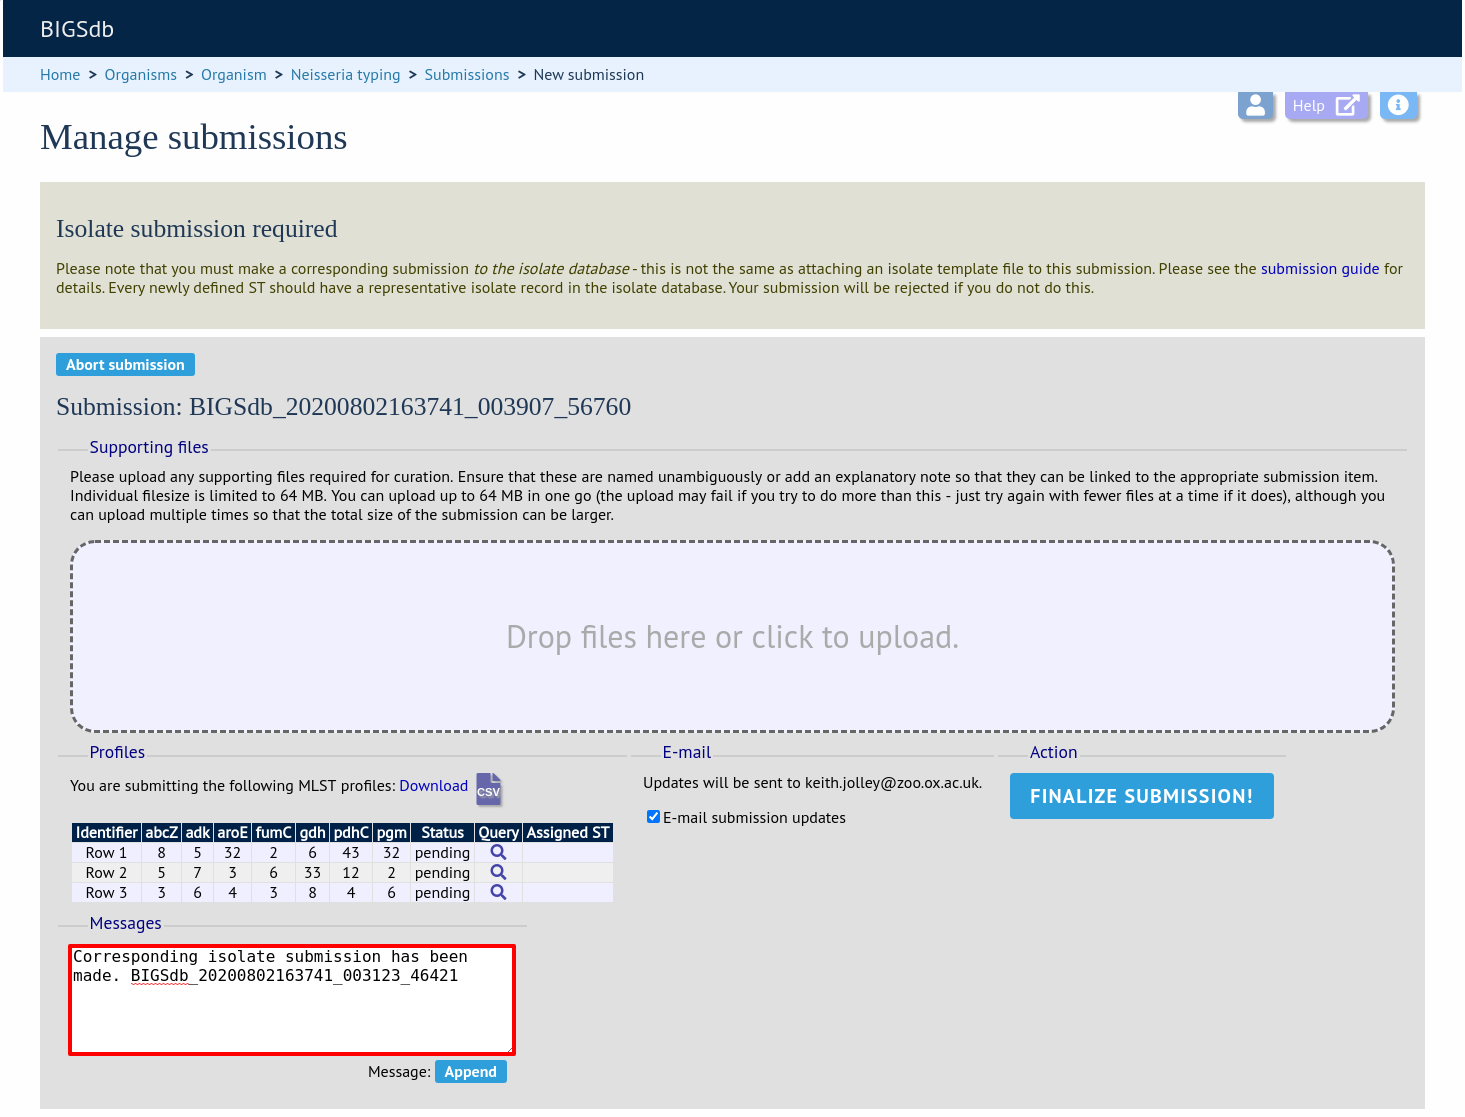
The message will be attached. A curator may respond to the message and attach their own, with the full conversation becoming part of the submission record.
Finalize submission
Make sure the ‘E-mail submission updates’ box is checked if you wish to receive E-mail notification of the result of your submission. This setting is remembered between sessions.
Click ‘Finalize submission!’.
Your submission will then be listed under ‘Pending submissions’ on your submission page.
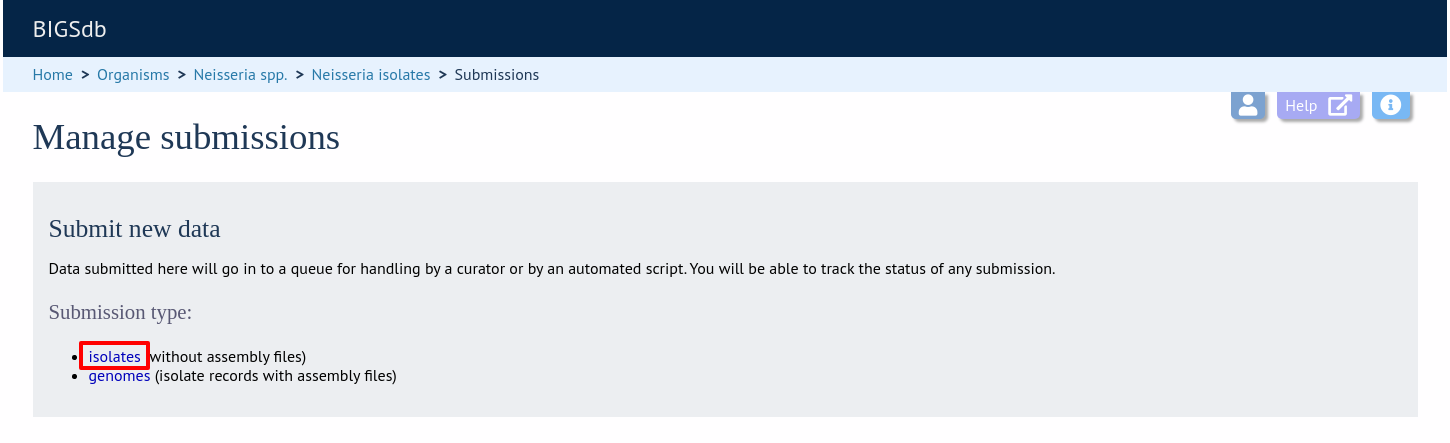
Isolate submission
New isolate data can only be submitted from within the appropriate isolate database. You may be required to submit isolate data if you would like to get a new MLST sequence type defined, but this depends on individual database policy.
Start
Click the ‘isolates’ link under submission type on the submission management page.
Download the Excel submission template.
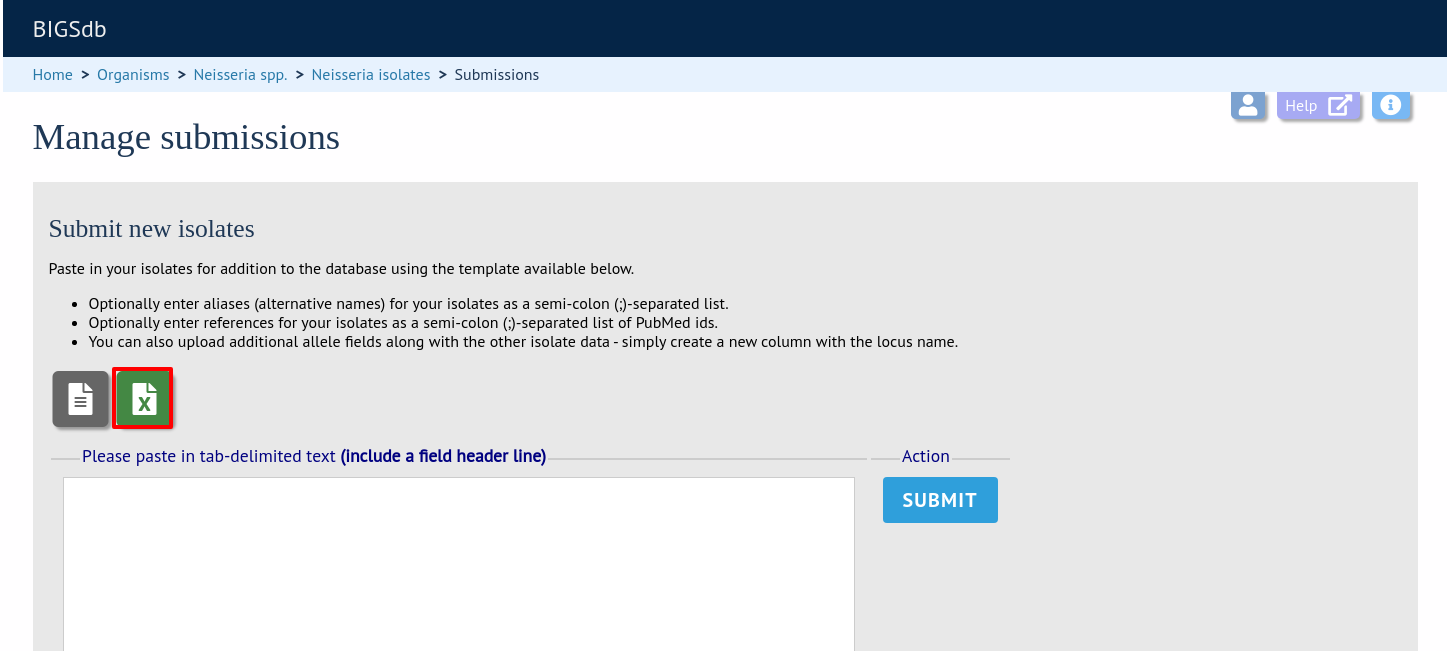
Paste in isolate data
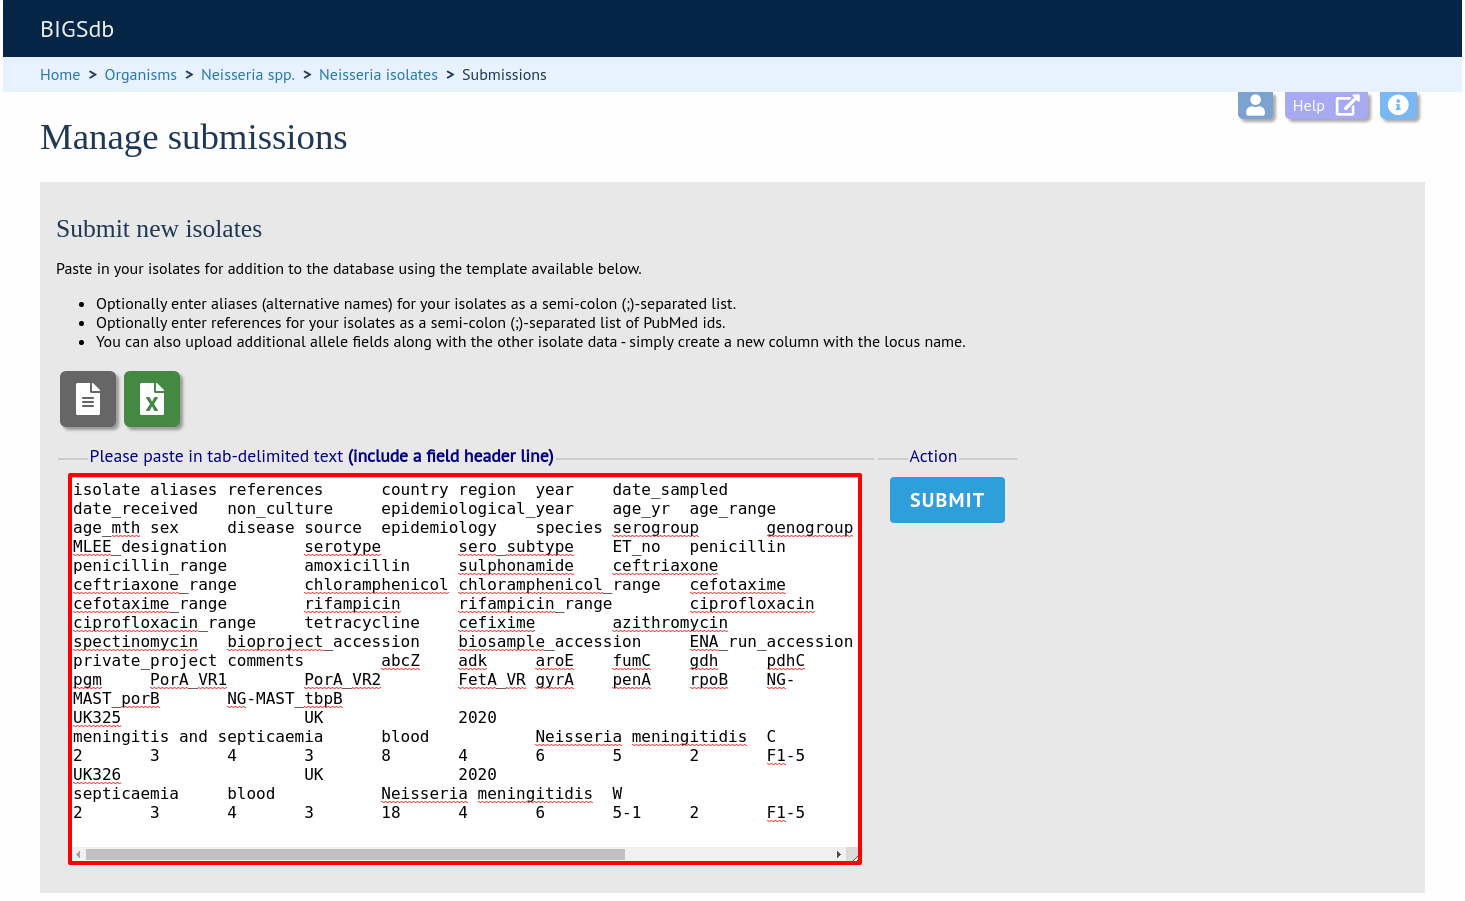
Fill in the template. Some fields are required and cannot be left blank. Check the ‘Description of database fields’ link on the database contents page to see a description of the fields and allowed values where these have been defined. Where allowed values have been set, the template will have dropdown boxes (although these require newer versions of Excel to work).
Some databases may have hundreds of loci defined, and most will not have a column in the template. You can add new columns for any loci that have been defined and for which you would like to include allelic information for. These locus names must be the primary locus identifier. A list of loci can be found in the ‘allowed_loci’ tab of the Excel submission template.
Copy and paste the entire contents of the submission worksheet. Click submit.
Some basic checks will be performed. These include checking all field values conform to allowed lists or data types. The submission cannot proceed if any checks fail.
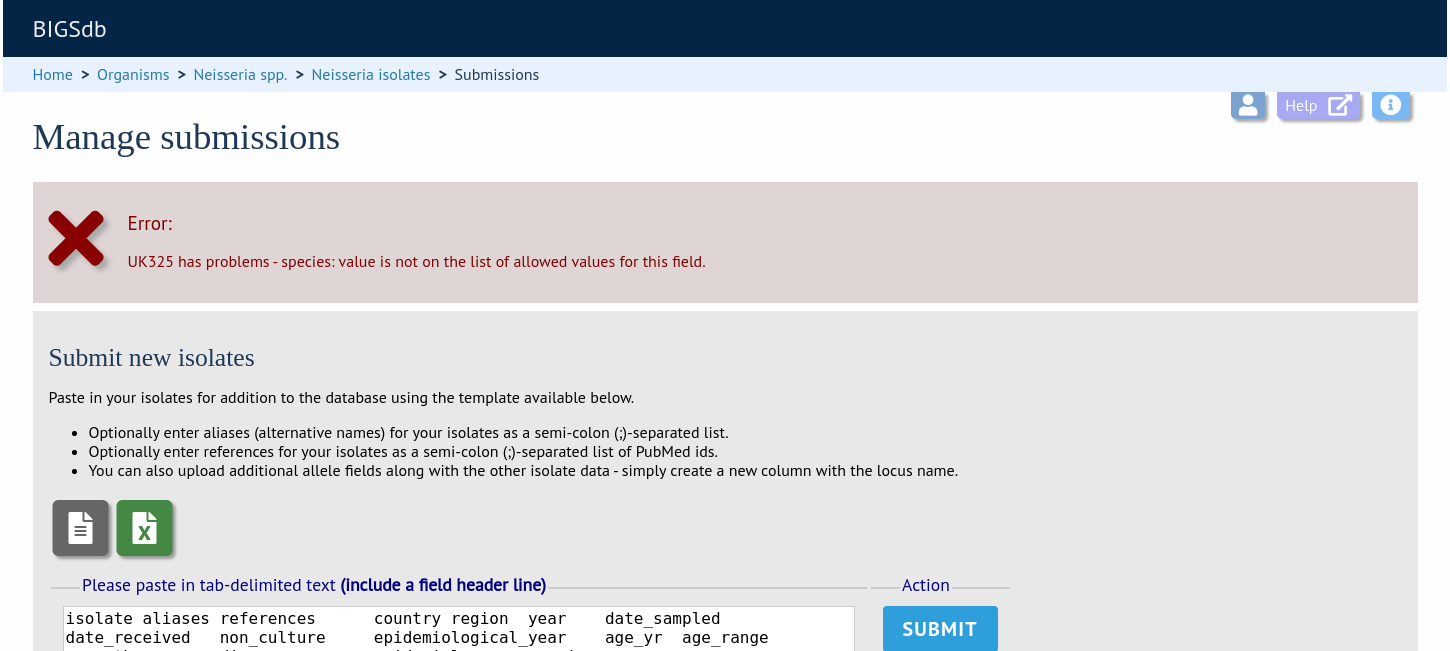
Provided the checks pass, you will then be able to add additional information to your submission.
Add message to curator
If you wish to enter a message to the curator, enter this in the messages box and click ‘Append’.
The message will be attached. A curator may respond to the message and attach their own, with the full conversation becoming part of the submission record.

Finalize submission
Make sure the ‘E-mail submission updates’ box is checked if you wish to receive E-mail notification of the result of your submission. This setting is remembered between sessions. You may also be able to request that your isolate record is embargoed (whether this is available depends on the site). If you request an embargo, your isolate will remain private until the embargo period ends when it will automatically be made public. You can request to make it public at any point before this.
Click ‘Finalize submission!’.

Your submission will then be listed under ‘Pending submissions’ on your submission page.
Genome submission
Submitting genomes uses the same process as standard isolate submission. The only difference is that there are a couple of extra required fields in the submission table:
assembly_filename - this is the name of the FASTA file containing the assembly contigs. This must be uploaded as a supporting file - you will not be able to finalize the submission until every isolate record has a matching contig file.
sequence_method - the sequencing technology used to generate the sequences. The allowed values are listed on the submission page.
Locus fields are not usually included in a genome submission as these can be readily extracted from the genome.
To start the submission, click the ‘genomes’ link under submission type on the submission management page.
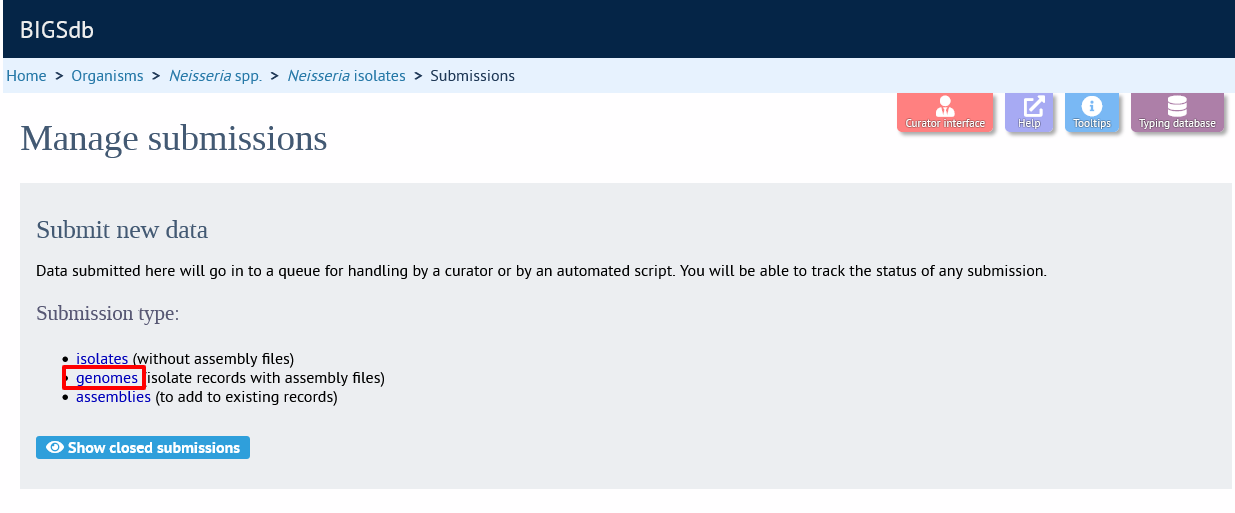
Then follow the steps for isolate submission, uploading the contig files as supporting files. You will be able to finalize the submission only after all the assembly files have been uploaded.
Note
When including the filename for your FASTA file containing the genome assembly, please note that Windows will, by default, hide the file extension, e.g. .fas or .fasta. Even if it is hidden in the Windows interface, the file extension is part of the filename and must be included so that the uploaded file has exactly the same name as entered in the submission template. See https://www.techadvisor.co.uk/how-to/windows/windows-10-file-extensions-3697651 to see how to display hidden file extensions in Windows 10.
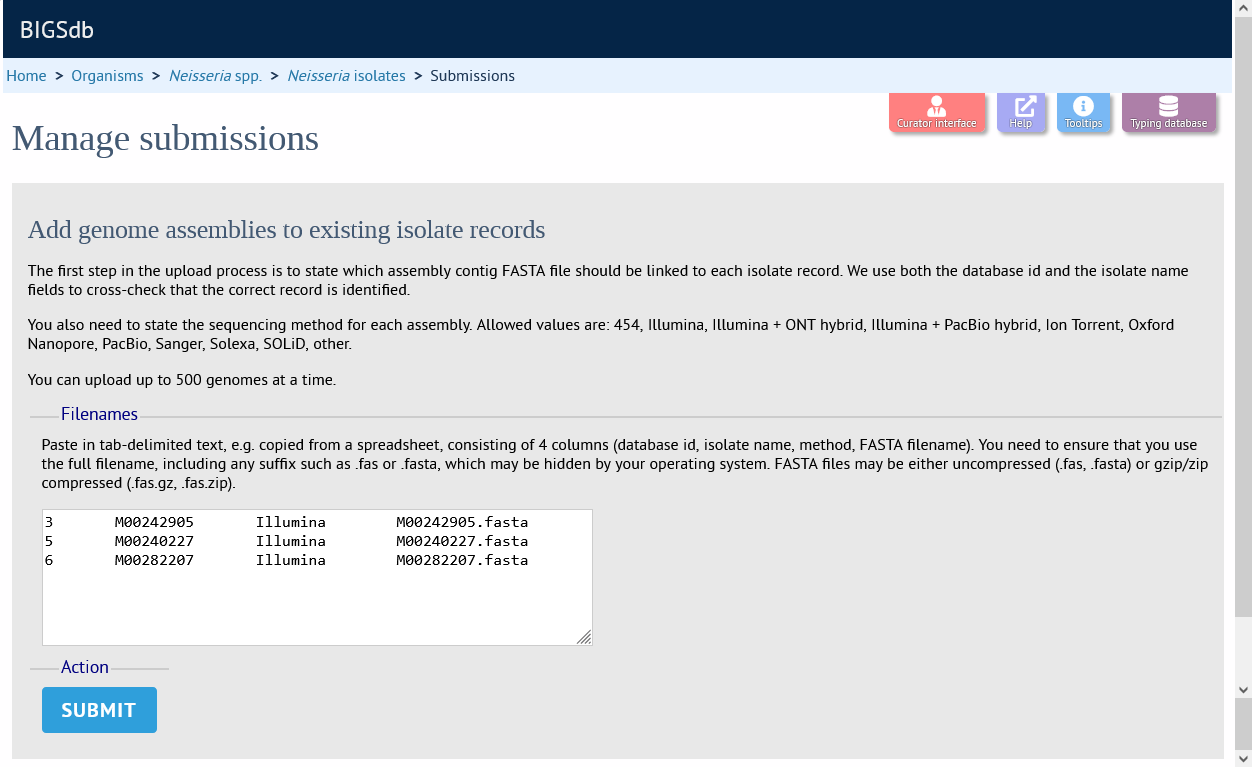
Assembly submission
Genome assemblies can be submitted to add to existing isolate records. These are often old records that have been submitted with just MLST results but whole genome sequencing has been performed later.
Start
Click the ‘assemblies’ link under submission type on the submission management page.

Link assembly files to isolate records
You need to tell the system which isolate record should be linked to each assembly that is being uploaded. In order to do this you should prepare a spreadsheet consisting of four columns that you then copy and paste into the web form. The columns are:
database id number
isolate name
sequence method
assembly filename
Both the database id and isolate name are used so that they can be cross-checked to ensure that the correct isolate record has been selected.
Click ‘Submit’ and the system will check that the id and isolate names correspond to isolate records that do not currently have assemblies. Provided these match, you will then be prompted to drag-and-drop your genome assemblies on to the web form. A check will also be performed to see if you are the original submitter of the isolate. If you are not, you can still make the submission but should add a message to the curator to confirm why you are adding assemblies for these records.
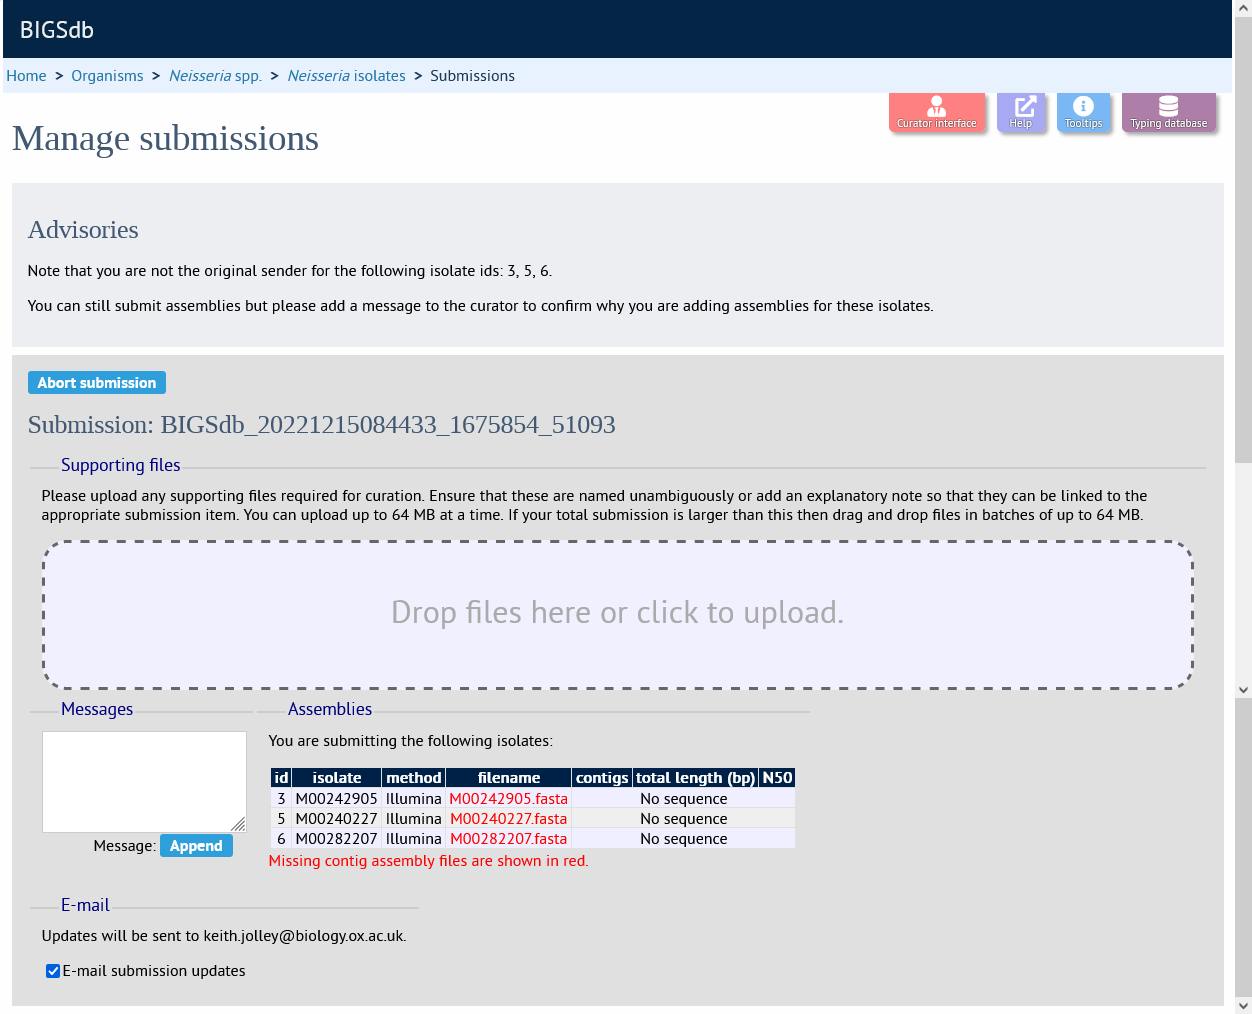
Files are uploaded as you drag-and-drop them. Basic checks will be performed for sequence length, number of contigs, and N50 values. If values are outside the preferred range you will see a warning for a specific value shown with a pink background. If values are outside the allowed range then the validation will fail and you will need to abort the submission. In the image below, the N50 values have a warning but have not failed the validation.
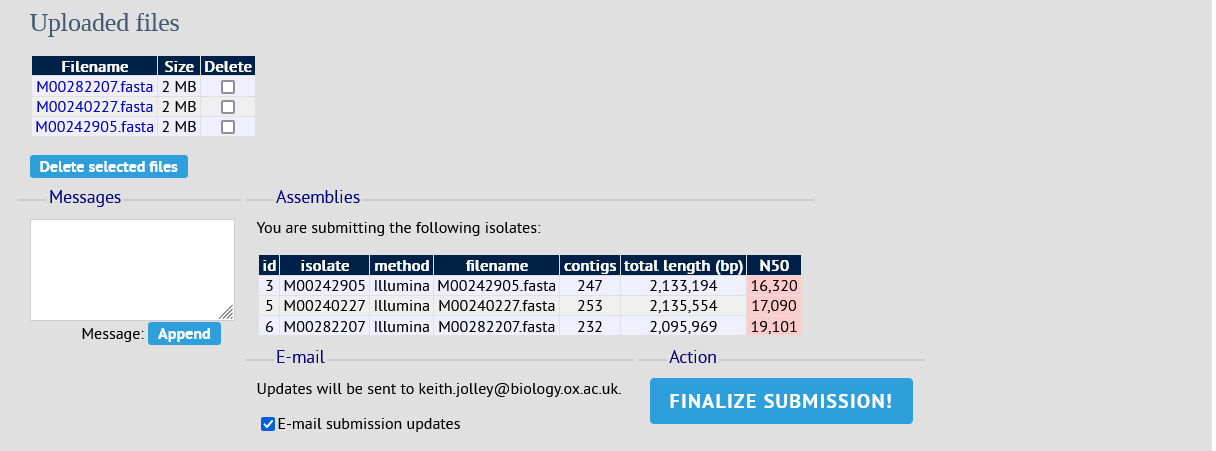
Once the files have been uploaded and passed validation, add any message to the curator if necessary, e.g. if the original isolate submissions were made by someone else. Click ‘Finalize submission’.
Removing submissions from your notification list
Once a submission has been closed by a curator, the results will be displayed in your ‘Manage submissions’ area. You can remove submissions once you have noted the result by clicking the ‘Remove’ link.
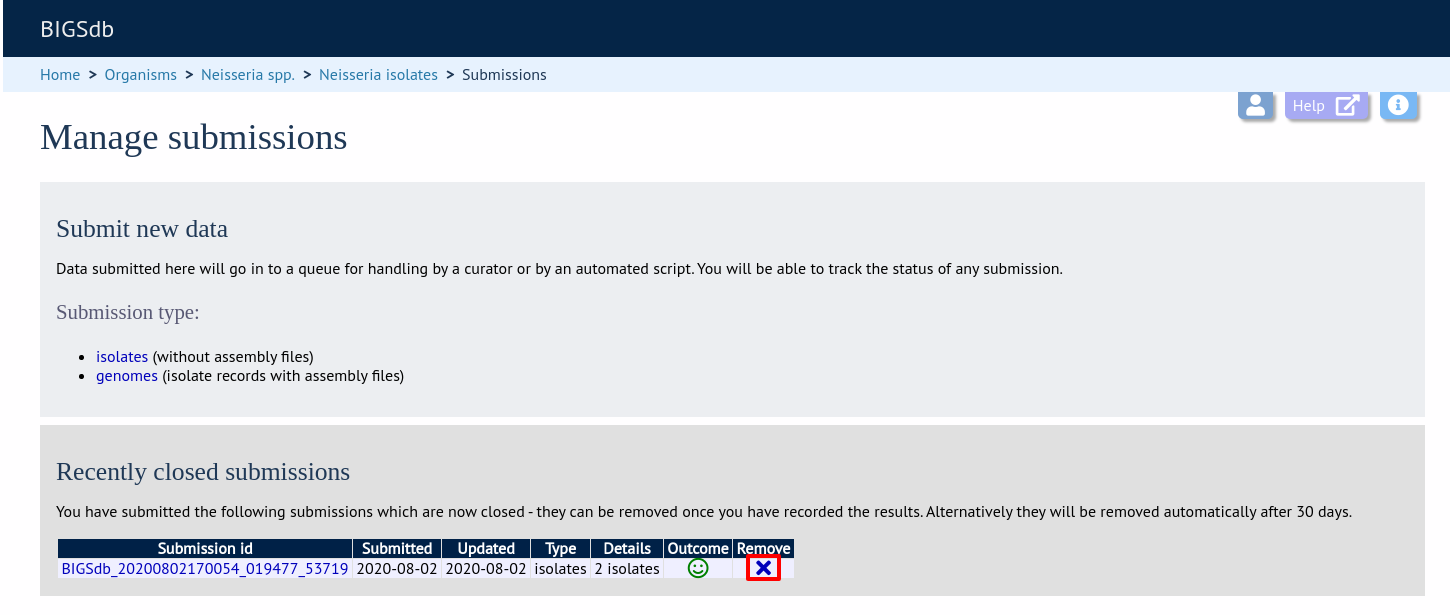
Alternatively, submissions will be removed automatically a specified period of time after closure. By default, this time is 90 days, but this can vary depending on the site configuration.